
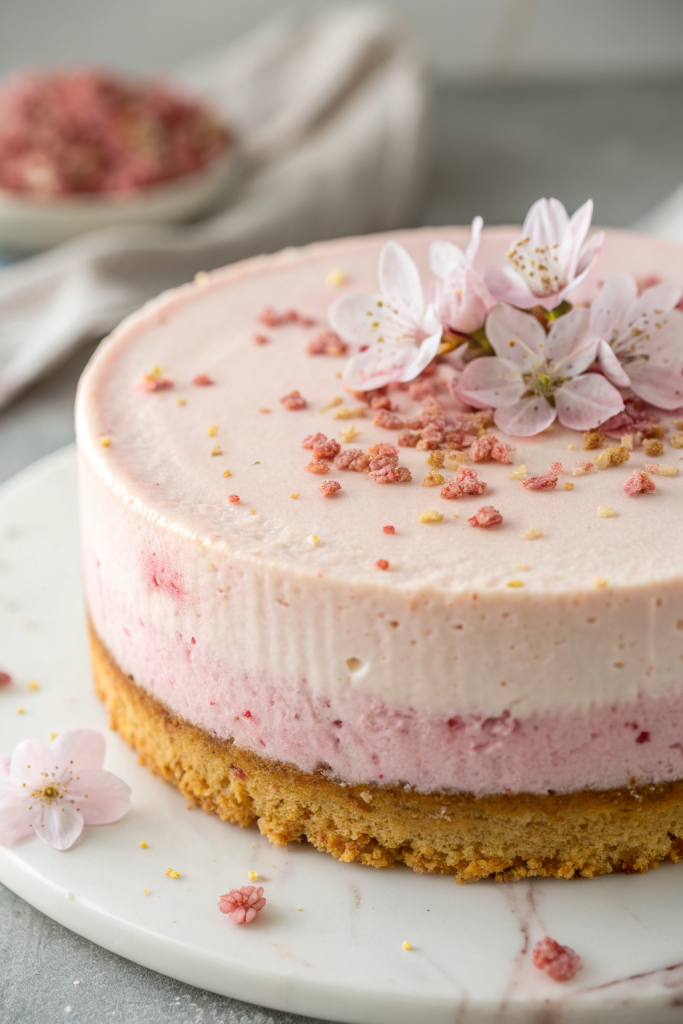
Cherry Blossom Japanese Sakura Cheesecake Recipe tastes like a cloud of vanilla cheesecake kissed with floral cherry blossom and a hint of tart cherry, perfect for spring dessert lovers who want something elegant but not fussy, and it takes about 1 hour of active time plus chilling. This recipe works well for anyone who loves Japanese-style light cheesecakes, pretty pink desserts, or wants a showstopper for a brunch or birthday. I first baked this sakura cheesecake after a cherry blossom festival in D.C., and my family still asks for it every spring.
Why Make This Cherry Blossom Japanese Sakura Cheesecake Recipe at Home
You control the flavor balance at home, so the sakura stays gentle and fragrant instead of tasting like perfume. You also skip the bakery markup while serving a dessert that looks like it came out of a fancy patisserie.
You also adjust sweetness, texture, and color to match your taste. I like a barely pink, not neon, cheesecake with a soft, cottony interior and a smooth, shiny sakura jelly top.
“This Cherry Blossom Japanese Sakura Cheesecake Recipe tastes like spring on a plate and looks like it belongs in a glass display case. ★★★★★”
Ingredients You Need
I base this on a light Japanese cheesecake style with a biscuit crust and a sakura jelly layer on top. You can find most ingredients in a regular grocery store, and you can order the sakura items online if your local Asian market runs small.
Crust
- 1 cup (100 g) graham cracker crumbs
- Use digestive biscuits or vanilla cookies if you prefer a milder crust.
- 3 tablespoons (40 g) unsalted butter, melted
- 1 tablespoon sugar (optional, skip if your cookies taste very sweet)
- Pinch of fine sea salt
Cheesecake Filling
- 12 ounces (340 g) cream cheese, full fat, room temperature
- I like Philadelphia or a good store brand with minimal stabilizers.
- 1/3 cup (70 g) granulated sugar
- 2 large eggs, room temperature
- 1/3 cup (80 ml) whole milk, room temperature
- 1/3 cup (80 ml) heavy cream
- 1 tablespoon lemon juice
- 1 teaspoon vanilla extract
- 1 tablespoon cake flour, sifted
- Substitute all-purpose flour if needed, but cake flour keeps the texture softer.
- 1/4 teaspoon fine sea salt
Sakura Flavor & Color
- 1–2 teaspoons sakura extract or sakura syrup
- Start small and taste; the flavor turns strong quickly.
- 2–3 salted sakura blossoms, rinsed and soaked in water for 10 minutes, then patted dry
- These add aroma and a pretty garnish.
- 1–2 drops pink gel food coloring (optional)
- Gel works better than liquid so the batter stays thick.
Sakura Jelly Topping
- 1 cup (240 ml) water
- 2 tablespoons sugar
- 1 tablespoon sakura syrup or 1 teaspoon sakura extract
- 1 teaspoon lemon juice
- 1 1/2 teaspoons powdered gelatin
- 2 tablespoons cold water (for blooming gelatin)
- Extra salted sakura blossoms for decoration
- Soak and rinse them to remove excess salt before using.
Optional Cherry Swirl
If you want a stronger cherry note, add a light swirl.
- 1/4 cup cherry jam or preserve, seedless
- 1 teaspoon water
- Tiny pinch of salt
Warm the jam with water until loose and smooth, then cool before swirling into the batter.
Equipment
- 7 or 8 inch round springform pan
- I prefer 7 inch for a taller cheesecake.
- Parchment paper
- Aluminum foil
- Large roasting pan or deep baking dish for a water bath
- Electric mixer (hand or stand)
- Heatproof mixing bowls
- Small saucepan
- Fine mesh strainer (helpful for a super smooth jelly)
- Rubber spatula
- Toothpick or skewer for swirling
Tips & Mistakes
- Use room temperature cream cheese, eggs, and dairy so the batter mixes smooth and creamy.
- Line the bottom and sides of the pan with parchment to prevent sticking and to keep the sides neat.
- Wrap the outside of the springform with foil so water from the bath does not sneak in and soak the crust.
- Avoid overmixing after you add eggs; mix just until combined so the cheesecake stays tender instead of rubbery.
- Tap the filled pan on the counter to pop big air bubbles and keep the texture light but not spongy.
- Bake in a low oven and use a water bath so the top stays pale and avoids cracks.
- Do not overbake; pull it when the edges look set and the center still jiggles slightly.
- Cool the cheesecake completely before adding the jelly, or the heat will melt and thin the topping.
- Bloom gelatin in cold water first, then heat gently; high heat can damage the setting power.
- Add sakura extract slowly and taste as you go so the floral note stays soft and pleasant.
How to Make Cherry Blossom Japanese Sakura Cheesecake Recipe
Step 1: Prepare the Pan and Oven
Preheat your oven to 320°F (160°C). Line the bottom of a 7 or 8 inch springform pan with parchment and lightly grease the sides, then line the sides with a strip of parchment as well.
Wrap the outside of the pan with a double layer of foil, covering the bottom and sides. Set the wrapped pan on a baking sheet while you prepare the crust.
Step 2: Make the Crust
Stir the graham cracker crumbs, sugar, and salt in a bowl. Pour in the melted butter and mix until the crumbs feel like damp sand and hold together when you squeeze them.
Press the mixture firmly into the bottom of the pan in an even layer. Use the bottom of a measuring cup to press it flat and tight, then bake for 8–10 minutes until it smells toasty and feels set. Cool while you mix the filling.
Step 3: Mix the Cheesecake Batter
Beat the cream cheese and sugar in a bowl with a mixer on medium speed until smooth and fluffy, about 2–3 minutes. Scrape the bowl often so no lumps hide on the bottom.
Add the lemon juice, vanilla, sakura extract or syrup, and salt, then mix until combined. Add the milk and heavy cream in two additions, mixing on low so the batter stays smooth.
Beat in the eggs one at a time on low speed, mixing just until each egg disappears. Sift the cake flour over the batter and fold it in gently with a spatula until no streaks remain. Add a drop or two of pink gel color if you want a blush tone and stir lightly.
Step 4: Optional Cherry Swirl
If you use the cherry swirl, spoon the cooled cherry jam mixture over the crust in small dollops. Pour half the cheesecake batter over the crust, then add a few more small spoonfuls of cherry mixture.
Pour the remaining batter on top. Drag a toothpick or skewer through the batter in gentle swirls to marble the cherry without overmixing.
Step 5: Bake in a Water Bath
Place the springform pan in a large roasting pan. Pour hot tap water into the roasting pan until it reaches about halfway up the sides of the springform.
Carefully move the whole setup into the oven. Bake at 320°F (160°C) for 45–60 minutes, depending on pan size and your oven. The edges should look set, and the center should jiggle like soft jelly when you nudge the pan.
Turn off the oven, crack the door slightly, and leave the cheesecake inside for 20–30 minutes. Move the pan to a rack, remove the foil, and cool to room temperature.
Step 6: Chill the Cheesecake
Once the cheesecake cools to room temperature, cover the pan and chill it in the fridge for at least 4 hours, or overnight for best flavor and texture. The cheesecake will firm up and slice more cleanly after a long chill.
Do not rush this step; warm cheesecake and cold jelly do not get along. While it chills, you can soak and prep your sakura blossoms for the topping.
Step 7: Prepare the Sakura Blossoms
Place the salted sakura blossoms in a bowl of cold water and soak them for 10–15 minutes. Change the water once if they taste very salty.
Pat them dry gently on a paper towel. Set them aside for garnish and for the jelly layer.
Step 8: Make the Sakura Jelly Topping
Sprinkle the powdered gelatin over 2 tablespoons of cold water in a small bowl and let it sit for 5 minutes to bloom. Heat 1 cup water with sugar in a small saucepan until the sugar dissolves and the liquid steams but does not boil.
Remove from heat, then stir in the bloomed gelatin until it dissolves completely. Add sakura syrup or extract and lemon juice, then taste and adjust sweetness or floral strength. Let the mixture cool to room temperature, stirring occasionally so a skin does not form.
Step 9: Assemble the Jelly Layer
Once the cheesecake feels fully chilled and firm, arrange the soaked sakura blossoms on top in a pattern you like. You can cluster them in the center or scatter them like petals.
Pour a thin layer of the cooled jelly mixture over the blossoms, just enough to cover them. Chill for 15–20 minutes until this first layer sets and locks the blossoms in place.
Pour the remaining jelly gently over the top. Chill again for at least 1–2 hours until the jelly sets completely and looks clear and wobbly.
Step 10: Unmold and Slice
Run a thin knife around the inside edge of the pan to loosen the parchment. Release the springform ring and peel away the parchment strip.
Slide a long spatula under the parchment base and move the cheesecake to a serving plate. Use a sharp knife dipped in hot water and wiped dry between cuts to slice clean wedges that show the layers clearly.
Variations I've Tried
I sometimes swap the graham crust for a chocolate cookie crust, which gives a pretty contrast with the pale pink jelly. You can also use a sponge cake base if you prefer a more traditional Japanese style.
Matcha pairs beautifully with sakura, so you can whisk 1–2 teaspoons of matcha into the batter for a green and pink effect. If you like fruit, top the jelly with fresh strawberries or cherries right before serving for extra color and flavor.
You can also skip the jelly and fold chopped, soaked sakura blossoms directly into the batter for a more rustic look. That version travels well and works nicely for picnics under actual cherry blossoms.
How to Serve Cherry Blossom Japanese Sakura Cheesecake Recipe
Serve this cheesecake well chilled so the sakura jelly stays firm and glossy and the filling tastes light and creamy. I like to plate each slice with a few fresh berries or a spoonful of cherry compote on the side. A cup of hot green tea, jasmine tea, or a simple latte pairs beautifully with the floral notes. If you serve it at a party, cut smaller slices because the flavor feels rich even though the texture stays airy.
How to store
- Store leftover cheesecake covered in the fridge for up to 4 days; keep it in an airtight container so it does not pick up fridge odors.
- Chill slices on a flat tray first, then move them to containers so the jelly top stays neat and smooth.
- Freeze individual slices without the jelly layer for up to 1 month; wrap tightly in plastic, then place in a freezer bag or container.
- Thaw frozen cheesecake in the fridge overnight and add a fresh sakura or fruit topping before serving; avoid microwaving since that softens the jelly and can make the texture uneven.