
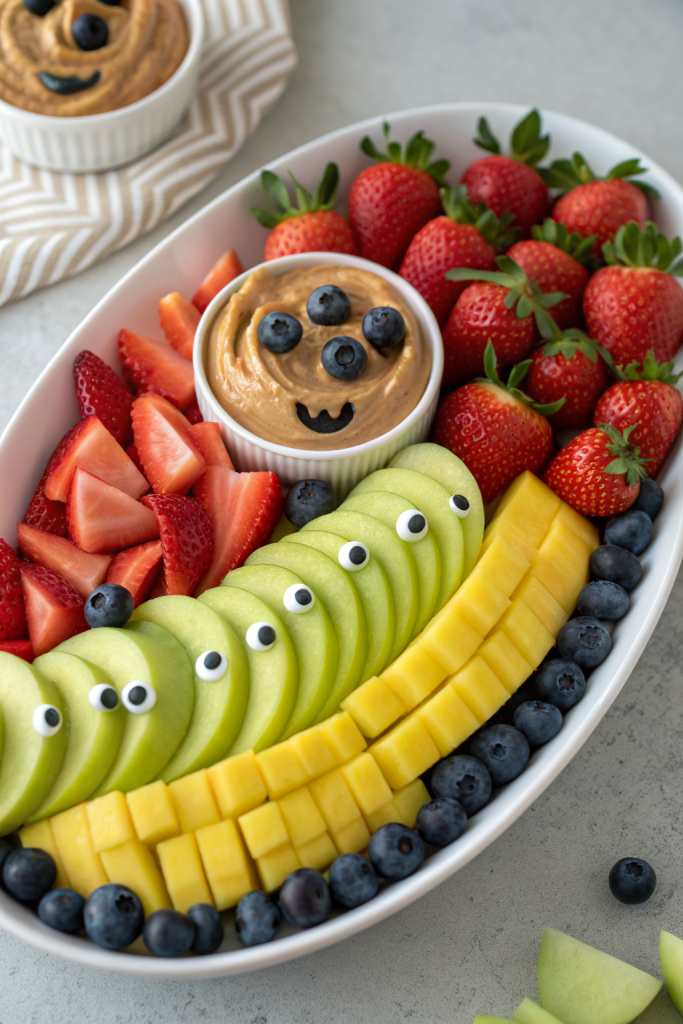
Halloween Fruit Platter Idea brings juicy, bright, and just-spooky-enough flavors together for a snack that tastes fresh, sweet, and a little tangy. It works perfectly for busy parents, party hosts, or teachers who want a fun Halloween snack in about 25 to 30 minutes. I tested this idea on my own family first, and my kids attacked the platter faster than the candy bowl.
Why Choose This Halloween Fruit Platter Idea
This Halloween Fruit Platter Idea gives you all the fun of a Halloween treat without the sugar crash. You get natural sweetness, bright colors, and cute spooky shapes that kids and adults both love.
You can prep it ahead, use mostly store bought fruit, and arrange everything right on a big cutting board or tray. Cleanup stays easy, and you control how healthy or indulgent you want it.
“This Halloween Fruit Platter Idea disappeared before the cupcakes even left the kitchen, and everyone asked for the recipe. ★★★★★”
Ingredients You’ll Need
Use what you like and what looks fresh, but this list gives you a solid starting point.
Fresh fruit
- Seedless green grapes
- Seedless red or black grapes
- Strawberries, medium size
- Blueberries
- Blackberries
- Raspberries (optional but tasty)
- Kiwi, peeled and sliced into rounds
- Pineapple rings or thick slices
- Cantaloupe or honeydew, sliced
- Navel oranges or clementines
- Bananas, firm but ripe
- Apples, crisp varieties like Honeycrisp, Gala, or Fuji
Fun Halloween “characters”
These turn the Halloween Fruit Platter Idea into something kids talk about later.
- Mini chocolate chips for eyes
- Dark chocolate chips or mini M&M style candies for eyes and noses
- Candy eyeballs (check the baking aisle)
- Pretzel sticks for “stems” and “arms”
- Thin licorice strings or fruit leather strips for mouths
- Mini marshmallows for teeth or eyes
- Peanut butter or sunflower seed butter to “glue” eyes on fruit
- Toothpicks or cocktail picks (plain or Halloween themed)
Pantry shortcuts & brand notes
- Precut fruit trays from the grocery store save time; just rearrange them into a Halloween Fruit Platter Idea at home.
- Canned pineapple rings in juice work well if fresh pineapple costs too much or looks sad.
- Use bottled lemon or lime juice to prevent browning on apples and bananas.
- Store bought caramel dip or chocolate sauce works as a fun side, especially for older kids.
Simple equipment
- Large platter, wooden board, or baking sheet lined with parchment
- Small bowls or ramekins for dips and loose berries
- Sharp paring knife and a small serrated knife
- Small cookie cutters (pumpkin, bat, ghost, cat) if you have them
- Cutting board
- Paper towels for drying fruit so it does not slide around
Tips & Tricks
- Dry fruit well with paper towels so it stays in place on the platter.
- Toss apple and banana slices in lemon or lime juice to slow browning.
- Use peanut butter, cream cheese, or melted chocolate as “glue” for eyes and decorations.
- Keep shapes simple; circles and triangles work better than tiny details.
- Build the platter from the center out so it looks full and balanced.
- Group colors together for impact, then add a few “contrast” pieces to make it pop.
- Keep grapes on small clusters or toothpicks so kids can grab them easily.
- Add a couple of small bowls with dip to fill gaps and anchor the design.
- Prep fruit ahead, then assemble the Halloween Fruit Platter Idea right before serving.
- Use a photo on your phone as a layout guide so you do not overthink the design.
How to Make Halloween Fruit Platter Idea
Step 1: Wash, dry, and prep the fruit
Rinse all fruit under cool water and pat it completely dry. Pull grapes into small clusters or thread a few on toothpicks. Slice strawberries in half if they look large.
Peel and slice kiwi into thick rounds. Cut pineapple into rings or half rings. Slice melons into wedges or chunks that hold their shape.
Peel oranges or clementines and separate them into segments, or leave them whole and peel off the outer skin only. Slice apples and bananas just before assembly. Toss apple and banana slices in a little lemon or lime juice so they stay bright.
Step 2: Make “pumpkin” oranges and clementines
Place peeled clementines or small oranges on a plate. Break pretzel sticks into short pieces. Press one piece into the top of each orange to look like a pumpkin stem.
Use a tiny bit of melted chocolate or peanut butter to stick candy eyes on a few of the “pumpkins” if you want faces. Keep some plain for variety. Set them aside while you prep the rest of the Halloween Fruit Platter Idea.
Step 3: Build banana “ghosts”
Cut bananas in half widthwise. Stand each piece cut side down so the rounded end points up. Press two mini chocolate chips or candy eyes near the top for eyes.
Add a third chip lower down for a “boo” mouth. Brush the cut bottom lightly with lemon juice to slow browning. Keep the banana ghosts in the fridge while you arrange the base of the platter.
Step 4: Shape simple melon or pineapple “pumpkins” and “bats”
Use small cookie cutters to punch pumpkin or ghost shapes from melon slices or pineapple rings. If you do not have cutters, cut thick slices and trim simple triangles for eyes and jagged mouths. Keep the designs bold and easy.
Use a knife to cut rough bat wings from leftover scraps. Do not worry about perfection; the fun shapes carry the Halloween Fruit Platter Idea. Place shaped pieces on a plate and chill until assembly.
Step 5: Arrange the base layer on the platter
Place a few small bowls or ramekins on your board for dips or loose berries. Add grapes around the bowls to create a border. Tuck kiwi rounds and pineapple pieces in clusters around the grapes.
Add melon wedges or chunks next, filling larger gaps. Keep similar colors together so the platter looks intentional. Leave a few open spaces for your “characters” like ghosts and pumpkins.
Step 6: Add the Halloween fruit characters
Place banana ghosts standing upright along the back or in a cluster on one side. Nestle clementine pumpkins around the center or along the edges. Add melon or pineapple pumpkins and bats in visible spots where the shapes stand out.
Press candy eyes onto a few strawberries or kiwi slices with a dab of peanut butter or melted chocolate. Use licorice strings or fruit leather strips to give a few fruits crooked smiles. Keep the characters spread out so every part of the Halloween Fruit Platter Idea feels fun.
Step 7: Fill gaps with berries and details
Tumble blueberries and blackberries into any open spaces. Add raspberries in small piles where you see gaps. Place mini marshmallows as teeth on a few apple slices or as eyes on a couple of grapes.
Stick pretzel sticks into melon or pineapple pieces to look like arms or legs. Step back and check the balance of colors and shapes. Adjust a few pieces until the platter looks full and inviting.
Step 8: Add dips and final touches
Fill the small bowls with yogurt dip, chocolate sauce, or caramel dip, depending on your crowd. Sprinkle a few extra candy eyes around the board for a playful spooky vibe. Wipe the edges of the platter so it looks clean.
Chill the Halloween Fruit Platter Idea until serving time, about 15 to 30 minutes. Serve with small plates, napkins, and toothpicks so guests can build their own little fruit monsters.
What to Serve with Halloween Fruit Platter Idea
Pair this Halloween Fruit Platter Idea with simple savory snacks like popcorn, cheese cubes, crackers, or veggie sticks and hummus. Add a tray of sandwiches or mini sliders so kids get something more filling before dessert. Offer fun drinks like apple cider, hot chocolate, fruit punch, or flavored sparkling water.
If you host a classroom party, set the fruit platter in the center and surround it with nut free snacks and allergy friendly treats. The bright fruit colors balance all the chocolate and candy on the table.
Storage Options
- Store leftover fruit in airtight containers in the fridge for 2 to 3 days; keep bananas separate since they soften faster.
- Keep decorated pieces with candy eyes in a shallow container so they do not smudge, and eat those within 1 to 2 days.
- Skip the freezer for most of the Halloween Fruit Platter Idea, since thawed fruit turns mushy and loses the fun shapes.
- Serve leftovers cold straight from the fridge, or repurpose them into smoothies, yogurt parfaits, or fruit salad the next day.