
Valentine’s Day Red Velvet Cookies Recipe gives you soft, chewy, cocoa-kissed cookies with creamy white chocolate that taste like a bakery treat in under 45 minutes, start to finish. This recipe works perfectly for anyone who wants a festive, red cookie that feels special but still uses simple pantry ingredients. I test red velvet recipes way too often according to my family, but they never complain when a fresh batch of these hits the cooling rack.
Why Make This Valentine’s Day Red Velvet Cookies Recipe at Home
You control the texture, color, and sweetness, so every cookie comes out exactly how you like it. Store-bought red velvet cookies often taste dry or overly sweet, while these stay soft in the center with crisp edges and a gentle cocoa flavor.
You also skip mystery ingredients and use what you already keep in your pantry. The dough chills quickly, so you can bake these on a weeknight or right before a cozy movie night.
“These Valentine’s Day Red Velvet Cookies taste like a bakery special, but my kids watched me mix them in a single bowl and still think I have secret training.”
Ingredients You Need
Dry ingredients
- 2 1/4 cups all-purpose flour
- Use a standard unbleached flour like King Arthur or Gold Medal for consistent results.
- 2 tablespoons unsweetened cocoa powder
- Use natural cocoa, not Dutch-process, so the baking soda reacts correctly.
- 1 teaspoon baking soda
- 1/2 teaspoon fine sea salt
Wet ingredients
- 1/2 cup unsalted butter, softened to room temperature
- Use real butter, not margarine, for best flavor and texture.
- 1/2 cup neutral oil (canola or vegetable)
- This combo of butter and oil keeps the cookies soft for days.
- 1 1/4 cups granulated sugar
- 1/4 cup light brown sugar, packed
- 2 large eggs, at room temperature
- 2 teaspoons pure vanilla extract
- 1 1/2 to 2 tablespoons red gel food coloring
- Gel food coloring gives a rich red color without thinning the dough; I like AmeriColor or Wilton.
- 1 teaspoon white vinegar
- This brightens the red color and supports the baking soda.
Mix-ins
- 1 1/4 cups white chocolate chips
- Ghirardelli or Guittard melt nicely and taste creamy, but store brands work fine too.
- 1/2 cup mini semisweet chocolate chips (optional)
- These add a deeper chocolate note and balance the sweetness.
Pantry shortcuts and substitutions
- Use pre-sifted flour if you have it and skip sifting at home.
- Swap half the butter with room-temperature cream cheese for a tangier, more “cake-like” cookie.
- Use dark chocolate chips instead of white chocolate if you prefer less sweetness.
- If you avoid artificial color, use a natural red food color and add an extra teaspoon of cocoa, though the color turns more burgundy than bright red.
Equipment list
- Large mixing bowl
- Medium bowl
- Hand mixer or stand mixer with paddle attachment
- Silicone spatula
- Measuring cups and spoons
- Baking sheets
- Parchment paper or silicone baking mats
- Cookie scoop (1 1/2 tablespoon size works great)
- Wire cooling rack
Tips & Mistakes
- Chill the dough at least 20 to 30 minutes so the cookies hold shape and bake thick, not flat.
- Measure flour correctly and level the cup so you avoid dense, dry cookies.
- Use gel food coloring, not liquid drops, so the dough stays thick and the color stays vibrant.
- Bring eggs and butter to room temperature so they mix smoothly and avoid greasy pockets.
- Do not overmix after you add flour or the cookies turn tough instead of tender.
- Pull the cookies from the oven when the edges set but the centers still look slightly soft; they finish on the hot pan.
- Line pans with parchment so the cookies release easily and the bottoms do not overbrown.
- Space dough balls at least 2 inches apart so they do not bake into one giant cookie.
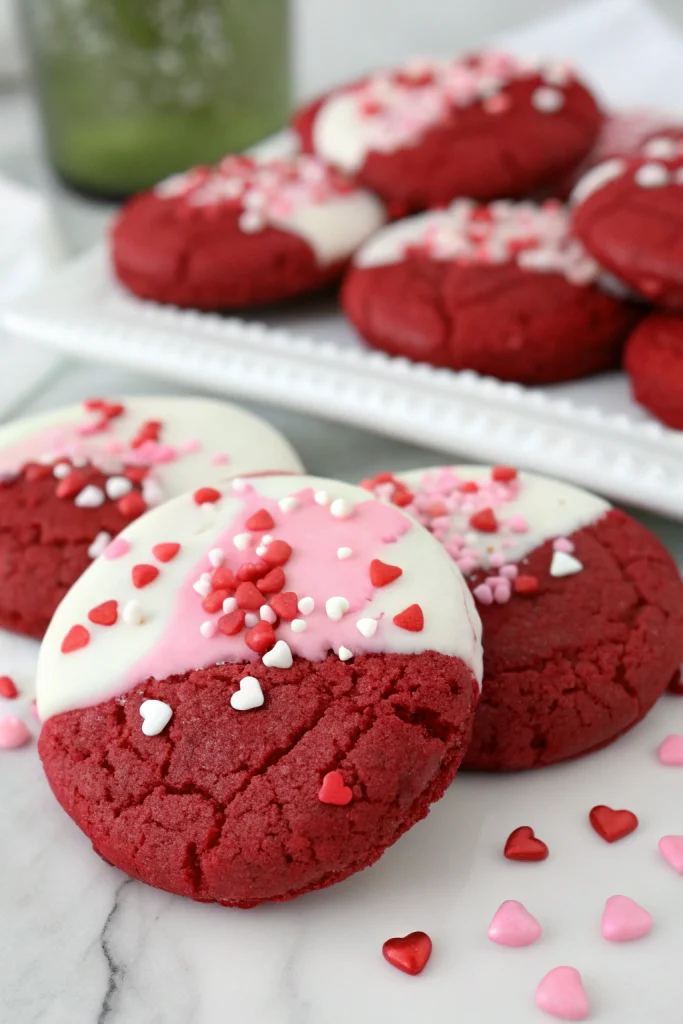
- Add a few extra white chocolate chips on top of each dough ball before baking for a bakery-style look.
- Let cookies cool at least 10 minutes on the pan so they firm up and do not break when you move them.
How to Make Valentine’s Day Red Velvet Cookies Recipe
Step 1: Mix dry ingredients
Add flour, cocoa powder, baking soda, and salt to a medium bowl. Whisk until the cocoa blends evenly and no streaks remain. Set the bowl aside near your mixer so you reach it easily.
Step 2: Cream butter, oil, and sugars
Place softened butter, oil, granulated sugar, and brown sugar in a large mixing bowl. Beat with a hand mixer or stand mixer on medium speed for 2 to 3 minutes until the mixture looks lighter in color and slightly fluffy. Scrape down the sides of the bowl so everything mixes evenly.
Step 3: Add eggs, vanilla, vinegar, and color
Beat in the eggs one at a time, mixing well after each addition. Add vanilla and vinegar, then mix again. Add 1 1/2 tablespoons red gel food coloring and mix until the color looks uniform; add more gel a little at a time if you want a deeper red.
Step 4: Combine wet and dry ingredients
Turn the mixer to low and add the dry ingredients in two additions. Mix just until the flour disappears and the dough looks thick and smooth. Use a spatula to scrape the bottom of the bowl and fold a few times so no dry pockets hide underneath.
Step 5: Fold in chocolate chips and chill
Pour in the white chocolate chips and optional mini semisweet chips. Fold them into the dough with a spatula so you do not overwork the gluten. Cover the bowl and chill the dough in the fridge for 20 to 30 minutes while you heat the oven.
Step 6: Preheat oven and prep pans
Heat your oven to 350°F (175°C). Line two baking sheets with parchment paper or silicone baking mats. Use this time to clear a cooling rack space so you transfer cookies easily later.
Step 7: Scoop and shape dough
Use a cookie scoop or tablespoon to portion dough into balls about 1 1/2 tablespoons each. Roll each portion between your palms to smooth the surface. Place dough balls on the prepared baking sheets with about 2 inches between each one, then press a few extra white chocolate chips on top for a pretty finish.
Step 8: Bake cookies
Place one sheet on the middle rack and bake 9 to 11 minutes, depending on your oven. Watch the edges; they should look set while the centers still look slightly soft and puffy. Pull the pan from the oven as soon as you see that stage so the cookies stay chewy.
Step 9: Cool and set
Leave the cookies on the hot baking sheet for 8 to 10 minutes so they finish setting. Transfer them carefully to a wire rack to cool completely. Repeat with the remaining dough, or keep some dough chilled and bake fresh cookies later in the day.
Variations I’ve Tried
- Cream cheese swirl cookies: Press a small thumbprint in the center of each dough ball and spoon in 1/2 teaspoon of sweetened cream cheese before baking for a cheesecake vibe.
- Heart-shaped cookies: Chill the dough longer, roll it slightly thicker, and gently pinch the top of each ball into a heart shape before baking; the cookies puff a bit but still keep a cute heart outline.
- Red velvet cookie sandwiches: Spread vanilla or cream cheese frosting between two cooled cookies for a rich sandwich that feels like a mini cake.
- Sprinkle-studded cookies: Roll the dough balls in red, pink, and white sprinkles before baking for extra crunch and color.
How to Serve Valentine’s Day Red Velvet Cookies Recipe
Serve these Valentine’s Day Red Velvet Cookies slightly warm so the white chocolate chips taste melty and soft. Pair them with cold milk, hot cocoa, or a cozy mug of tea. Pack a few in a small box or clear bag with a ribbon for a sweet homemade gift. Set them on a platter with fresh strawberries and a bowl of vanilla yogurt dip for a simple dessert board.
How to store
- Store cooled cookies in an airtight container at room temperature for 3 to 4 days; add a slice of sandwich bread in the container to keep them soft.
- Keep the dough tightly covered in the fridge for up to 3 days and bake small batches as you want fresh cookies.
- Freeze baked cookies in a freezer bag with the air pressed out for up to 2 months; thaw at room temperature.
- Freeze scooped dough balls on a sheet pan, then transfer to a freezer bag for up to 2 months; bake from frozen at 350°F and add 1 to 2 minutes to the bake time.
- Reheat baked cookies in a 300°F oven for 3 to 4 minutes or in the microwave for about 8 to 10 seconds so they taste freshly baked again.

Valentine's Day Red Velvet Cookies Recipe
Ingredients
Instructions
- Preheat the oven to 350°F (175°C). Line two baking sheets with parchment paper or silicone baking mats.
- In a medium bowl, whisk together the flour, cocoa powder, baking soda, and salt. Set aside.
- In a large mixing bowl, beat the softened butter, granulated sugar, and brown sugar together until light and creamy, about 2–3 minutes.
- Add the egg, egg yolk, and vanilla extract to the butter mixture and beat until well combined, scraping down the sides of the bowl as needed.
- Mix in the red food coloring and vinegar until the color is evenly distributed.
- Gradually add the dry ingredients to the wet ingredients, mixing on low speed just until a soft dough forms. Do not overmix.
- Fold in the white chocolate chips and, if using, half of the Valentine sprinkles or candy hearts.
- Scoop about 1 1/2 tablespoons of dough per cookie onto the prepared baking sheets, spacing them about 2 inches apart.
- Gently press a few extra white chocolate chips and the remaining sprinkles or candy hearts on top of each dough ball for a festive look.
- Bake for 10–12 minutes, or until the edges are set but the centers still look slightly soft. The cookies will continue to firm up as they cool.
- Allow the cookies to cool on the baking sheet for 5 minutes, then transfer to a wire rack to cool completely.
- Serve once cooled or store in an airtight container at room temperature for up to 4 days.
Notes
Approximate per 1 cookie (1 of 24): 160 calories; fat 8 g; saturated fat 5 g; carbohydrates 21 g; fiber 0.5 g; sugars 14 g; protein 2 g; sodium 95 mg. Values will vary based on exact ingredients, brands, and portion size.
Leave a Reply