
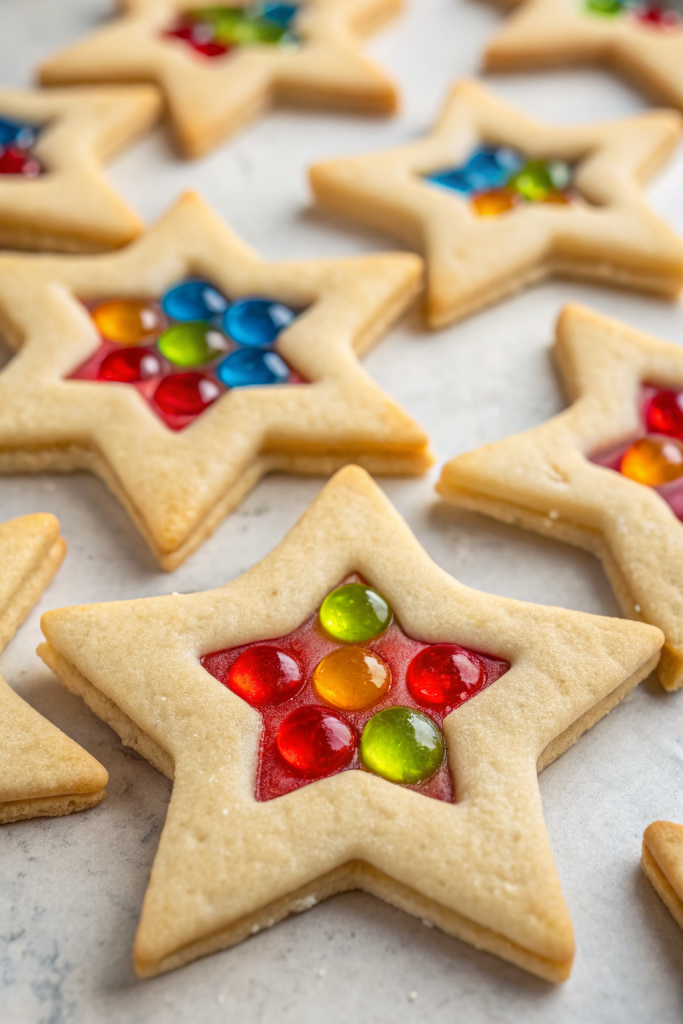
Stained Glass Cookies Recipe tastes buttery and crisp with a candy center that snaps like a lollipop, which makes them perfect for anyone who loves pretty desserts that actually taste good and needs a fun cookie in about 1 hour and 15 minutes. This recipe works well for holiday cookie trays, kids’ baking projects, or anytime you want a cookie that doubles as edible art. I still remember the first time my kids saw the light shine through these cookies and asked if we could hang them on the tree instead of eating them.
Why Choose This Stained Glass Cookies Recipe
This stained glass cookies recipe uses a simple sugar cookie dough that holds its shape, so your cutouts stay sharp and the candy centers stay neat. You chill the dough once, roll it easily, and bake everything on one sheet, which keeps the process stress free.
You also crush store-bought hard candies, so you skip any tricky sugar work or thermometers. The cookies taste buttery and slightly chewy around the edges with a crunchy, fruity center that looks like little sun catchers.
“These stained glass cookies looked like they came from a bakery window, but my kids and I pulled them off in one afternoon and ate every last one. ★★★★★”
Ingredients You’ll Need
Cookie dough
- 2 ¾ cups (330 g) all-purpose flour
- ½ teaspoon baking powder
- ½ teaspoon fine sea salt
- 1 cup (2 sticks / 226 g) unsalted butter, softened to cool room temperature
- 1 cup (200 g) granulated sugar
- 1 large egg, room temperature
- 2 teaspoons pure vanilla extract
- ¼ teaspoon almond extract (optional, but it adds a bakery-style flavor)
I prefer King Arthur or Gold Medal flour because they give consistent results. Use real butter, not margarine, so the cookies hold their shape and taste rich. If you need a dairy free option, use a high quality plant-based baking stick that stays firm at room temperature.
Candy centers
- 30 to 40 hard fruit candies (like Jolly Ranchers or Life Savers), assorted colors
- Separate by color and crush each color in its own zip-top bag with a rolling pin or meat mallet
Choose clear, bright candies for the best stained glass effect. Avoid chewy candies or anything with a soft center, since those melt unevenly and bubble too much. If you want a less sweet center, use citrus flavors like lemon and lime instead of all cherry or grape.
Optional decorations
- Sprinkles for the cookie edges
- Coarse sanding sugar
- Royal icing for outlining after baking
Equipment
- Large mixing bowl and hand mixer or stand mixer with paddle attachment
- Medium bowl for dry ingredients
- Measuring cups and spoons
- Rubber spatula
- Rolling pin
- 2 to 3 baking sheets
- Parchment paper or silicone baking mats
- 2 sizes of cookie cutters in matching shapes (large and small stars, trees, hearts, circles, etc.)
- Plastic zip-top bags and rolling pin or mallet for crushing candy
- Cooling racks
- Skewer or straw if you want to make hanging ornaments
Tips & Tricks
- Chill the dough at least 30 minutes so the cookies hold sharp edges and do not spread.
- Crush candy into small bits, not fine dust, so it melts into a smooth pool without burning.
- Line baking sheets with parchment so the melted candy releases easily and does not glue itself to the pan.
- Keep candy colors separate so they stay bright and do not turn into a brownish mix.
- Cut shapes close together to reduce re-rolling, since extra flour can toughen the dough.
- If you want ornaments, punch the hanging hole right after cutting and again right after baking if it shrinks.
- Let cookies cool completely on the parchment before you move them, or the centers may crack.
- Bake one test cookie first to check spread and candy melt, then adjust oven time by 1 to 2 minutes if needed.
How to Make Stained Glass Cookies Recipe
Mix the dry ingredients
- Add flour, baking powder, and salt to a medium bowl.
- Whisk until everything looks evenly combined and no streaks of baking powder remain.
- Set the bowl aside while you mix the wet ingredients.
Cream butter and sugar
- Place softened butter and granulated sugar in a large mixing bowl.
- Beat with a hand mixer or stand mixer on medium speed for 2 to 3 minutes until the mixture looks light and fluffy.
- Scrape down the sides of the bowl halfway through so everything mixes evenly.
Add egg and flavorings
- Add the egg, vanilla extract, and almond extract to the butter mixture.
- Beat on medium speed until the mixture looks smooth and creamy.
- Scrape the bowl again to pull in any mixture stuck on the sides or bottom.
Combine wet and dry ingredients
- Add half of the flour mixture to the butter mixture.
- Mix on low speed just until the flour disappears.
- Add the remaining flour and mix again on low until the dough comes together and no dry spots remain.
- If the dough looks crumbly, squeeze a bit in your hand; if it holds together, it works perfectly.
Chill the dough
- Divide the dough into two equal portions.
- Shape each portion into a flat disc, wrap tightly in plastic wrap, and place in the fridge.
- Chill for at least 30 minutes and up to 2 days so the dough firms up and rolls easily.
Crush the candies
- While the dough chills, unwrap the hard candies.
- Sort them by color into separate zip-top bags.
- Use a rolling pin or mallet to crush them into small pieces, about the size of coarse sand or tiny pebbles.
- Set the bags aside so you can sprinkle the candy quickly once you cut the cookie centers.
Roll and cut the cookie shapes
- Preheat the oven to 350°F (175°C) and line baking sheets with parchment paper.
- Lightly flour your work surface and rolling pin.
- Roll one disc of dough to about ¼ inch thickness.
- Use large cookie cutters to cut shapes and transfer them to the prepared baking sheets, leaving about 1 ½ inches between cookies.
Cut the “stained glass” windows
- Use a smaller cutter of the same shape to cut a window in the center of each cookie on the baking sheet.
- Lift out the center dough pieces and save them to re-roll.
- If you want to hang the cookies, use a straw or skewer to punch a small hole near the top of each cookie.
Fill with candy pieces
- Spoon crushed candy into each cutout window, filling it almost to the top of the dough but not overflowing.
- Keep candy pieces inside the cutout so they do not touch the cookie edges, which helps prevent bubbling over.
- Use one color per window or create simple patterns like stripes or half-and-half colors.
Bake the cookies
- Place the baking sheet in the preheated oven.
- Bake for 8 to 11 minutes, until the cookie edges look set and just start to turn light golden and the candy melts into a shiny pool.
- Pull the sheet from the oven and set it on a cooling rack.
- If the hanging holes shrank, gently twist a skewer through them while the cookies still feel warm.
Cool and finish
- Let the cookies cool completely on the baking sheet so the candy centers firm up.
- Once cool, peel the cookies gently from the parchment.
- Add any extra decorations like royal icing outlines or sanding sugar on the cookie parts, not on the candy windows.
- Thread ribbon or twine through the holes if you plan to hang them as ornaments.
What to Serve with Stained Glass Cookies Recipe
Serve stained glass cookies with cold milk, hot cocoa, or a big pot of herbal tea for a cozy afternoon treat. Kids love them with simple vanilla yogurt or fruit on the side for a snack plate that looks festive. You can also tuck them into holiday cookie boxes with classics like chocolate chip cookies and gingerbread men for a mix of textures and flavors. If you hang a few on the tree, keep a plate nearby because everyone will want to taste one too.
Storage Options
- Store cookies in an airtight container at room temperature for 4 to 5 days, with parchment between layers so the candy centers do not stick.
- Keep them away from direct sunlight and heat so the candy centers stay clear and do not soften.
- Freeze baked cookies in a single layer on a sheet pan, then transfer them to a freezer-safe container for up to 2 months.
- Thaw frozen cookies at room temperature in the closed container so condensation does not form on the candy.
- If the cookies lose a bit of crispness, warm them on a parchment-lined baking sheet in a 275°F (135°C) oven for 3 to 5 minutes, then cool completely to crisp back up.
Stained Glass Cookies Recipe
Ingredients
Instructions
- In a medium bowl, whisk together the flour, baking powder, and fine sea salt until evenly combined and no streaks of baking powder remain. Set aside.
- Place the softened butter and granulated sugar in a large mixing bowl.
- Beat with a hand mixer or a stand mixer fitted with the paddle attachment on medium speed for 2 to 3 minutes, until the mixture looks light and fluffy.
- Scrape down the sides and bottom of the bowl halfway through mixing so everything combines evenly.
- Add the egg, vanilla extract, and almond extract (if using) to the creamed butter mixture.
- Beat on medium speed until the mixture looks smooth and creamy, then scrape the bowl again to incorporate anything stuck to the sides or bottom.
- Add about half of the flour mixture to the butter mixture and mix on low speed just until the flour disappears.
- Add the remaining flour mixture and mix again on low just until the dough comes together and no dry spots remain.
- If the dough looks crumbly, squeeze a small amount in your hand; if it holds together, it is ready.
- Divide the dough into two equal portions.
- Shape each portion into a flat disc, wrap tightly in plastic wrap, and refrigerate for at least 30 minutes and up to 2 days, until firm enough to roll easily.
- While the dough chills, unwrap the hard candies and sort them by color into separate zip-top bags.
- Use a rolling pin or meat mallet to crush the candies into small pieces about the size of coarse sand or tiny pebbles. Set aside until ready to fill the cookie centers.
- Preheat the oven to 350°F (175°C) and line 2 to 3 baking sheets with parchment paper or silicone baking mats.
- Lightly flour your work surface and rolling pin.
- Working with one disc of dough at a time, roll the dough to about 1/4 inch thickness.
- Use large cookie cutters to cut out shapes and transfer them to the prepared baking sheets, leaving about 1 1/2 inches between cookies.
- Use a smaller cookie cutter of the same or a coordinating shape to cut a window from the center of each cookie on the baking sheet.
- Lift out the center dough pieces and reserve them to re-roll for more cookies.
- If you plan to hang the cookies as ornaments, use a skewer or straw to punch a small hole near the top of each cookie for hanging.
- Spoon crushed candy into each cutout window, filling almost to the top of the dough but not overflowing.
- Keep the candy pieces inside the cutout area so they do not touch the cookie edges, which helps prevent bubbling or spilling over.
- Use one color per window or arrange simple patterns such as stripes or two colors side by side if desired.
- Place the baking sheet in the preheated oven and bake for 8 to 11 minutes, until the cookie edges look set and just begin to turn light golden and the candy has melted into a shiny pool.
- Remove the baking sheet from the oven and place it on a cooling rack.
- If you are making ornaments and the hanging holes have shrunk, gently twist a skewer through each hole while the cookies are still warm to reopen them.
- Allow the cookies to cool completely on the baking sheet so the candy centers can firm up and harden.
- Once fully cool, carefully peel the cookies away from the parchment paper or baking mat.
- If desired, decorate the cookie portions (not the candy centers) with royal icing, sprinkles, or coarse sanding sugar.
- If using as ornaments, thread ribbon or twine through the holes for hanging.
Notes
Approximate per cookie (about 30 cookies): 135 calories; fat 6 g; saturated fat 4 g; carbohydrates 20 g; fiber 0 g; sugars 12 g; protein 1 g; sodium 70 mg. Values are estimates and will vary based on cookie size, candy brand, and decorations used.