

Football Cakesicles Recipe tastes like a fudgy cake pop wrapped in a crisp chocolate shell, with just enough sweetness to keep both kids and adults happy. It works perfectly for game day parties, tailgates, birthday spreads, or any football watch party and takes about 1 hour total, including chilling time. I tested these during a Sunday game at my house, and my family ignored the score because they focused on the dessert table.
Why Choose This Football Cakesicles Recipe
This Football Cakesicles Recipe uses simple ingredients, but the final treats look like you ordered them from a fancy bakery. You get moist cake, creamy frosting, and a smooth chocolate coating that snaps when you bite it.
The method keeps things beginner friendly, so even nervous bakers can pull this off. Kids can help with dipping and decorating, which turns dessert into a fun pre-game activity.
“These football cakesicles disappeared before halftime and guests asked for the recipe on the spot. ★★★★★”
Ingredients You’ll Need
Cake & Filling
You can use homemade cake or a boxed mix here. I usually grab a box mix on busy game days and save my energy for decorating.
- 1 box chocolate cake mix, baked in a 9×13 pan and cooled
- Any good brand works; I like Duncan Hines or Betty Crocker for consistent texture.
- 1/2 to 3/4 cup chocolate or vanilla frosting
- Store-bought frosting works great; start with 1/2 cup and add more if needed.
- 1 teaspoon vanilla extract
- Pinch of salt to balance the sweetness
Chocolate Coating
- 2 cups milk chocolate or semi-sweet chocolate chips
- Use good quality chips or melting wafers so the coating sets smoothly.
- 1 tablespoon refined coconut oil or vegetable shortening
- This helps the chocolate thin out and coat evenly.
Football Decorations
- 1/2 cup white candy melts or white chocolate chips
- 1 teaspoon coconut oil or shortening (for thinning the white coating)
- Optional: brown candy melts if you prefer a lighter football color than dark chocolate
Equipment
- Silicone cakesicle mold (football shape or regular popsicle shape)
- Popsicle sticks or cakesicle sticks
- Microwave-safe bowls
- Small offset spatula or spoon
- Piping bag or zip-top bag for the white laces
- Cooling rack or sheet pan lined with parchment paper
- Small brush or clean food-safe paintbrush (optional but helpful for coating molds)
Tips & Tricks
- Crumble the cake completely so no big chunks stay; fine crumbs mix more evenly with frosting.
- Add frosting gradually; stop when the mixture feels like playdough that holds together without feeling sticky.
- Chill the cake mixture before shaping if your kitchen feels warm; cold mixture molds cleaner.
- Use melting wafers or candy melts if chocolate chips look too thick, since wafers coat more smoothly.
- Heat chocolate in short bursts in the microwave and stir often so you avoid scorching.
- Tap the mold gently on the counter after adding chocolate to release air bubbles.
- Insert sticks while the chocolate still feels soft so they anchor firmly.
- Keep finished cakesicles chilled until serving if your house runs warm or humid.
How to Make Football Cakesicles Recipe
Step 1: Bake and Cool the Cake
Prepare the chocolate cake mix according to the package directions. Bake it in a 9×13 pan so it cools faster and crumbles easily. Let the cake cool completely so the frosting does not melt when you mix it in.
Step 2: Crumble and Mix the Cake Filling
Break the cooled cake into large chunks and place them in a big mixing bowl. Rub the pieces between your fingers until you get fine, even crumbs. Add 1/2 cup frosting, vanilla, and a pinch of salt, then mix with a spoon or clean hands until the mixture feels soft and moldable. Add more frosting a tablespoon at a time if the mixture feels dry or crumbly.
Step 3: Prep the Chocolate Coating
Place the chocolate chips and 1 tablespoon coconut oil in a microwave-safe bowl. Heat in 20 to 30 second bursts, stirring after each round, until the chocolate turns smooth and glossy. If the chocolate still looks thick, stir in a tiny bit more coconut oil until it flows easily off the spoon.
Step 4: Coat the Molds
Spoon some melted chocolate into each cavity of the silicone cakesicle mold. Use the back of the spoon or a small brush to coat the bottom and sides with a medium-thick layer. Tilt and rotate the mold so the chocolate reaches every corner and no gaps stay visible. Place the mold in the fridge for about 5 to 10 minutes so the chocolate firms up.
Step 5: Add the Cake Filling
Once the chocolate shells feel firm, take the mold out of the fridge. Roll small portions of the cake mixture into oval shapes that fit inside the cavities with a little room on top. Press the cake gently into each chocolate shell, leaving space for a final chocolate layer to seal everything in. Insert a stick into each cavity, pushing it through the cake mixture and into the chocolate shell.
Step 6: Seal with More Chocolate
Spoon more melted chocolate over the top of each filled cavity. Spread it to the edges so it touches the sides of the first chocolate layer and seals the cake mixture inside. Scrape off excess chocolate with a spatula so the backs look smooth and level. Chill the mold again for 10 to 15 minutes until the chocolate sets completely.
Step 7: Unmold the Cakesicles
Gently peel the silicone mold away from each cakesicle instead of pulling on the stick. Work slowly and push from the bottom of the mold so the chocolate shell stays intact. Place the unmolded cakesicles on a parchment-lined tray and keep them chilled while you prepare the decorations.
Step 8: Make the White Lace Icing
Melt the white candy melts with 1 teaspoon coconut oil in a small bowl using the same short microwave bursts. Stir until smooth and slightly thick but still pipeable. Transfer the melted white coating to a piping bag or a zip-top bag and snip a tiny hole in the tip.
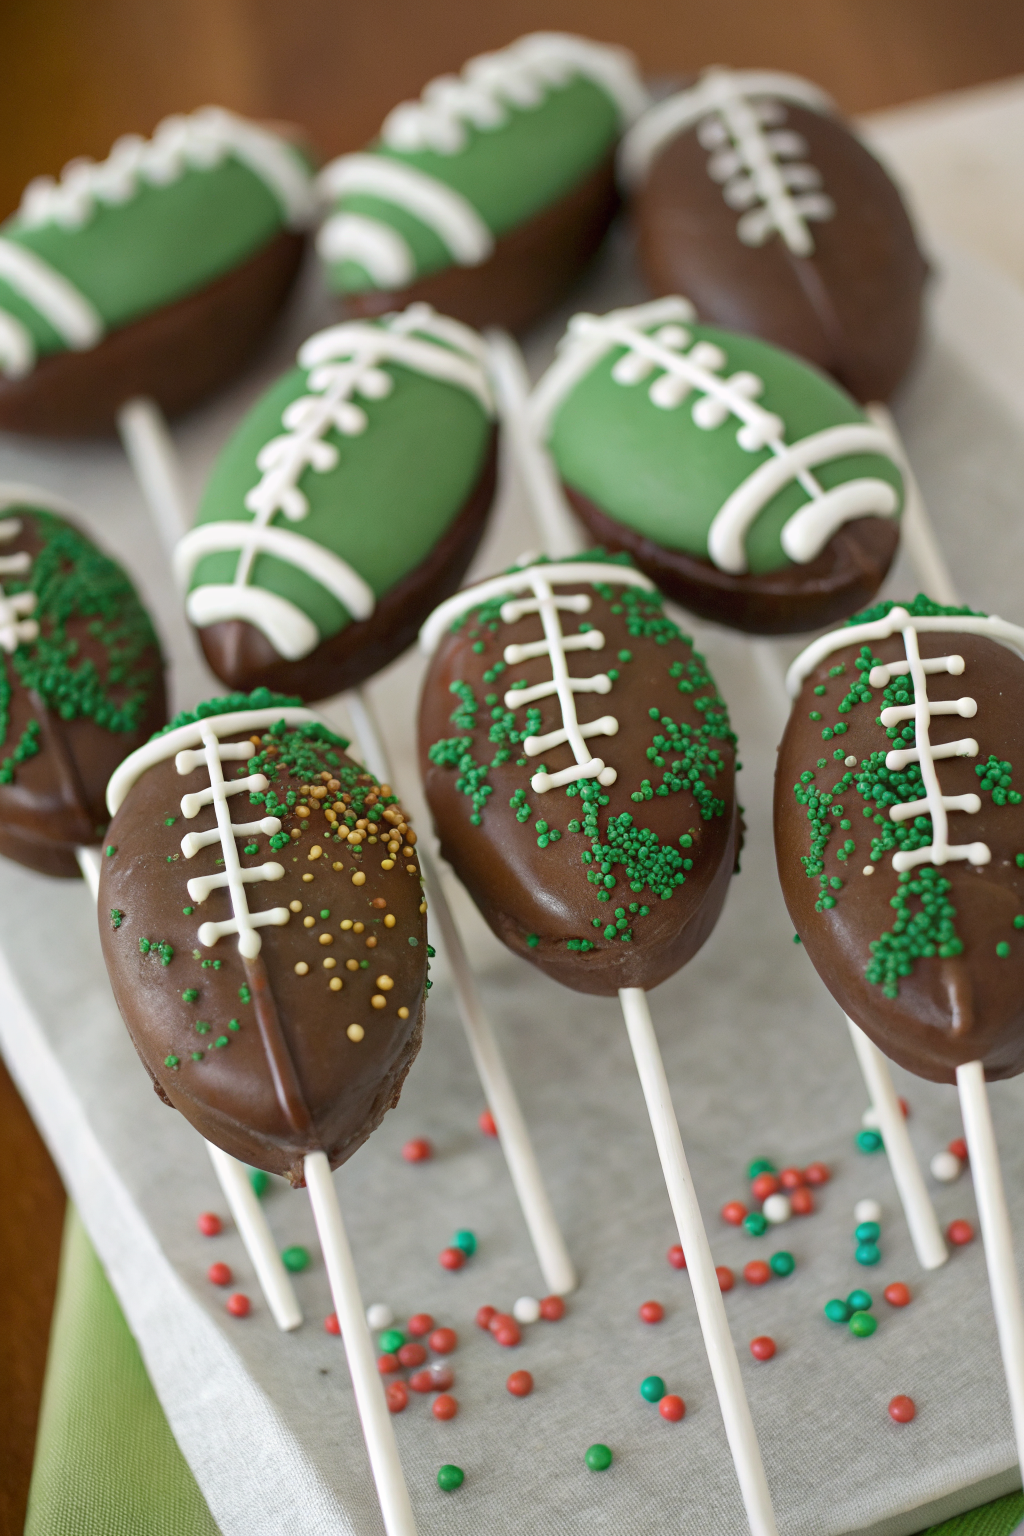
Step 9: Decorate like Footballs
Pipe a short vertical line across the center of each cakesicle. Add three or four short horizontal lines across that center line to mimic football laces. If you want extra detail, pipe a curved line at each end of the cakesicle to outline the football shape. Chill the decorated cakesicles for about 5 minutes so the white coating sets.
Step 10: Serve and Enjoy
Arrange the Football Cakesicles Recipe on a platter with team-colored sprinkles or napkins. Add little flags or team logos on toothpicks around the tray for extra spirit. Serve them slightly chilled so the chocolate shell stays firm while the inside stays soft and fudgy.
What to Serve with Football Cakesicles Recipe
Serve these Football Cakesicles Recipe treats with a big bowl of fresh fruit like strawberries, grapes, or apple slices to balance the richness. Kids love them alongside hot cocoa, chocolate milk, or flavored sparkling water. You can also pair them with salty snacks such as popcorn, pretzels, or chips and salsa for a sweet and salty spread. If you host a birthday or team party, add simple vanilla cupcakes or brownies so guests can pick their favorite dessert style.
Storage Options
- Store leftover Football Cakesicles Recipe in an airtight container in the fridge for up to 5 days.
- Keep them in a single layer or separate layers with parchment so they do not stick together.
- Freeze cakesicles on a tray until solid, then transfer them to a freezer bag for up to 2 months.
- Thaw in the fridge for a few hours before serving and enjoy them chilled without reheating.
Football Cakesicles Recipe
Ingredients
Instructions
- Bake the chocolate cake according to the package directions in a 9x13-inch pan. Allow it to cool completely.
- Crumble the cooled cake into a large mixing bowl, breaking it into fine crumbs with your hands or a fork.
- Add the chocolate frosting to the crumbs a little at a time, mixing until the mixture holds together when pressed. It should be moist but not sticky.
- Press portions of the cake mixture firmly into the cakesicle mold, filling each cavity about three-quarters full and shaping it into a smooth football shape. Insert a stick into each cavity, making sure it is centered and secure.
- Place the filled molds in the freezer for 20–30 minutes, or until the cakesicles are firm enough to hold their shape when removed.
- Carefully remove the chilled cakesicles from the mold and place them on a parchment-lined baking sheet.
- Melt the chocolate candy melts in a microwave-safe bowl in 20–30 second bursts, stirring between each burst until smooth. If needed, stir in a small amount of shortening or coconut oil to thin.
- Holding each cakesicle by the stick, dip it into the melted chocolate or spoon the chocolate over it, letting excess drip back into the bowl. Gently tap to smooth the coating.
- Lay the coated cakesicles on the parchment-lined baking sheet and allow the chocolate to set completely. You can refrigerate them for 10–15 minutes to speed this up.
- Melt the white candy melts in a small microwave-safe bowl until smooth.
- Transfer the melted white candy to a piping bag or small zip-top bag with a tiny corner snipped off.
- Pipe one long line across the top of each cakesicle, then pipe several short perpendicular lines to create football laces.
- Allow the decorations to set completely before serving or packaging.
- Serve the football cakesicles at room temperature for the best texture.
- Store leftovers in an airtight container at room temperature for up to 3 days or in the refrigerator for up to 1 week.
Notes
Approximate per 1 cakesicle (1 of 12): 260 calories; fat 14 g; saturated fat 7 g; carbohydrates 33 g; fiber 2 g; sugars 25 g; protein 3 g; sodium 220 mg. Values are estimates and will vary based on cake mix, frosting brand, candy melts, and portion size.
Leave a Reply