
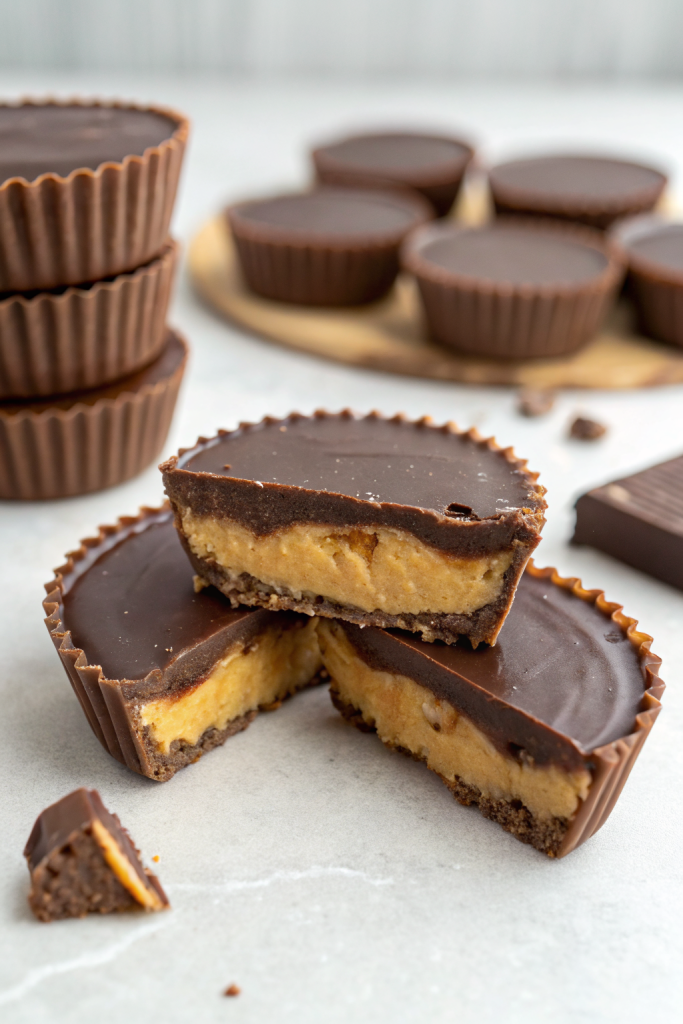
Reeses Peanut Butter Cups Recipe tastes like a salty-sweet, chocolatey hug with a creamy, slightly gritty peanut butter center and a snappy chocolate shell, and it works perfectly for anyone who loves classic candy but wants a homemade version in about 45 minutes total. This Reeses Peanut Butter Cups Recipe works well for beginner bakers, kids in the kitchen, or anyone who wants a fun no-oven dessert that still feels impressive. I tested this style of candy so many times over the last decade that my family now treats “cup testing day” like a national holiday.
Why Reeses Peanut Butter Cups Recipe Is Worth It
Homemade Reeses Peanut Butter Cups Recipe gives you control over everything: sweetness, salt level, chocolate thickness, and peanut butter texture. You skip preservatives and weird ingredients, and you get candy that tastes fresher and more peanut-forward than the store-bought version.
You also customize the size, from mini bites to bakery-style jumbo cups. The recipe uses simple pantry ingredients, comes together quickly, and chills in the fridge while you clean up and pretend you didn’t lick the bowl.
“These homemade cups taste richer, creamier, and more chocolatey than the store version, and they disappear in minutes at every party. ★★★★★”
Ingredients You Need
Chocolate layer
- 2 cups (about 12 oz) semisweet chocolate chips
- Use a good-quality brand like Ghirardelli or Guittard for smoother melting.
- Swap with milk chocolate chips for a sweeter, more classic Reeses Peanut Butter Cups Recipe flavor.
- 2 tbsp refined coconut oil or neutral vegetable oil
- Coconut oil gives a slightly firmer snap from the fridge.
- Use canola or sunflower oil if you avoid coconut flavor.
Peanut butter filling
- 1 cup creamy peanut butter
- Use shelf-stable peanut butter (Skippy, Jif, or similar) for the closest candy texture.
- Natural peanut butter works, but stir it very well and expect a slightly softer, less sweet center.
- 1/2 cup powdered sugar, sifted
- This sweetens and thickens the filling without graininess.
- 1/4 cup light brown sugar, packed
- Brown sugar adds that signature Reeses Peanut Butter Cups Recipe hint of molasses and chew.
- 1/4 tsp fine sea salt
- Increase to 1/2 tsp if your peanut butter tastes unsalted or very mild.
- 1 tsp vanilla extract
- Optional but adds a bakery-style flavor.
Optional toppings
- Flaky sea salt, for sprinkling on top
- Crushed peanuts, for crunch
- Mini chocolate chips, for extra chocolate on top
Pantry shortcuts & notes
- Use chocolate melting wafers instead of chips if you want a super shiny finish without tempering.
- Use pre-sifted powdered sugar to save time and avoid clumps.
- Use pre-lined cupcake or mini cupcake liners to skip greasing and scrubbing pans.
Equipment list
- 12-cup standard muffin tin or 24-cup mini muffin tin
- Paper cupcake liners (standard or mini)
- Microwave-safe bowl or heatproof bowl plus saucepan for double boiler
- Rubber spatula
- Small cookie scoop or tablespoon measure
- Spoon or small offset spatula
- Measuring cups and spoons
- Baking sheet (optional, if you use silicone liners and want easy transfer to fridge)
Quick Tips & substitutions
- Use room-temperature peanut butter so it mixes smoothly with the sugars.
- Melt chocolate in short bursts (20–30 seconds) and stir often so it stays glossy and doesn’t burn.
- Chill the first chocolate layer until just set but still slightly tacky so the filling bonds well.
- Use mini muffin tins for bite-size Reeses Peanut Butter Cups Recipe that kids love.
- Swap peanut butter with almond butter or sunflower seed butter for allergy-friendly cups.
- Use dark chocolate chips if you like a less sweet, more grown-up flavor.
- Add an extra pinch of salt to the filling if you use unsalted peanut butter.
- Keep the filling slightly thick and moldable; add more powdered sugar if it feels too sticky.
- Use silicone liners if you want cups that release extra cleanly.
- Work in batches if your kitchen runs warm; keep some filling in the fridge so it stays firm.
How to Make Reeses Peanut Butter Cups Recipe
Step 1: Line the pan
Place paper liners into each cup of your muffin tin.
Use standard liners for 12 larger cups or mini liners for about 24 small cups.
Set the pan aside on a flat surface so the chocolate settles evenly.
Step 2: Mix the peanut butter filling
Add peanut butter, powdered sugar, brown sugar, salt, and vanilla to a medium bowl.
Stir with a spatula until the mixture turns thick, smooth, and holds its shape like soft dough.
If the filling feels too sticky, sprinkle in 1–2 extra tablespoons of powdered sugar and stir again.
Step 3: Shape the filling
Scoop about 1 tablespoon of filling for standard cups or 1 heaping teaspoon for mini cups.
Roll each portion into a ball, then flatten it into a disk slightly smaller than the base of your liners.
Place the disks on a plate or small tray and chill them in the fridge while you melt the chocolate.
Step 4: Melt the chocolate
Add chocolate chips and coconut oil to a microwave-safe bowl.
Microwave in 20–30 second bursts, stirring well after each burst, until the chocolate turns smooth and glossy.
If you use a double boiler, place the bowl over barely simmering water and stir until everything melts evenly.
Step 5: Make the bottom chocolate layer
Spoon about 1 to 1 1/2 teaspoons of melted chocolate into each liner for standard cups (about 1/2 teaspoon for mini).
Tilt and swirl the pan gently so the chocolate covers the bottom and creeps slightly up the sides.
Tap the pan on the counter a few times to pop air bubbles and level the chocolate.
Step 6: Chill the base
Slide the pan into the fridge for about 5–10 minutes until the chocolate just sets.
Touch the surface lightly; it should feel firm but not rock hard.
Pull the peanut butter disks from the fridge while the base finishes setting.
Step 7: Add the peanut butter centers
Place one peanut butter disk in the center of each chocolate-lined cup.
Press gently so the filling nestles into the base but does not touch the sides of the liner.
Leave a small border of chocolate around the filling so the top layer seals everything in.
Step 8: Cover with more chocolate
Spoon more melted chocolate over each peanut butter center, about 1 to 1 1/2 teaspoons for standard cups.
Use the back of the spoon or a small offset spatula to nudge the chocolate to the edges so it covers the filling completely.
Tap the pan again on the counter to smooth the tops and remove any air pockets.
Step 9: Add toppings
While the chocolate still looks wet, sprinkle a tiny pinch of flaky sea salt on each cup.
Add crushed peanuts or mini chocolate chips if you want extra texture and flavor.
Keep toppings light so they don’t sink into the chocolate.
Step 10: Chill and set
Place the pan in the fridge for 25–30 minutes until the chocolate firms up.
Touch the tops; they should feel solid with no soft spots.
Once set, peel off the liners and transfer the cups to an airtight container.
Step 11: Serve
Serve the Reeses Peanut Butter Cups Recipe slightly chilled or at cool room temperature.
If they sit out in a warm kitchen, the chocolate softens a bit and the centers turn extra creamy.
Offer napkins, because chocolate plus peanut butter tends to jump onto fingers.
Recipe Variations
- Gluten-free: Use certified gluten-free chocolate chips and liners; the base recipe already avoids gluten.
- Vegan: Use dairy-free chocolate chips, plant-based butter or coconut oil, and vegan-friendly sugar.
- Low carb: Use sugar-free chocolate chips and powdered sweetener (like powdered erythritol or allulose) in place of powdered and brown sugar.
- Crunchy center: Use crunchy peanut butter or mix in finely chopped peanuts to the filling.
- Extra chocolate: Add a thin drizzle of white chocolate over the set cups for a bakery-style look.
- Peanut-free: Use almond butter, cashew butter, or sunflower seed butter for a similar texture with different flavor.
- Flavor twist: Stir a little cinnamon, espresso powder, or a drop of maple extract into the filling.
Ways to Serve Reeses Peanut Butter Cups Recipe
- Serve on a dessert platter with brownies, cookies, and fruit for a party tray.
- Pack in lunchboxes as a special treat.
- Crumble over vanilla ice cream or frozen yogurt.
- Chop and mix into homemade milkshakes or peanut butter smoothies.
- Use as a topping for chocolate cupcakes or peanut butter cupcakes.
- Wrap individually and tuck into gift boxes or holiday cookie tins.
Storage Success
Store Reeses Peanut Butter Cups Recipe in an airtight container in the fridge for up to 2 weeks. They hold their shape best when chilled, especially in warm weather, and the chocolate keeps a nice snap. If you prefer a softer bite, pull a few cups out of the fridge and let them sit at room temperature for 5–10 minutes before serving. Freeze them for up to 3 months, and thaw in the fridge overnight so condensation does not form on the chocolate.

Reese’s Peanut Butter Cups Copycat Recipe
Ingredients
Instructions
- Line a standard 24-cup mini muffin tin with paper liners and set aside.
- In a microwave-safe bowl, combine the chocolate chips and vegetable shortening. Microwave in 20–30 second bursts, stirring between each, until smooth and fully melted.
- Spoon about 1 teaspoon of melted chocolate into the bottom of each liner. Tilt the pan or use the back of the spoon to spread the chocolate slightly up the sides. Refrigerate for 10 minutes to set.
- Meanwhile, in a medium bowl, beat together the peanut butter and softened butter until smooth and creamy.
- Add the powdered sugar, salt, and vanilla extract to the peanut butter mixture. Mix until a thick, smooth dough forms that holds its shape but is still pliable.
- Divide the peanut butter mixture into 24 equal portions and roll into small balls. Gently flatten each ball into a disc that fits inside the chocolate-lined cups.
- Place a peanut butter disc into each chilled chocolate shell and gently press down so the top is mostly level, leaving a little space around the edges for the top layer of chocolate.
- Rewarm the remaining chocolate briefly if needed until fluid again, then spoon about 1 teaspoon over each peanut butter filling, covering it completely and smoothing the tops.
- Refrigerate the pan for 20–30 minutes, or until the chocolate is fully set and firm to the touch.
- Serve chilled or at cool room temperature. Store leftover peanut butter cups in an airtight container in the refrigerator for up to 1 week.
Notes
Approximate per 1 peanut butter cup: 150 calories; fat 10 g; saturated fat 4 g; carbohydrates 13 g; fiber 1 g; sugars 11 g; protein 3 g; sodium 60 mg. Values will vary based on exact brands, chocolate type, and portion size.
Leave a Reply