
Red Velvet Cake Pops Recipe tastes like a bite of tangy cocoa cake wrapped in creamy vanilla frosting and dipped in a crisp chocolate shell. It works perfectly for parties, bake sales, and kid-approved desserts, and you can finish a batch in about 1 hour 30 minutes if you use shortcuts. I baked my first red velvet cake pops for a chaotic school fundraiser, and they disappeared faster than my patience with glitter glue.
Why You Should Try This Red Velvet Cake Pops Recipe
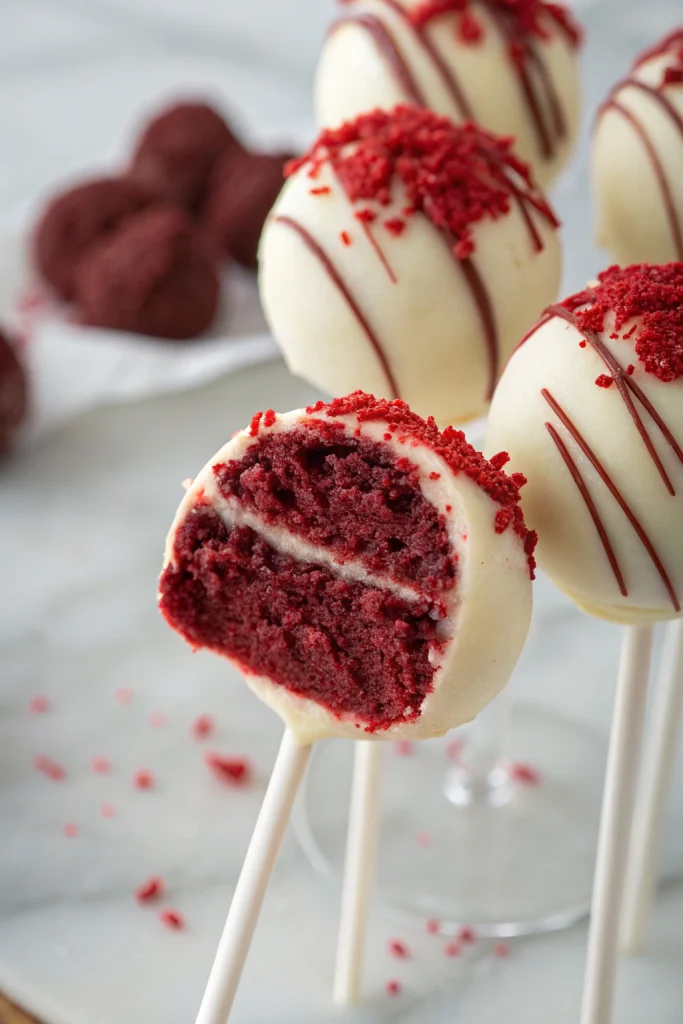
These red velvet cake pops hit that sweet spot between rich chocolate and subtle tang from buttermilk and cream cheese. The texture feels fudgy inside with a satisfying snap from the candy coating outside.
They travel well, look impressive on a dessert table, and stay neat in little hands. You can decorate them for birthdays, holidays, or random Tuesday cravings with sprinkles, drizzle, or colored candy melts.
“I brought a batch of these red velvet cake pops to a family gathering, and people hovered near the dessert table like it paid rent. The centers tasted moist and rich, the coating stayed smooth and shiny, and not a single pop cracked. My sister asked where I bought them, and she did not believe me when I said I made them at home.”
Ingredients You’ll Need
Cake & Binding Mixture
- 1 box red velvet cake mix
- Any standard 15.25 ounce box works. I like Duncan Hines or Betty Crocker for consistent texture.
- Ingredients listed on the cake mix box
- Usually eggs, oil, and water. Use neutral oil like canola or vegetable.
- 4 to 5 tablespoons cream cheese frosting
- Use canned frosting for speed. I like the tang of cream cheese frosting, but vanilla frosting also works.
- Add frosting slowly so the mixture does not turn mushy.
Coating & Decoration
- 12 ounces red candy melts or white candy melts
- Ghirardelli or Wilton melt smoothly. If the coating looks too thick, add 1 to 2 teaspoons refined coconut oil.
- 4 ounces dark or milk chocolate chips, optional, for drizzling
- Sprinkles, crushed cookies, or colored sugar, optional, for topping
Equipment
- 9×13 inch baking pan
- Mixing bowls
- Baking sheet
- Parchment paper or silicone baking mat
- Forks and a sturdy spoon
- 25 to 30 lollipop sticks
- Styrofoam block or a cardboard box with holes poked in it
- Microwave safe bowls or a double boiler
- Cookie scoop or tablespoon measure
- Cooling rack, optional
Tips & Tricks
- Bake the cake a day ahead and chill it so it crumbles more cleanly.
- Crumble the cake very finely so the pops look smooth and hold together.
- Add frosting 1 tablespoon at a time and stop when the mixture feels like moldable cookie dough.
- Chill the shaped balls at least 20 to 30 minutes so they stay on the sticks.
- Dip the stick tips in melted coating before inserting them to anchor the cake pops.
- Keep the coating warm and fluid; reheat in short bursts if it thickens.
- Spin and tap your wrist gently after dipping to shake off extra coating without loosening the cake.
- Decorate quickly while the coating still feels wet so sprinkles stick.
- Work in small batches; keep extra cake balls in the fridge while you dip others.
- If cracks appear, patch them with a little warm coating and smooth with the back of a spoon.
How to Make Red Velvet Cake Pops Recipe
Step 1: Bake the Red Velvet Cake
Preheat your oven to the temperature on the cake mix box. Grease a 9×13 inch pan or line it with parchment. Mix the red velvet cake batter according to package directions, then pour it into the pan and smooth the top.
Bake until a toothpick comes out clean from the center. This usually takes 25 to 30 minutes, but check at the earlier time. Set the cake on a rack and let it cool completely so it does not melt the frosting later.
Step 2: Crumble the Cake
Once the cake cools, cut off any very dry or browned edges. Those edges taste fine but can add tough bits to the cake pops. Break the remaining cake into large chunks and place them in a large mixing bowl.
Use clean hands to crumble the cake into fine, even crumbs. Rub larger pieces between your fingers until no big lumps remain. The finer the crumbs, the smoother your cake pops will look.
Step 3: Mix with Frosting
Add 2 tablespoons of cream cheese frosting to the crumbs and mix with a spoon or your hands. Add more frosting 1 tablespoon at a time and keep mixing. Stop when the mixture holds together easily and feels like soft modeling clay.
Squeeze a bit in your hand; it should form a ball without cracking but should not feel wet or greasy. If it crumbles, add a tiny bit more frosting. If it feels too sticky, add a spoonful of extra cake crumbs if you saved any edges.
Step 4: Shape the Cake Balls
Line a baking sheet with parchment or a silicone mat. Use a cookie scoop or tablespoon to portion the mixture into even mounds. Roll each portion between your palms to form smooth, tight balls about 1 to 1.25 inches wide.
Place the balls on the lined baking sheet with a little space between them. Chill the tray in the fridge for 20 to 30 minutes or in the freezer for 10 to 15 minutes. Cold cake balls stay on the sticks more easily and coat more cleanly.
Step 5: Prepare the Candy Coating
Place the candy melts in a microwave safe bowl. Heat in 20 to 30 second bursts, stirring after each round, until the melts look smooth and fluid. If the coating seems thick, stir in 1 teaspoon of refined coconut oil or vegetable shortening.
Aim for a texture that flows off the spoon in a steady ribbon. Keep the bowl over a mug of hot water or near the warm stove so it stays fluid. If it cools and thickens, reheat in short bursts and stir again.
Step 6: Attach the Sticks
Take 5 to 6 cake balls out of the fridge and keep the rest chilled. Dip the tip of a lollipop stick about 0.5 inch into the melted coating. Push that coated tip halfway into the center of a cake ball.
Set the cake pop back on the tray with the stick pointing up. Repeat with the remaining cake balls, working in small batches so they stay cold. Chill again for 10 minutes so the coating around the stick sets and locks it in place.
Step 7: Dip the Cake Pops
Hold a cake pop by the stick and tilt the bowl of melted coating. Dip the cake pop in at an angle and turn it so the coating covers the entire surface. Lift it out and gently tap your wrist while you rotate the stick so extra coating drips off.
Keep the cake pop upside down until the coating stops dripping and looks smooth. If you want sprinkles, add them now while the coating still feels wet. Stick the pop upright into a Styrofoam block or a box with holes so it can set without smudging.
Step 8: Add Drizzles and Decorations
If you want chocolate drizzle, melt chocolate chips in a small bowl in the microwave. Stir until smooth and let the chocolate cool slightly so it thickens just a bit. Use a spoon or piping bag to drizzle thin lines over the set cake pops.
Add crushed cookies, colored sugar, or themed sprinkles for holidays or birthdays. Let everything sit at room temperature until the coating and drizzle firm up completely. Once set, the cake pops feel firm to the touch and travel easily.
What to Serve with Red Velvet Cake Pops
Serve these red velvet cake pops on a dessert table with fresh berries, vanilla cupcakes, or chocolate chip cookies. Kids love them with cold milk or hot chocolate, and adults often reach for coffee or a strong black tea. Arrange them in a mason jar or a decorated foam block so they double as a centerpiece. They also pack well in lunchboxes or party favor bags for a sweet surprise later.
Storage Options
- Store finished cake pops at room temperature in an airtight container for up to 2 days if your kitchen stays cool.
- Keep them in the fridge for 5 to 6 days; let them sit at room temperature 15 to 20 minutes before serving so the centers soften.
- Freeze uncoated cake balls on a tray, then move them to a freezer bag for up to 2 months; thaw in the fridge before coating.
- Freeze finished cake pops in a single layer, then wrap gently; thaw in the fridge overnight and bring to room temperature before serving.

Red Velvet Cake Pops Recipe
Ingredients
Instructions
- Preheat the oven to 350°F (175°C). Grease and flour an 8-inch round cake pan or line it with parchment paper.
- In a bowl, whisk together flour, cocoa powder, baking soda, and salt.
- In a separate large bowl, whisk sugar and vegetable oil until combined, then beat in the egg.
- Stir in buttermilk, vanilla extract, red food coloring, and vinegar until smooth.
- Add the dry ingredients to the wet ingredients and mix just until combined.
- Pour the batter into the prepared pan and bake for 25–30 minutes, or until a toothpick inserted in the center comes out clean.
- Let the cake cool completely in the pan on a wire rack.
- Once cooled, crumble the cake into fine crumbs in a large bowl, removing any hard edges.
- Add cream cheese frosting a spoonful at a time, mixing with your hands until the mixture holds together like a moist dough. You may not need all the frosting.
- Roll the mixture into 1-inch balls and place them on a parchment-lined baking sheet.
- Chill the cake balls in the refrigerator for at least 1 hour, or 20–30 minutes in the freezer, until firm.
- Melt the candy melts or white chocolate with the shortening (if using) according to package directions until smooth.
- Dip the tip of each lollipop stick about 1/2 inch into the melted coating, then insert it halfway into a chilled cake ball. This helps secure the stick.
- Return the cake pops to the refrigerator for 10–15 minutes to set.
- Holding each pop by the stick, dip the cake ball into the melted coating, gently tapping off any excess and rotating to coat evenly.
- While the coating is still wet, add sprinkles if desired.
- Place the cake pops upright in a styrofoam block or a stand to set completely at room temperature.
- Store the finished cake pops in an airtight container at cool room temperature for 2–3 days or refrigerate for up to 1 week.
Notes
Approximate per 1 cake pop (1 of 24): 130 calories; fat 7 g; saturated fat 3.5 g; carbohydrates 16 g; fiber 0.5 g; sugars 12 g; protein 1.5 g; sodium 85 mg. Values are estimates and will vary based on exact ingredients, coating type, and portion size.
Leave a Reply