
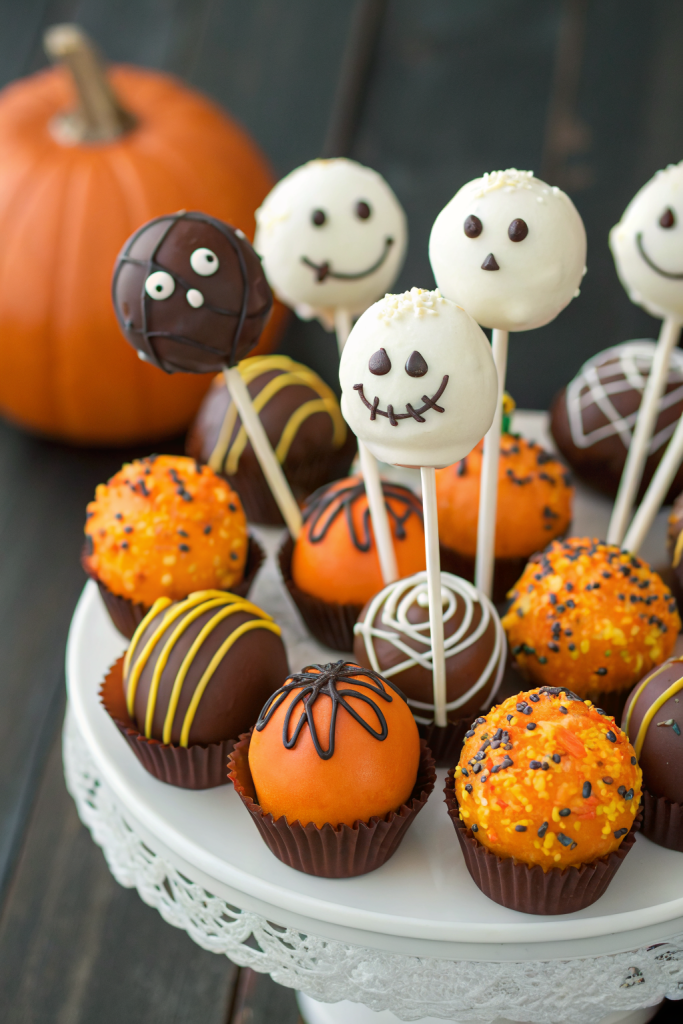
Halloween Cake Pops Recipe tastes like a bite of moist chocolate birthday cake wrapped in a crisp candy shell with just enough spooky decoration to thrill kids and adults. It works perfectly for busy parents, party hosts, or anyone who wants a Halloween dessert in about 1 hour of hands-on time plus chilling. I tested these with my own nieces, and they disappeared faster than the candy bowl.
Why Choose This Halloween Cake Pops Recipe
This Halloween Cake Pops Recipe uses a boxed cake mix and store-bought frosting, so you save time and still get rich, bakery-style flavor. You decorate them with easy designs like mummies, pumpkins, and spooky eyeballs, so beginners feel confident and kids can help.
You also prepare everything ahead, which makes party day feel calmer. The cake pops hold their shape, the coating sets smooth, and the decorations stay cute even after a few hours on the dessert table.
“These Halloween cake pops vanished from the party table in 10 minutes and guests begged for the recipe. ★★★★★”
Ingredients You’ll Need
Cake and Frosting
- 1 box chocolate cake mix (any brand you like; I often use Betty Crocker or Duncan Hines)
- Ingredients listed on the cake mix box (usually eggs, oil, and water)
- 1/3 to 1/2 cup canned chocolate frosting (Pillsbury, Betty Crocker, or store brand all work)
Shortcut note: You can use leftover homemade cake or a bakery cake instead of boxed cake. Just crumble about 9 cups of cake and add frosting until the mixture feels like soft playdough.
Candy Coating and Decorations
- 16 ounces orange candy melts
- 16 ounces white candy melts
- 8 ounces black candy melts or black chocolate wafers (for details and drizzles)
- 2 teaspoons refined coconut oil or vegetable shortening (helps thin the coating)
- Assorted Halloween sprinkles (bones, bats, pumpkins, orange and black jimmies)
- Candy eyeballs
- Black gel icing or edible marker (for faces and details)
- Optional: green candy melts for pumpkin stems and accents
You can swap candy melts with high-quality white chocolate chips and tint them with oil-based candy coloring. Avoid water-based food coloring, because it can cause the chocolate to seize and turn grainy.
Equipment
- 1 9×13 inch baking pan
- Mixing bowls
- Baking rack or large plate lined with parchment paper
- 30 to 40 lollipop sticks (6 inch size works best)
- Styrofoam block or a cardboard box with small holes poked in it (to hold pops upright)
- Small microwave-safe bowls for melting candy
- Toothpicks or squeeze bottles for detail work
- Cookie scoop or tablespoon for portioning cake balls
Tips & Tricks
- Chill the baked cake before crumbling so it does not turn gummy.
- Add frosting a spoonful at a time until the cake mixture feels like soft clay that holds a ball shape without cracking.
- Use a cookie scoop to portion the cake balls so they all match in size and cook evenly when you chill and coat them.
- Roll the balls with slightly damp hands to get a smooth surface that coats nicely.
- Always chill the cake balls at least 30 minutes so they stay on the sticks and do not slide off.
- Dip the tip of each lollipop stick in melted candy before inserting it into the cake ball to glue it in place.
- Keep the candy coating warm and fluid by microwaving in short bursts and stirring often.
- Thin thick candy melts with a teaspoon of coconut oil or shortening until the coating flows like heavy cream.
- Dip the cake pops straight down and up without swirling to avoid crumbs in the coating.
- Tap the stick gently while you rotate the pop so extra coating drips off and the surface looks smooth.
- Decorate with sprinkles while the coating still feels wet so they stick well.
- Use a toothpick dipped in melted candy for tiny details like mummy lines or spider legs.
- Work in small batches and keep extra cake balls in the fridge so they stay firm.
- If a cake pop cracks, patch it with a little melted candy and cover that spot with a sprinkle or eyeball.
- Let the finished pops set completely at room temperature before wrapping or packing them.
How to Make Halloween Cake Pops Recipe
Bake and Cool the Cake
- Preheat your oven to the temperature listed on the cake mix box. Grease a 9×13 inch pan or line it with parchment paper.
- Mix the cake batter according to the package directions. Pour the batter into the pan and smooth the top.
- Bake until a toothpick inserted in the center comes out clean. This usually takes 25 to 30 minutes.
- Let the cake cool completely in the pan on a rack. A warm cake turns mushy when you crumble it, so give it time.
Crumble the Cake and Add Frosting
- Once the cake cools, cut off any very dark or crispy edges if you want a smoother texture.
- Crumble the cake into a large mixing bowl using clean hands. Break it down into fine crumbs without big chunks.
- Add 1/3 cup of frosting to the crumbs. Mix with your hands until the mixture feels moist and holds together.
- If the mixture feels dry or cracks when you squeeze it, add more frosting a tablespoon at a time. Stop when it feels like soft playdough.
Shape the Cake Balls
- Use a cookie scoop or tablespoon to portion the mixture into equal mounds. Aim for about 1 to 1.25 inches in diameter.
- Roll each portion between your palms until you get a smooth ball. Place the balls on a parchment-lined baking sheet.
- Chill the tray in the fridge for at least 30 minutes or in the freezer for 15 minutes. The balls should feel firm but not rock hard.
Attach the Sticks
- Melt a small handful of candy melts in a microwave-safe bowl. Heat in 20 second bursts and stir until smooth.
- Dip the tip of a lollipop stick about 1/2 inch into the melted candy.
- Push the dipped end of the stick halfway into a chilled cake ball. Do not push all the way through.
- Repeat with all the cake balls. Chill again for 15 to 20 minutes so the candy glue sets.
Melt the Candy Coating
- Place the orange candy melts in one bowl and the white candy melts in another. Add 1 teaspoon of coconut oil or shortening to each bowl.
- Microwave one bowl at a time in 20 to 30 second bursts, stirring after each burst. Stop when the mixture turns smooth and fluid.
- If the coating looks thick, stir in a little more coconut oil or shortening until it flows like heavy cream.
- Keep the bowls of melted candy on a warm stovetop or near the oven so they stay fluid, and reheat briefly as needed.
Dip the Cake Pops
- Take a few cake pops out of the fridge at a time and keep the rest chilled.
- Hold a pop by the stick and dip the cake ball straight down into the melted candy. Cover it completely.
- Lift it straight up and gently tap the stick on the edge of the bowl while you rotate the pop. Let extra coating drip off until the surface looks smooth.
- If you want sprinkles only, add them now while the coating still feels wet. Then stick the pop upright into a Styrofoam block or box to set.
Decorate as Halloween Characters
Pumpkin Cake Pops
- Dip cake pops in orange candy coating and let the excess drip off.
- While the coating still feels wet, drag a toothpick gently from top to bottom in a few spots to suggest pumpkin ridges.
- Melt green candy melts and pipe or dab a tiny stem on top with a toothpick or small piping bag.
- Add black gel icing or edible marker faces once the coating sets.
Mummy Cake Pops
- Dip cake pops in white candy coating and let them set.
- Use a squeeze bottle or a spoon with white coating to drizzle thin lines back and forth across the pop.
- Press two candy eyeballs into the coating before it sets so they peek out between the lines.
- Let the drizzle lines firm up before you move or pack the pops.
Spooky Eyeball Cake Pops
- Dip cake pops in white coating and let them set completely.
- Use colored candy melts or gel icing to draw a circle for the iris and a smaller dot for the pupil.
- Add thin red lines with red gel icing to mimic veins.
- Chill briefly to set the details so they do not smear.
Bat or Monster Pops
- Dip cake pops in black or dark chocolate coating.
- While the coating still feels wet, add candy eyeballs and Halloween sprinkles for hair or fur.
- Use small chocolate cookie pieces or candy corn halves as ears or horns.
- Draw mouths and fangs with white or red gel icing after the base coat sets.
Let the Pops Set and Serve
- Leave all decorated cake pops upright in the Styrofoam block until the coating feels completely firm.
- This usually takes 20 to 30 minutes at room temperature.
- Once set, arrange them in a jar, pumpkin bucket, or on a platter lined with candy corn or Halloween sprinkles.
- Serve within a few hours for the best texture, or store them as described below.
What to Serve with Halloween Cake Pops Recipe
Serve this Halloween Cake Pops Recipe on a dessert table with classic treats like caramel apples, chocolate chip cookies, and candy corn. Add some kid-friendly drinks such as apple cider, hot chocolate, or orange punch with floating gummy worms. You can also pair them with a simple fruit tray shaped like a jack-o-lantern face to balance the sugar. If you host a classroom party, pack the cake pops individually in treat bags and set them next to bowls of popcorn and pretzels.
Storage Options
- Store cake pops at room temperature in an airtight container for up to 2 days if your kitchen stays cool and dry.
- Keep them in the fridge for up to 5 days; place them in a container so they do not bump into each other and smudge.
- Freeze undecorated cake balls on a tray, then transfer them to a freezer bag for up to 2 months; thaw in the fridge before dipping.
- Freeze finished cake pops by wrapping each one in plastic wrap, then placing them in a container for up to 1 month; thaw in the fridge and bring to room temperature before serving.
- Avoid reheating cake pops, since heat can melt the candy coating; instead, let chilled or frozen pops come back to room temperature so the texture softens again.
Leave a Reply