
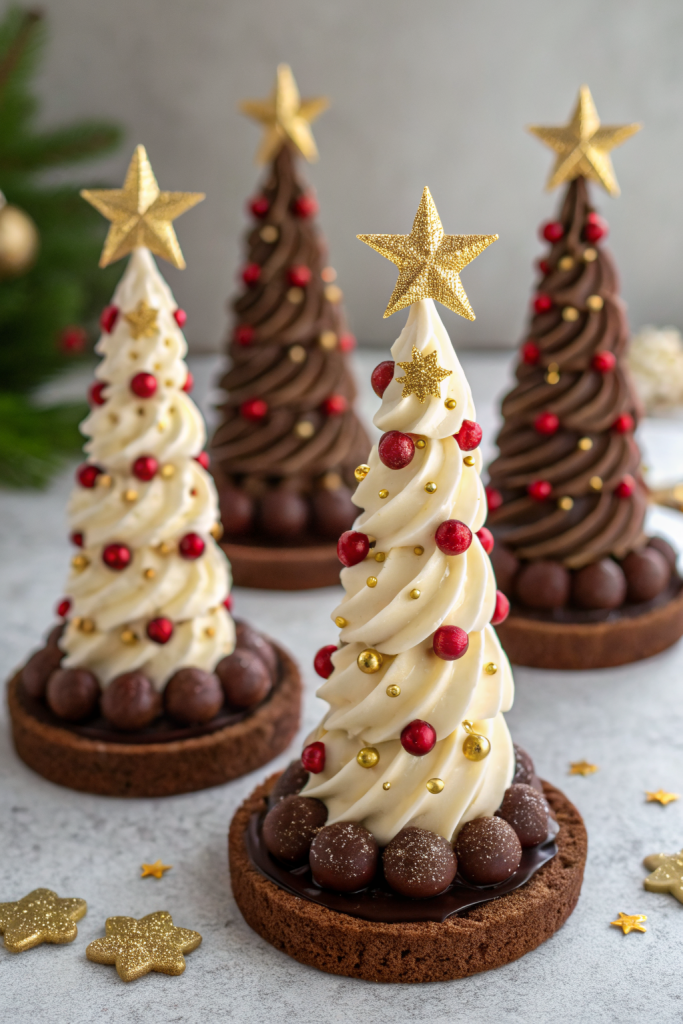
Christmas Chocolate Trees Recipe tastes like a cross between a fudgy brownie and a rich truffle, with a cute crunch from sprinkles and cones that kids go wild over. It works perfectly for busy home bakers who want a show-stopping Christmas dessert in about 30–40 minutes, start to finish. I tested these with my nieces last year, and they declared them “too pretty to eat” right before inhaling three each.
Why Christmas Chocolate Trees Recipe Is Worth It
These Christmas Chocolate Trees look bakery-level fancy, but you make them with simple pantry ingredients and ice cream cones. You skip complicated piping and still end up with a dessert table centerpiece that guests photograph before they eat.
The recipe uses one chocolate base and a couple of easy toppings, so you customize it for picky kids or chocolate snobs without extra work. Cleanup stays surprisingly painless, which matters when you already juggle ten other holiday dishes.
“These Christmas Chocolate Trees disappeared faster than the actual presents under the tree, and everyone asked for the recipe. ★★★★★”
Ingredients You Need
You can scale this Christmas Chocolate Trees Recipe up or down, but this base makes about 12 trees.
Chocolate tree base
- 2 cups semi-sweet chocolate chips (I like Ghirardelli or Guittard for smooth melting, but store-brand works in a pinch)
- 2 tablespoons unsalted butter
- 1/2 cup heavy cream (or full-fat canned coconut milk for dairy-free)
- 1 teaspoon pure vanilla extract
- 1/4 teaspoon fine sea salt
- 1/3 cup powdered sugar, sifted (adjust to taste for sweetness)
“Tree” cones and decorations
- 12 sugar cones (the pointy ice cream cones; waffle cones feel too fragile)
- 1 cup white chocolate chips or white candy melts (candy melts stay more stable on a warm buffet)
- Green gel food coloring (gel works better than liquid so the coating stays thick)
- 1–2 teaspoons neutral oil (coconut, canola, or avocado) to thin chocolate as needed
- Assorted sprinkles:
- Star-shaped sprinkles or candy stars for tree toppers
- Mini round sprinkles or nonpareils as “ornaments”
- Shredded coconut or powdered sugar for “snow”
Optional fillings for inside the cones
- Mini marshmallows
- Crushed candy canes
- Rice cereal for crunch
- Chopped nuts (pecans, walnuts, or almonds)
Pantry shortcuts
- Use store-bought chocolate frosting instead of the chocolate base if you feel short on time; just thicken it with a little powdered sugar.
- Swap homemade ganache with a tub of chocolate ganache from the bakery section if your grocery store sells it.
- Use pre-colored green candy melts so you skip the food coloring step.
Equipment list
- Heatproof mixing bowl
- Small saucepan (for a simple double boiler or to heat cream)
- Rubber spatula
- Piping bag or zip-top bag (for filling cones)
- Spoon for coating cones
- Cooling rack set over a parchment-lined baking sheet
- Small bowls for sprinkles and toppings
- Microwave-safe bowl (if you melt chocolate in the microwave)
Quick Tips & substitutions
- Chill the cones briefly before coating them so the green chocolate sets faster and drips less.
- Use candy melts instead of white chocolate if your kitchen runs warm; they hold their shape better on the table.
- Swap heavy cream with canned coconut milk for a dairy-free chocolate base.
- Use gluten-free cones and certified gluten-free sprinkles for guests with gluten sensitivity.
- Fill cones only halfway if you serve small kids, so the portion size stays manageable.
- Add 1 teaspoon instant espresso powder to the chocolate base for a deeper chocolate flavor.
- Keep a baking sheet under the rack to catch sprinkle fallout and save your counters.
- Work in small batches of 3–4 cones so the coating stays wet while you add decorations.
How to Make Christmas Chocolate Trees Recipe
Step 1: Prepare the chocolate base
Heat the heavy cream in a small saucepan over medium-low heat until it steams and tiny bubbles form around the edges. Pour the hot cream over the semi-sweet chocolate chips and butter in a heatproof bowl. Wait 1–2 minutes, then stir until the mixture turns smooth and glossy.
Stir in vanilla, salt, and powdered sugar until the chocolate thickens slightly. Taste and adjust sweetness with a bit more powdered sugar if needed. Set the bowl aside at room temperature while you prep the cones; the mixture should cool enough to pipe but still feel soft.
Step 2: Prep and fill the cones
Stand the sugar cones upright in a glass, muffin tin, or small cups so they stay steady. Spoon a little chocolate base into the bottom of each cone. Add a few mini marshmallows, crushed candy canes, or rice cereal, then add more chocolate base.
Fill each cone almost to the top, leaving about 1/4 inch of space so the chocolate does not overflow. Tap the cone gently on the counter to remove air pockets. Chill the filled cones in the fridge for 10–15 minutes while you prepare the green coating.
Step 3: Make the green chocolate coating
Place white chocolate chips or candy melts in a microwave-safe bowl. Heat in 20–30 second bursts, stirring between each, until the chocolate melts and turns smooth. Stir in 1 teaspoon neutral oil to thin the mixture slightly; add a bit more if it still feels too thick.
Add green gel food coloring a little at a time until you reach a deep evergreen shade. Stir thoroughly so no streaks remain. Keep the bowl over a small pot of barely warm water if your kitchen runs cool, so the chocolate stays fluid.
Step 4: Coat the cones
Set a cooling rack over a parchment-lined baking sheet. Hold a chilled filled cone by the base and spoon the green chocolate over the outside, turning the cone so you cover it completely. Let the excess drip off back into the bowl.
Lightly tap your wrist with the other hand to shake off extra coating so it does not pool at the tip. Set the coated cone upright on the cooling rack. Work quickly with 3–4 cones at a time so the coating stays wet for sprinkles.
Step 5: Decorate the Christmas Chocolate Trees
While the coating still looks glossy, sprinkle on mini round sprinkles or nonpareils as ornaments. Press one star sprinkle at the very top of each cone. Add shredded coconut or a dusting of powdered sugar over the tray for a snowy effect.
Repeat with all cones until you have a little forest of chocolate trees. Chill the tray for 10–15 minutes so the coating firms up. After it sets, move the trees gently to a serving platter or cake stand.
Step 6: Final touches and serving
Arrange the Christmas Chocolate Trees on a platter with extra mini marshmallows and crushed candy canes scattered around. Add a small bowl of extra sprinkles on the side if kids want to “decorate” more at the table. Serve the trees at cool room temperature so the chocolate centers taste fudgy, not rock hard.
Slice one tree in half to show off the inside and tempt everyone. Keep a few napkins nearby because chocolate plus kids equals sticky fingers every time.
Recipe Variations
- Gluten-free: Use gluten-free sugar cones and certified gluten-free sprinkles; keep the chocolate base as written.
- Vegan: Use dairy-free chocolate chips, canned coconut milk instead of cream, vegan butter, and vegan cones; choose vegan sprinkles.
- Low sugar: Use sugar-free chocolate chips, reduce powdered sugar, and pick sugar-free sprinkles.
- Mint chocolate trees: Add 1/2 teaspoon peppermint extract to the chocolate base and fill cones with crushed candy canes.
- Peanut butter trees: Swirl 1/4 cup creamy peanut butter into the chocolate base and top with chopped peanuts.
- Nutty crunch trees: Mix chopped toasted almonds, pecans, or hazelnuts into the chocolate base before filling cones.
- Salted caramel trees: Drizzle a little thick caramel sauce inside each cone along with the chocolate and finish with flaky sea salt on top.
Ways to Serve Christmas Chocolate Trees Recipe
- Line them up down the center of your dessert table as an edible “forest.”
- Use them as individual place settings with name tags tied around the cone base.
- Serve them on a hot cocoa bar so guests grab a tree with their mug of cocoa.
- Pack one or two trees in a festive box as a take-home treat.
- Add them to a cookie platter to break up all the flat shapes with something tall and fun.
Storage Success
Store Christmas Chocolate Trees in a single layer in an airtight container so they do not bump into each other and lose decorations. Keep them in a cool spot or the fridge for up to 4–5 days. If you chill them, let them sit at room temperature for about 15 minutes before serving so the centers soften. Avoid warm spots near the oven or heater, because the green coating can slide and turn your forest into a chocolate landslide.