
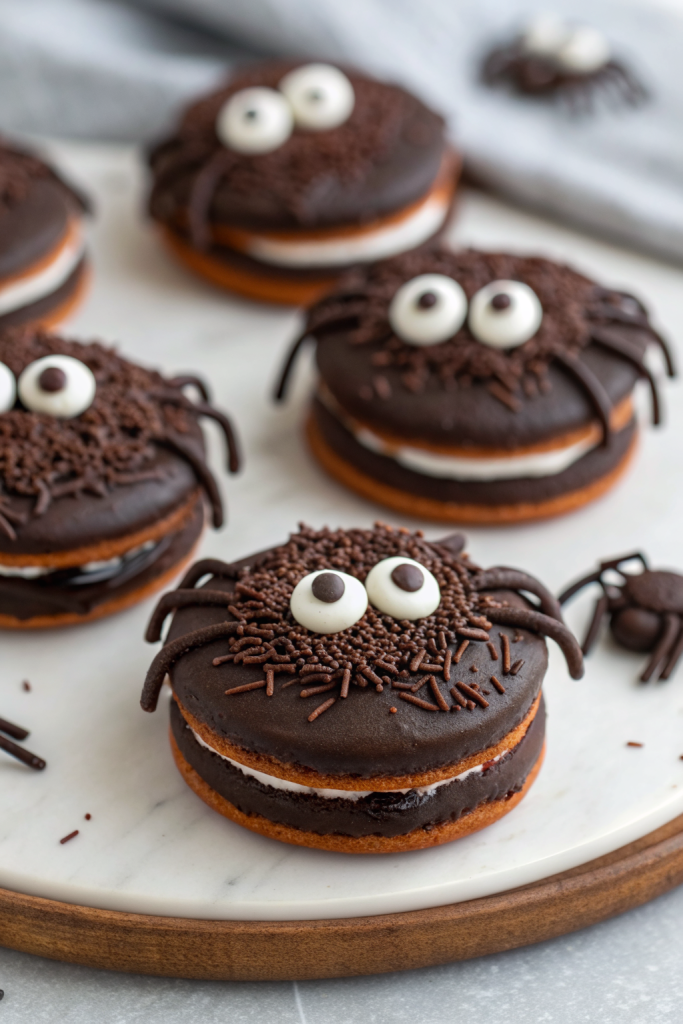
Spooky Oreo Spider Halloween Cookies Recipe tastes like a cookies-and-cream truffle dressed up in a chocolate costume with crunchy candy eyes and sweet licorice legs. It works perfectly for busy parents, classroom parties, and last-minute Halloween dessert trays, and it takes about 30 minutes from start to finish. I tested these with my nieces last weekend, and they cackled louder than the mixer.
Why Make This Spooky Oreo Spider Halloween Cookies Recipe at Home
You control the sweetness, the chocolate quality, and how creepy or cute the spiders look. Kids can help with almost every step, which turns dessert into a fun little craft project.
Store-bought Halloween treats often cost more and taste less chocolatey than these. You need only a few pantry staples, and the no-bake method keeps the kitchen cool and stress low.
“These Spooky Oreo Spider Halloween Cookies disappeared from the party table in minutes and everyone asked for the recipe ★★★★★”
Ingredients You Need
Main ingredients
-
Oreo cookies:
- 36 regular Oreos, crushed very fine
- Use classic, double-stuf, or store-brand chocolate sandwich cookies.
- Double-stuf gives a softer, creamier center, while regular keeps the filling a bit firmer.
-
Cream cheese:
- 6 ounces full-fat cream cheese, softened
- Block style works best because it stays thicker than tub cream cheese.
- Use room temperature cream cheese so it blends smoothly with the cookie crumbs.
-
Chocolate for coating:
- 12 ounces semisweet chocolate chips or melting wafers
- Use good-quality chocolate chips or candy melts for a smoother shell.
- If you use chocolate chips, add 1 teaspoon neutral oil to help the coating set shiny.
Decorations for the spider cookies
-
Candy eyes:
- About 48 small candy eyeballs
- You can use mini chocolate chips if you cannot find candy eyes.
-
Licorice or pretzel legs:
- 24 thin black licorice strings, cut into short pieces
- Or use thin pretzel sticks broken into short lengths.
- You need 8 small pieces per spider cookie.
-
Extra decorations (optional):
- Orange and purple sprinkles
- Colored candy melts for drizzling
- Mini M&M’s or similar candies for “spots” on the spider backs
Pantry shortcuts and notes
- Use pre-crushed Oreo crumbs from the baking aisle if you want to skip the food processor.
- Use candy melts if you want a coating that sets fast and stays firm at room temperature.
- Use store-brand sandwich cookies to cut costs; the cream cheese and chocolate still carry the flavor.
Equipment list
- Food processor or large zip-top bag with rolling pin
- Medium mixing bowl
- Rubber spatula or wooden spoon
- Small cookie scoop or tablespoon
- Baking sheet lined with parchment paper
- Microwave-safe bowl or double boiler for melting chocolate
- Toothpicks or small offset spatula for adjusting decorations
- Cooling rack (optional but helpful)
Tips & Mistakes
- Crush the Oreos into fine crumbs so the filling looks smooth and holds together well.
- Soften the cream cheese fully; cold cream cheese leaves lumps and streaks.
- Chill the shaped Oreo balls before dipping so they keep a round shape and do not slide off the fork.
- Melt the chocolate slowly in short bursts in the microwave and stir often so it does not scorch.
- Work with a few Oreo balls at a time and keep the rest in the fridge so they stay firm.
- Insert the licorice legs while the chocolate still feels wet so they stick without extra glue.
- Press the candy eyes on gently but firmly so they sit flat and do not fall off later.
- Do not overheat candy melts; they thicken and turn grainy when they get too hot.
- Use a fork to dip and tap off extra chocolate so the spiders do not form big puddles underneath.
- Chill the finished spiders until the chocolate sets completely so they travel well to parties.
How to Make Spooky Oreo Spider Halloween Cookies Recipe
Step 1: Crush the Oreos
Place the Oreos in a food processor and pulse until they turn into fine crumbs. Scrape down the sides so no big chunks hide at the bottom. If you use a zip-top bag, seal it well and crush the cookies with a rolling pin until they look like sand.
Step 2: Mix the cookie filling
Add the softened cream cheese to the Oreo crumbs in a mixing bowl. Stir and mash with a spatula until the mixture turns thick, smooth, and uniform in color. The mixture should feel like a soft dough that holds together when you press it.
Step 3: Shape the spider bodies
Use a small cookie scoop or tablespoon to portion the mixture into balls. Roll each portion between your palms to form smooth, round shapes about 1 inch wide. Place the balls on a parchment-lined baking sheet with a little space between each one.
Step 4: Chill the centers
Place the baking sheet in the fridge for at least 20 minutes or in the freezer for 10 minutes. The centers should feel firm to the touch before you dip them in chocolate. This step keeps the spiders from falling apart in the warm coating.
Step 5: Melt the chocolate
Place the chocolate chips or candy melts in a microwave-safe bowl. Heat in 20 to 30 second bursts, stirring well between each burst, until the chocolate looks smooth and fluid. Stir in a teaspoon of neutral oil if the chocolate seems too thick.
Step 6: Dip the spider bodies
Drop one chilled Oreo ball into the melted chocolate. Use a fork to roll it around until it gets fully coated, then lift it out and tap the fork gently on the bowl to shake off extra chocolate. Slide the coated ball back onto the parchment-lined baking sheet.
Step 7: Add the legs
While the chocolate still feels wet, press four licorice pieces into each side of the spider body. Angle them slightly so they look like bent legs. If the chocolate starts to firm up, coat a few more spiders, then add legs right away.
Step 8: Add the eyes and decorations
Place two candy eyes on the front of each spider while the chocolate still feels tacky. Press them lightly so they sink in just a bit. Sprinkle colored sprinkles or add mini candies on top if you want extra Halloween flair.
Step 9: Chill until set
Place the tray of decorated spiders in the fridge for about 15 to 20 minutes. The chocolate should harden completely and lose its shine on the surface. Once set, lift a spider and check that the legs and eyes stay firmly attached.
Step 10: Clean up the edges
Peel each spider off the parchment and trim any big chocolate drips with a small knife if they bother you. Arrange the spiders on a serving plate or tiered stand. Keep them chilled until you plan to serve them so the chocolate stays firm.
Variations I've Tried
I swapped the regular Oreos for golden Oreos and used white chocolate coating for “ghost spiders” with silly eyes. I used peanut butter sandwich cookies with a spoonful of peanut butter mixed into the filling for a peanut butter cup vibe. I also tried mint Oreos with dark chocolate coating and green drizzle, which worked perfectly for a spooky mint-chocolate version.
How to Serve Spooky Oreo Spider Halloween Cookies Recipe
Serve these Spooky Oreo Spider Halloween Cookies on a big platter with candy corn, pretzels, and sliced apples for a fun Halloween dessert board. Kids love to “adopt” a spider and name it before they eat it. Pack them in cupcake liners so they stay neat in lunch boxes or classroom treat bags.
How to store
- Room temperature: Keep the cookies at cool room temperature for up to 2 hours during a party, then move leftovers to the fridge.
- Fridge: Store in an airtight container in a single layer or with parchment between layers for up to 5 days.
- Freezer: Freeze in a firm single layer, then transfer to a container with parchment between layers; store up to 2 months.
- Thawing: Thaw in the fridge for a few hours so condensation forms on the container, not on the chocolate.
- Re-serving: Serve chilled or let them sit at room temperature for 10 to 15 minutes so the centers soften slightly before biting.
Spooky Oreo Spider Halloween Cookies Recipe
Ingredients
Instructions
- Place the Oreo cookies in a food processor and pulse until they form very fine crumbs, scraping down the sides so no large pieces remain. Alternatively, seal the cookies in a zip-top bag and crush them with a rolling pin until they resemble sand.
- Transfer the Oreo crumbs to a mixing bowl, add the softened cream cheese, and stir and mash with a spatula until the mixture is thick, smooth, and uniform in color like a soft dough.
- Use a small cookie scoop or tablespoon to portion the mixture into mounds, then roll each one between your palms into smooth balls about 1 inch wide. Arrange them on a parchment-lined baking sheet.
- Chill the shaped Oreo balls in the refrigerator for about 20 minutes or in the freezer for about 10 minutes, until they feel firm to the touch.
- Place the chocolate chips or melting wafers in a microwave-safe bowl. Microwave in 20 to 30 second bursts, stirring after each, until the chocolate is fully melted and smooth. If using chocolate chips and the mixture seems thick, stir in the neutral oil until glossy and fluid.
- Drop one chilled Oreo ball into the melted chocolate. Roll it around with a fork to coat completely, then lift it out and gently tap the fork on the edge of the bowl to remove excess chocolate. Slide the coated ball back onto the parchment-lined baking sheet. Repeat with remaining balls, working with a few at a time so they stay firm.
- While the chocolate coating is still wet, press four short pieces of black licorice into each side of a coated ball to form eight legs, angling them slightly so they look bent. Continue adding legs to the rest of the coated balls, reheating the chocolate briefly if it thickens too much.
- Place two candy eyes on the front of each spider while the chocolate is still tacky, pressing gently so they adhere. Add sprinkles, candy drizzle, or mini chocolate candies on top if desired for extra Halloween decoration.
- Refrigerate the decorated spiders for 15 to 20 minutes, or until the chocolate is fully set and firm. Check that the legs and eyes are secure.
- Carefully peel each spider from the parchment and trim any large chocolate drips with a small knife if you like. Arrange on a serving plate and keep chilled until ready to serve.
Notes
Approximate per spider cookie (1 of 24): 160 calories; fat 9 g; saturated fat 5 g; carbohydrates 19 g; fiber 1 g; sugars 14 g; protein 2 g; sodium 105 mg. Values are estimates and will vary based on cookie brand, chocolate type, decorations, and portion size.