

Valentines Day Cookie Mug Huggers Recipe tastes like buttery sugar cookies with a hint of vanilla and just enough crunch to hold onto your favorite mug of hot chocolate. This recipe works perfectly for anyone who wants a cute, edible garnish that bakes in under 1 hour from start to finish. I tested these while my coffee went cold because I kept “hugging” every mug in the house.
Why Valentines Day Cookie Mug Huggers Recipe Is Worth It
These little cookies turn a basic mug of cocoa or coffee into something that looks straight out of a cozy café. The dough mixes easily, holds its shape, and bakes into cookies that hug the rim without sliding off or breaking.
Kids love decorating them, and adults love posting them on social media before dunking them. You can bake them a day ahead, decorate when you have time, and still serve them crisp and fresh.
“These Valentine’s Day Cookie Mug Huggers disappeared faster than the hot chocolate. They looked bakery-level cute, hugged the mugs perfectly, and tasted like classic vanilla sugar cookies with just the right crunch. My kids asked if we could keep a batch on standby all winter.”
Ingredients You Need
Dry ingredients
- 2 ¼ cups (270 g) all-purpose flour
- Use a standard unbleached all-purpose flour; King Arthur or Gold Medal both work great.
- Swap with a 1:1 gluten-free baking blend if you want a gluten-free version.
- ½ teaspoon baking powder
- Gives a tiny bit of lift without puffing the shapes too much.
- ¼ teaspoon fine sea salt
- Table salt works, but use a pinch less since it tastes stronger.
Wet ingredients
- ¾ cup (170 g) unsalted butter, softened to room temperature
- Use real butter, not margarine, so the cookies hold shape and taste rich.
- If you only have salted butter, reduce the added salt to a tiny pinch.
- ¾ cup (150 g) granulated sugar
- White sugar keeps the color pale and the texture crisp.
- 1 large egg, room temperature
- 2 teaspoons pure vanilla extract
- Use real vanilla for the best flavor; I like Nielsen-Massey or a good store brand.
- Add ¼ teaspoon almond extract if you want a bakery-style twist.
- 1–2 teaspoons milk or cream, only if needed
- Helps bring the dough together if it feels crumbly.
Decorations
- Royal icing or thick powdered sugar icing
- Shortcut: use store-bought cookie icing in squeeze pouches for easy decorating.
- Gel food coloring in red and pink
- Gel color keeps the icing thick so it does not run off the cookies.
- Sprinkles, sanding sugar, or mini heart sprinkles
Equipment list
- Medium and large mixing bowls
- Hand mixer or stand mixer with paddle attachment
- Measuring cups and spoons
- Rubber spatula
- Rolling pin
- Heart-shaped cookie cutters (2–3 sizes help)
- Small sharp knife or mini rectangle cutter to cut the mug slot
- Baking sheets
- Parchment paper or silicone baking mats
- Cooling rack
- Small piping bags or zip-top bags for icing
Quick Tips & substitutions
- Chill the dough at least 30 minutes so the mug huggers keep crisp edges.
- Roll the dough to about ¼ inch thickness; thinner cookies break, thicker ones slide off mugs.
- Cut the mug slot slightly wider than the mug rim so the cookie hugs without cracking.
- Use a small knife to clean up the slot edges before baking.
- Swap vanilla with half vanilla and half almond extract for a bakery-style flavor.
- Use a 1:1 gluten-free flour blend to make gluten-free mug huggers; chill that dough a bit longer.
- Decorate on fully cooled cookies so the icing sets and the cookies stay crisp.
- Store-bought cookie icing or royal icing mix saves time and still gives neat details.
- If the dough cracks when you roll it, knead in 1 teaspoon milk at a time until it feels smooth.
- Bake one test cookie first to check spread; if it spreads too much, chill the cut shapes 10–15 minutes before baking.
How to Make Valentine’s Day Cookie Mug Huggers Recipe
Step 1: Mix the dry ingredients
Add flour, baking powder, and salt to a medium bowl. Whisk until everything looks evenly combined. Set the bowl aside.
Step 2: Cream butter and sugar
Place softened butter and granulated sugar in a large mixing bowl. Beat with a hand mixer or stand mixer on medium speed until the mixture looks light and fluffy, about 2–3 minutes. Scrape down the sides of the bowl so no butter lumps hide at the bottom.
Step 3: Add egg and flavorings
Crack in the egg and pour in the vanilla extract. Beat again on medium speed until the mixture looks smooth and creamy. If you want a hint of almond, add it now and mix again.
Step 4: Bring the dough together
Add the dry ingredients to the wet ingredients in two additions. Mix on low speed until the dough starts to clump together and no dry flour streaks remain. If the dough feels too crumbly, add 1 teaspoon of milk at a time and mix until it forms a soft but not sticky dough.
Step 5: Chill the dough
Divide the dough into two equal portions. Shape each portion into a flat disc, wrap tightly in plastic wrap, and place in the fridge. Chill at least 30 minutes so the dough rolls easily and the cookies keep their shape.
Step 6: Prep the oven and pans
Heat the oven to 350°F (175°C). Line baking sheets with parchment paper or silicone baking mats. This step keeps the cookies from sticking and helps them bake evenly.
Step 7: Roll the dough
Unwrap one dough disc and place it on a lightly floured surface. Roll it out to about ¼ inch thickness, turning the dough and dusting with a tiny bit of flour as needed to prevent sticking. Keep the second disc in the fridge so it stays cool.
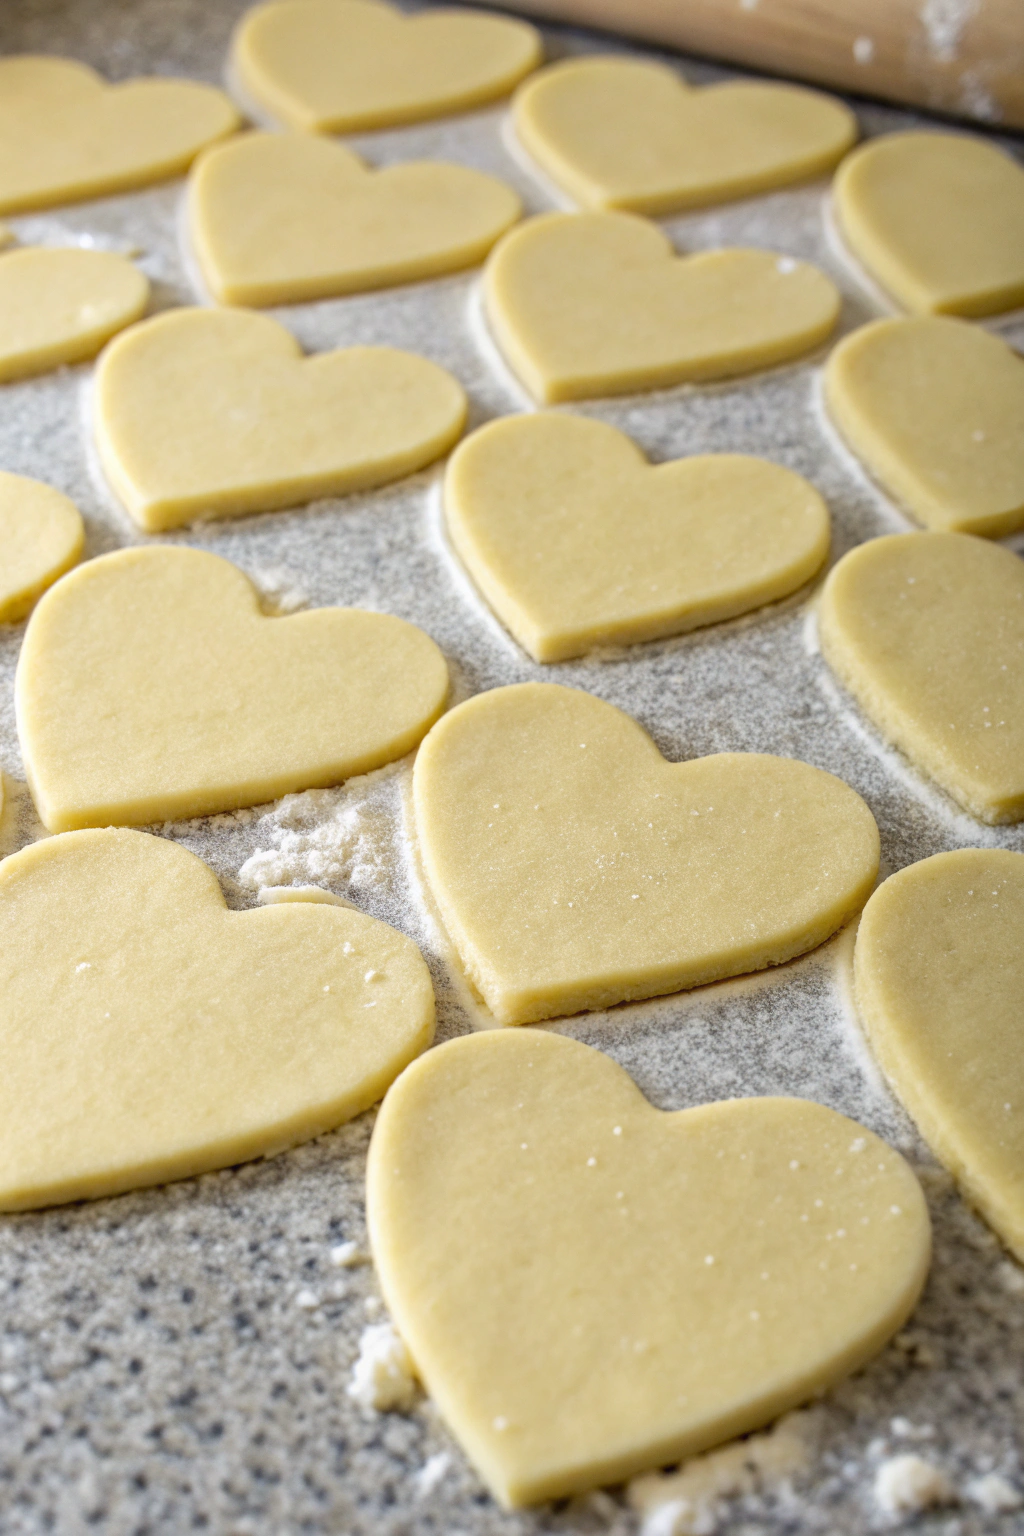
Step 8: Cut heart shapes
Use heart-shaped cookie cutters to cut as many hearts as you can from the rolled dough. Transfer the hearts to the prepared baking sheets, leaving a little space between each cookie. Re-roll the scraps gently and cut more hearts until you use all the dough.
Step 9: Cut the mug slots
Use a small sharp knife or mini rectangle cutter to cut a little notch on one side of each heart. Aim for a rectangle about ¼ inch wide and ½ inch deep, sized to fit over the rim of your favorite mug. Test one raw cookie on an actual mug to check the fit, then match that size for the rest.
Step 10: Chill the cut cookies
Place the baking sheets with the cut cookies in the fridge for 10–15 minutes. This short chill helps the mug huggers keep sharp edges and prevents spreading. Use this time to roll and cut the second dough disc.
Step 11: Bake the cookies
Slide the chilled baking sheets into the hot oven. Bake 8–11 minutes, depending on size, until the edges look just barely golden and the centers look set. Smaller hearts finish closer to 8 minutes, larger ones need closer to 11.
Step 12: Cool completely
Remove the baking sheets from the oven and let the cookies sit for 5 minutes. Transfer them gently to a cooling rack and let them cool completely. The cookies firm up as they cool, so handle them gently while warm.
Step 13: Mix the icing
Prepare royal icing according to package directions or whisk powdered sugar with a splash of milk and vanilla until thick and smooth. Divide the icing into small bowls and tint each portion with red or pink gel food coloring. Keep the icing thick enough that it holds lines and does not run off the cookies.
Step 14: Decorate the mug huggers
Transfer icing to piping bags or zip-top bags with a tiny corner snipped off. Pipe outlines, polka dots, stripes, or little messages like “XO” or “Love.” Add sprinkles right away so they stick before the icing crusts.
Step 15: Let the icing set
Leave the decorated cookies on the cooling rack or parchment until the icing feels dry to the touch. This step usually takes 1–2 hours, depending on thickness and humidity. Once dry, hook a cookie onto a mug, fill the mug with hot chocolate or coffee, and serve.
Recipe Variations
- Gluten-free: Use a 1:1 gluten-free baking flour blend and chill the dough at least 45 minutes.
- Vegan: Swap butter with a good vegan baking stick and use a flax egg (1 tablespoon ground flax + 3 tablespoons water).
- Low sugar: Cut the sugar to ½ cup and add a tiny splash more vanilla; the cookies turn out less sweet but still tasty.
- Chocolate version: Replace ¼ cup of the flour with cocoa powder for chocolate mug huggers.
- Citrus twist: Add 1 teaspoon finely grated orange or lemon zest to the dough.
- Spiced: Mix in ½ teaspoon cinnamon and a pinch of nutmeg for a cozy flavor.
- Filled hearts: Cut matching hearts, spread a thin layer of jam between two, seal edges, then cut the mug slot and bake.
Ways to Serve Valentine’s Day Cookie Mug Huggers Recipe
- Hook one cookie on each mug of hot chocolate topped with whipped cream.
- Serve with a mug of coffee or tea for a sweet afternoon treat.
- Pack a few in a treat bag with a packet of hot cocoa mix as a small gift.
- Arrange them around a big mug of warm milk for kids.
- Use them as edible place cards by piping names on each heart.
Storage Success
Store cooled Valentine’s Day Cookie Mug Huggers in an airtight container at room temperature for up to 5–7 days. Place parchment between layers so the decorations stay neat and the icing does not stick. If your kitchen runs warm, keep the container in a cool, dry spot away from direct sunlight. Freeze undecorated cookies or dough discs for up to 2 months, then thaw and decorate when you need a quick, cute treat.
Valentine's Day Cookie Mug Huggers Recipe
Ingredients
Instructions
- In a medium bowl, whisk together the flour, baking powder, and salt; set aside.
- In a large mixing bowl, beat the softened butter and granulated sugar together until light and fluffy.
- Add the egg, vanilla extract, and milk, and mix until well combined.
- Gradually add the dry ingredients to the wet mixture, mixing just until a soft dough forms.
- Divide the dough in half, flatten into disks, wrap in plastic, and chill for at least 30 minutes to make rolling easier.
- Preheat the oven to 350°F (175°C). Line baking sheets with parchment paper.
- On a lightly floured surface, roll out one disk of dough to about 1/4-inch thickness.
- Use heart-shaped or Valentine-themed cookie cutters to cut out shapes, then cut a small rectangular notch on one side or bottom of each cookie so it can hook over the rim of a mug.
- Transfer cookies to prepared baking sheets, spacing them about 1 inch apart.
- Bake for 8–10 minutes, or until the edges are just lightly golden. Do not overbake to keep them tender.
- Allow cookies to cool on the baking sheet for 5 minutes, then transfer to a wire rack to cool completely.
- In a small bowl, whisk together powdered sugar, milk, and vanilla until smooth and thick yet pipeable. Adjust with a few more drops of milk if needed.
- Divide icing into small bowls and tint with red and pink gel food coloring, if desired.
- Pipe or spread icing onto cooled cookies and decorate with sprinkles or sanding sugar. Let the icing set completely.
- To serve, gently hook each cookie onto the rim of a mug filled with hot chocolate, coffee, or tea.
Notes
Approximate per 1 cookie (1 of 24): 120 calories; fat 5 g; saturated fat 3 g; carbohydrates 18 g; fiber 0 g; sugars 10 g; protein 1 g; sodium 60 mg. Values are estimates and will vary based on exact ingredient brands, icing thickness, and cookie size.
Leave a Reply