
Heart Cookies Decorated Royal Icing Recipe tastes buttery, vanilla‑sweet, and just a little crisp at the edges with a soft bite in the center, perfect for anyone who loves bakery‑style decorated sugar cookies in about 2 hours total. This recipe suits beginner decorators and seasoned bakers who want pretty, sturdy heart cookies that hold their shape and keep well for gifting or parties. I baked and decorated a test batch at 11 p.m. one Tuesday, so consider this fully vetted by both me and my very opinionated neighbors.
Why Choose This Heart Cookies Decorated Royal Icing Recipe
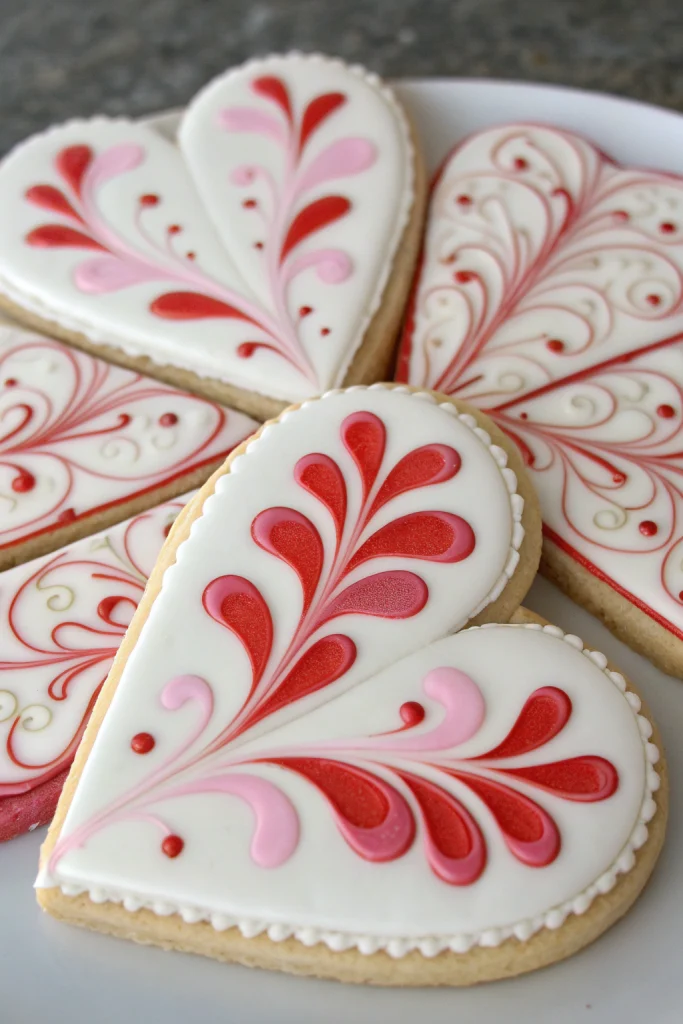
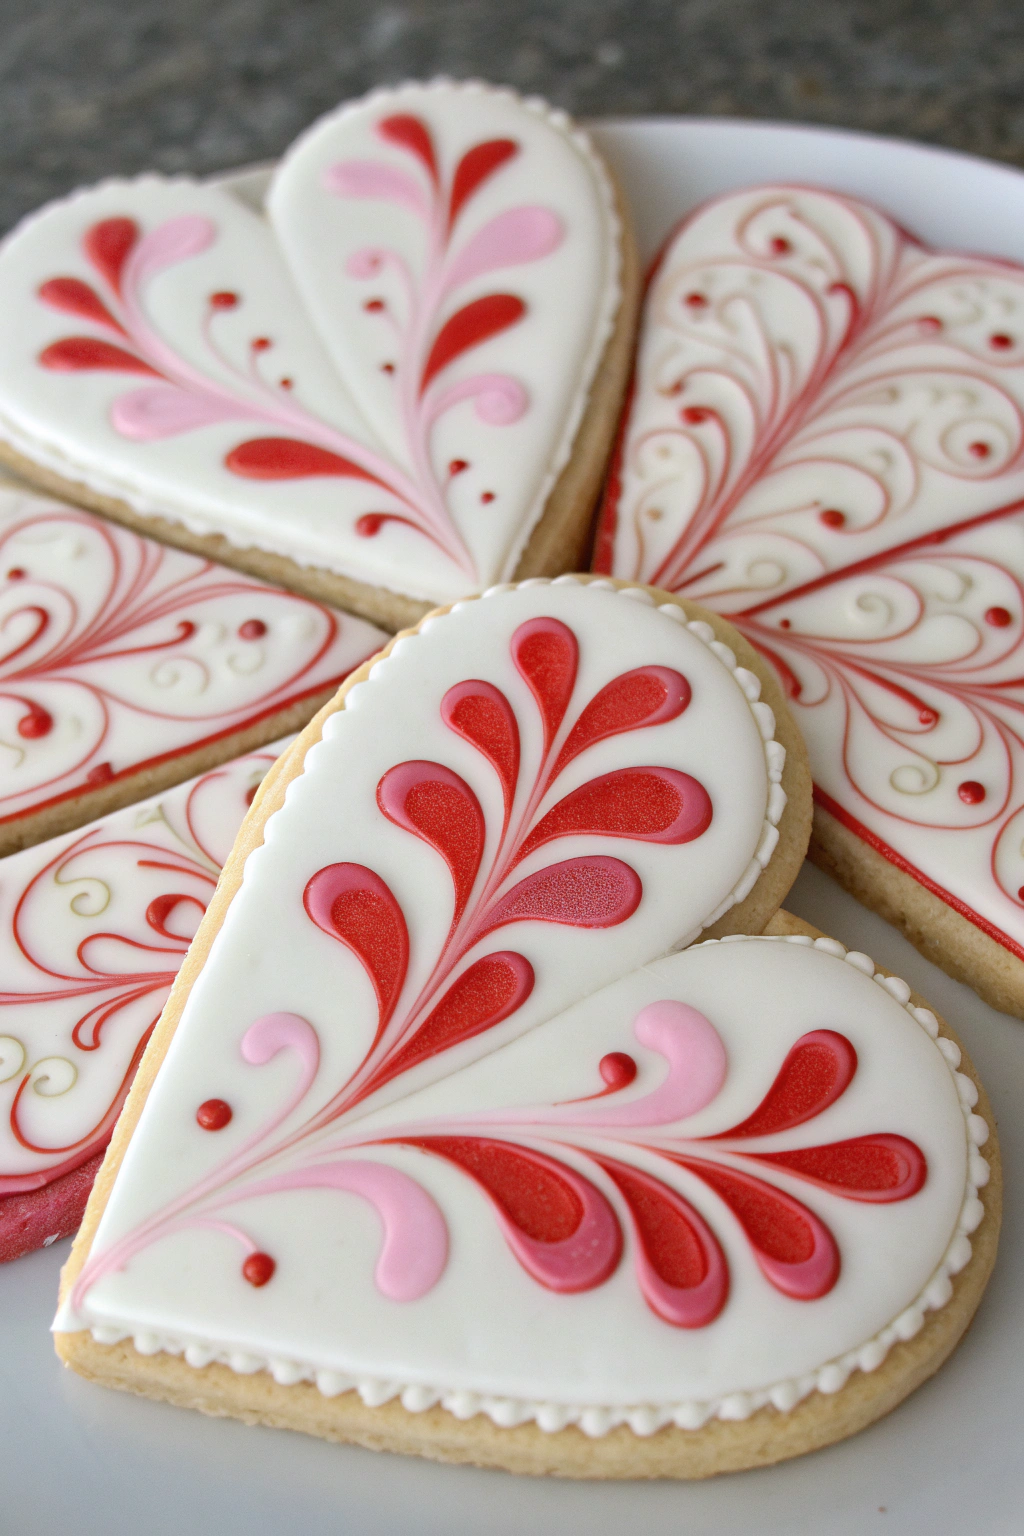
This Heart Cookies Decorated Royal Icing Recipe gives you cookies that hold sharp heart edges, do not puff into blobs, and still taste rich and tender. The royal icing dries with a smooth, shiny finish that stacks nicely but does not break teeth.
You mix the dough in one bowl, chill it briefly, and cut clean shapes without sticky chaos. The icing uses simple pantry ingredients, no meringue powder hunting required, and you can adjust the consistency easily for outlining and flooding.
“These heart cookies looked like they came from a fancy bakery, but they tasted like real butter and vanilla instead of cardboard. The icing dried firm enough to stack in a gift box, and every single cookie disappeared at the party.”
Ingredients You’ll Need
Heart Sugar Cookies
- 2 ¾ cups (330 g) all‑purpose flour
- Use a standard unbleached flour; I like King Arthur or Gold Medal for consistent texture.
- ½ teaspoon baking powder
- ½ teaspoon fine sea salt
- 1 cup (2 sticks / 226 g) unsalted butter, softened to cool room temperature
- Salted butter works in a pinch; reduce added salt to a tiny pinch.
- 1 cup (200 g) granulated sugar
- 1 large egg, room temperature
- 1 large egg yolk, room temperature
- 2 teaspoons pure vanilla extract
- Use real vanilla, not imitation, since the flavor carries the whole cookie.
- ½ teaspoon almond extract (optional but highly recommended)
Royal Icing
- 3 large egg whites, room temperature
- Use pasteurized carton egg whites if raw eggs concern you; check the label for “100% egg whites.”
- 4 cups (about 480 g) powdered sugar, sifted
- ½ teaspoon cream of tartar
- 1 teaspoon vanilla extract (clear vanilla keeps the icing brighter)
- 1–3 tablespoons water, as needed to adjust consistency
- Gel food coloring in red, pink, and white
- Gel color works better than liquid; it keeps the icing thick and vibrant.
Optional Decorations
- White sanding sugar or sparkling sugar
- Heart‑shaped sprinkles or nonpareils
- Edible glitter or luster dust (use a light hand so the cookies still taste good)
Equipment List
- Large mixing bowl and medium mixing bowl
- Hand mixer or stand mixer with paddle and whisk attachments
- Rubber spatula
- Measuring cups and spoons
- Kitchen scale (helps a lot with flour and powdered sugar)
- Heart‑shaped cookie cutters in various sizes
- Rolling pin
- Parchment paper or silicone baking mats
- Baking sheets
- Wire cooling racks
- Piping bags
- Small round piping tips (sizes 1, 2, or 3)
- Toothpicks or scribe tool for detail work
- Small bowls for coloring icing
- Plastic wrap or airtight containers for storing icing and cookies
Tips & Tricks
- Chill the dough at least 30 minutes so the heart shapes bake with clean edges.
- Roll the dough between two sheets of parchment to avoid extra flour and tough cookies.
- Keep cookie thickness around ¼ inch for a soft center and sturdy shape.
- Use cool baking sheets; warm sheets cause cookies to spread.
- Bake one tray at a time in the center of the oven for even browning.
- Sift powdered sugar for the royal icing so you avoid lumps that clog piping tips.
- Mix royal icing on low speed to avoid too many air bubbles.
- Use thicker icing for outlines and details, thinner icing for flooding the centers.
- Test icing consistency by dragging a knife through; 10–15 seconds to smooth works well for flooding.
- Cover royal icing with plastic wrap touching the surface so it does not crust in the bowl.
- Practice on parchment before decorating the actual heart cookies.
- Keep a damp paper towel over piping tips between uses so they do not crust.
- Let decorated cookies dry at least 8 hours before stacking or packaging.
- Work in small batches of icing color so it does not dry out while you decorate.
- Add almond extract lightly; a little goes a long way with heart cookies.
How to Make Heart Cookies Decorated Royal Icing Recipe
Step 1: Mix the dry ingredients
Add flour, baking powder, and salt to a medium bowl. Whisk until everything looks evenly combined. Set the bowl aside.
Step 2: Cream butter and sugar
Place softened butter and granulated sugar in a large mixing bowl. Beat with a mixer on medium speed until the mixture looks light, fluffy, and slightly paler, about 2 to 3 minutes. Scrape down the sides of the bowl so no butter hides at the bottom.
Step 3: Add egg, yolk, and flavorings
Add the egg and egg yolk to the butter mixture and beat until the mixture looks smooth and glossy. Pour in vanilla and almond extract and mix again until combined. Scrape the bowl and make sure no streaks of egg remain.
Step 4: Add dry ingredients
Add the dry ingredients to the wet mixture in two additions. Mix on low speed just until the flour disappears and the dough clumps together. Stop mixing as soon as it forms a soft, smooth dough so the cookies stay tender.
Step 5: Chill the dough
Divide the dough into two equal portions and shape each into a flat disc. Wrap each disc in plastic wrap and place them in the fridge for at least 30 minutes, or up to 2 days. Chilled dough rolls more easily and keeps the heart shapes sharp.
Step 6: Roll and cut heart cookies
Preheat the oven to 350°F (175°C) and line baking sheets with parchment paper. Unwrap one dough disc and place it between two sheets of parchment. Roll the dough to about ¼ inch thickness, then peel off the top parchment and cut out heart shapes with your cookie cutters.
Gather the scraps, press them together, and roll again. Place the cut hearts on the prepared baking sheets, leaving a little space between each cookie. Keep the sheets in the fridge while you roll the second disc so the shapes stay firm.
Step 7: Bake the heart cookies
Place one baking sheet in the center of the oven. Bake 9 to 12 minutes, until the edges look set and just barely golden, while the centers still look pale. Smaller hearts finish faster, so check them early.
Remove the baking sheet from the oven and let the cookies sit for 5 minutes. Transfer the cookies to a wire rack and let them cool completely. Cool cookies hold icing better and do not melt the royal icing.
Step 8: Make the royal icing base
Add egg whites and cream of tartar to a clean mixing bowl. Beat on medium speed until the mixture looks frothy. Gradually add sifted powdered sugar, about 1 cup at a time, while you mix on low speed.
Increase the speed to medium and beat until the icing looks thick, glossy, and forms soft peaks, about 3 to 5 minutes. Add vanilla extract and mix again. You now have a thick royal icing base that you can thin for outlining and flooding.
Step 9: Adjust icing consistency
Divide the icing into separate bowls, one for each color you want. For outlining, add a few drops of water at a time and stir until the icing flows slowly and holds a line without spreading. For flooding, add a bit more water until a ribbon of icing sinks back into the bowl in about 10 to 15 seconds.
Keep at least one bowl of plain white icing for accents and details. Cover each bowl with plastic wrap touching the surface while you work with other colors. This step keeps the icing from crusting and clogging your piping tips.
Step 10: Color the icing
Add a tiny amount of gel food coloring to each bowl with a toothpick. Stir until the color looks even, then adjust with more gel if you want a deeper shade. Use different shades of pink and red for dimension on your heart cookies.
Place each color in a piping bag fitted with a small round tip. Twist the top of the bag and secure it so icing does not squeeze out the wrong end. Keep the tips covered with a damp paper towel when you set them down.
Step 11: Outline the heart cookies
Start with completely cooled heart cookies. Use thicker icing to pipe an outline around the edge of each heart, holding the tip slightly above the cookie so the line flows smoothly. Work slowly and steady, and lift your hand rather than dragging the tip on the surface.
Let the outlines sit for 5 to 10 minutes to firm up slightly. This border keeps the flooding icing from spilling over the sides. If you see any gaps, patch them now before you start flooding.
Step 12: Flood the centers
Thin your icing to flooding consistency if you have not already. Pipe icing inside the outlined area, starting near the edges and working toward the center. Use a toothpick or scribe tool to nudge the icing into corners and pop any air bubbles.
Gently shake the cookie back and forth to smooth the surface. Add wet‑on‑wet designs, such as dots or stripes, while the base icing still looks shiny. Let the flooded cookies dry at least 1 to 2 hours before adding more layers or details.
Step 13: Add details and designs
Use thicker icing for details like polka dots, borders, tiny hearts, or lettering. Try simple designs such as white polka dots on pink hearts, stitched borders, or a smaller red heart inside a larger white heart. You can also drag a toothpick through dots to create heart shapes or marbled patterns.
If you want sprinkles or sanding sugar, add them while the icing still feels slightly wet so they stick. For clean designs without texture, skip sprinkles and keep the surface smooth and glossy. Let all decorated cookies dry on wire racks.
Step 14: Dry completely
Allow the decorated heart cookies to dry at room temperature for at least 8 hours, or overnight. Keep them in a cool, dry spot away from humidity and curious fingers. Once the icing feels completely firm and does not dent when you press lightly, you can stack or package the cookies.
What to Serve with Heart Cookies Decorated Royal Icing Recipe
Serve these heart cookies with cold milk, hot chocolate, or a cozy mug of tea for a simple treat. They also pair nicely with a fruit platter, since the fresh berries balance the sweet royal icing. Add them to a dessert board with chocolate‑dipped strawberries, mini brownies, and some salty pretzels for contrast.
You can pack them in clear treat bags with ribbons for party favors or classroom celebrations. They also sit nicely on a brunch table next to yogurt parfaits and fresh citrus.
Storage Options
- Store undecorated heart cookies in an airtight container at room temperature for up to 5 days.
- Keep decorated cookies in a single layer until the icing dries fully, then stack with parchment between layers and store at room temperature for 7 days.
- Freeze undecorated cookies in a freezer bag or airtight container for up to 2 months; thaw at room temperature in the closed container.
- Freeze cookie dough discs well wrapped for up to 2 months; thaw in the fridge overnight, then roll and bake.
- Avoid the fridge for decorated cookies, since condensation can spot the royal icing.
Heart Cookies Decorated with Royal Icing
Ingredients
Instructions
- In a medium bowl, whisk together the flour, baking powder, and salt; set aside.
- In a large bowl, beat the softened butter and granulated sugar together until light and fluffy, 2–3 minutes.
- Beat in the egg, vanilla extract, and milk until well combined.
- Gradually add the dry ingredients to the wet ingredients, mixing just until a soft dough forms.
- Divide the dough into two disks, wrap each in plastic, and chill for at least 1 hour or until firm enough to roll.
- Preheat the oven to 350°F (175°C). Line baking sheets with parchment paper.
- On a lightly floured surface, roll one disk of dough to about 1/4-inch thickness. Cut out heart shapes with a cookie cutter and transfer to prepared baking sheets, spacing about 1 inch apart.
- Bake 8–10 minutes or until the edges are set and just beginning to turn light golden. Do not overbake.
- Allow cookies to cool on the baking sheet for 5 minutes, then transfer to a wire rack to cool completely before decorating.
- In a mixing bowl, combine the powdered sugar and meringue powder.
- Add 4 tablespoons of warm water and beat on medium speed until thick, glossy, and smooth, 3–5 minutes. Add up to 1 more tablespoon water, a few drops at a time, to reach piping consistency (thick but pipeable).
- Flavor with vanilla or almond extract if using, and mix to combine.
- Divide the icing into bowls and tint with gel food coloring as desired. Cover each bowl with plastic wrap touching the surface to prevent drying out.
- Transfer some of the icing to piping bags fitted with small round tips. Outline each cooled heart cookie with thick icing.
- Thin remaining icing with a few drops of water at a time to flooding consistency (it should smooth out within about 10 seconds). Fill the centers of the outlined cookies with the thinned icing, using a toothpick to gently spread and pop air bubbles.
- Add additional details, such as dots, lines, or small hearts, with contrasting icing colors once the base has set slightly.
- Allow decorated cookies to dry at room temperature until the royal icing is fully set and firm, several hours or overnight, before stacking or packaging.
Notes
Approximate per 1 cookie (1 of 24): 150 calories; fat 6 g; saturated fat 4 g; carbohydrates 24 g; fiber 0 g; sugars 15 g; protein 2 g; sodium 70 mg. Values will vary based on exact cookie size, icing thickness, and ingredient brands.
Leave a Reply