

Cherry Blossom Japanese Sakura Cheesecake Recipe tastes like a cloud of vanilla cheesecake kissed with floral cherry blossom and a hint of tart cherry, all in one ultra-creamy bite. It suits spring parties, Mother’s Day, or anyone who wants a showstopper dessert in about 6 hours total (including chilling). I first tested this sakura cheesecake for a cherry blossom picnic in D.C., and my friends still ask me to “bring the pink one” every year.
Why Cherry Blossom Japanese Sakura Cheesecake Recipe Is Worth It
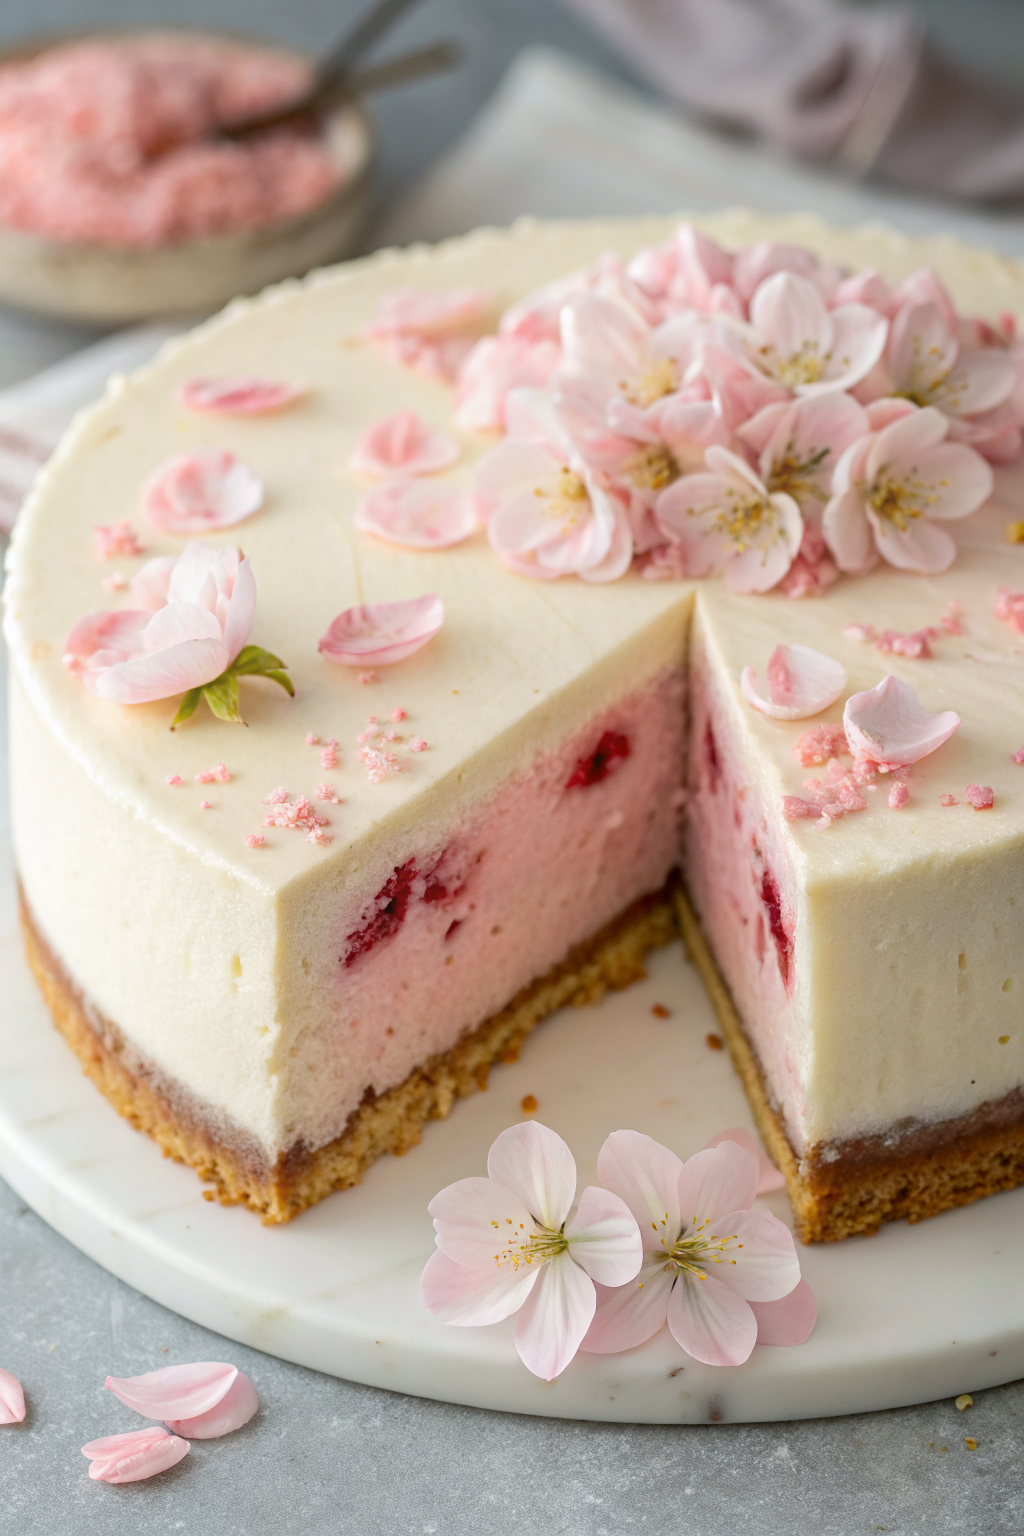
This cheesecake looks stunning with its soft blush color and delicate sakura accents, yet the method stays surprisingly simple. You get classic New York–style creaminess with a lighter, almost airy texture and a gentle floral note instead of heavy, in-your-face sweetness.
The recipe uses easy-to-find ingredients plus a couple of Japanese pantry gems, so you can pull off a bakery-level dessert at home. It also slices cleanly, travels well, and tastes even better the next day, which makes it perfect for parties and potlucks.
“This Cherry Blossom Japanese Sakura Cheesecake Recipe tastes like spring in cheesecake form—silky, floral, and not too sweet. ★★★★★”
Ingredients You Need
Crust
- 1 ½ cups (150 g) graham cracker crumbs
- Use digestive biscuits or vanilla cookies if you prefer a milder flavor.
- 2 tbsp granulated sugar
- 6 tbsp (85 g) unsalted butter, melted
- Salted butter works too; skip extra salt in the filling.
Cheesecake Filling
- 24 oz (680 g) full-fat cream cheese, room temperature
- Use brick-style cream cheese; whipped tubs stay too soft.
- ¾ cup (150 g) granulated sugar
- ¾ cup (180 g) sour cream, room temperature
- Greek yogurt (full-fat) works in a pinch.
- ½ cup (120 ml) heavy cream, room temperature
- 3 large eggs, room temperature
- 2 tsp pure vanilla extract
- 1–2 tsp sakura extract or cherry blossom flavoring
- Start with 1 tsp, taste, and add more if you want a stronger floral note.
- 2–3 tbsp sakura syrup or maraschino cherry syrup
- This adds color and a gentle cherry flavor.
- 1–2 drops pink gel food coloring (optional, but helpful for a soft blush shade)
- ¼ tsp fine sea salt
Sakura Topping (Optional but gorgeous)
- ¾ cup (180 ml) heavy cream, cold
- 2 tbsp powdered sugar
- ½ tsp vanilla extract
- 1–2 tsp sakura syrup (or cherry syrup)
- Edible salted sakura blossoms, rinsed and soaked to remove excess salt
- You can find these at Japanese markets or online.
Equipment
- 8- or 9-inch springform pan (8-inch gives more height)
- Parchment paper
- Heavy-duty aluminum foil (to wrap the pan for the water bath)
- Large roasting pan or deep baking dish (for the water bath)
- Stand mixer or hand mixer
- Mixing bowls
- Rubber spatula
- Measuring cups and spoons
- Kettle or pot for hot water
Quick Tips & substitutions
- Use room-temperature dairy so the batter mixes smoothly and avoids lumps.
- Wrap the springform pan tightly in several layers of foil to keep water out during the water bath.
- Swap graham crackers with Oreos (no filling) for a chocolate twist that pairs nicely with cherry blossom.
- Use Greek yogurt instead of sour cream if needed; keep it full-fat for best texture.
- Add sakura extract slowly and taste; too much can taste perfumy.
- Use cherry juice or grenadine if you cannot find sakura syrup.
- Skip food coloring if you prefer a natural cream color; the flavor still shines.
- Let the cheesecake cool slowly in the oven with the door cracked to reduce cracks.
- Chill the cheesecake at least 4 hours, but overnight gives the best flavor and texture.
How to Make Cherry Blossom Japanese Sakura Cheesecake Recipe
Prep the pan and oven
- Preheat the oven to 325°F (160°C).
- Line the bottom of your springform pan with parchment and lightly grease the sides.
- Wrap the outside of the pan with 2–3 layers of heavy-duty foil, covering the bottom and sides to above the halfway mark.
Make the crust
- Stir graham cracker crumbs, sugar, and melted butter in a bowl until the mixture looks like wet sand.
- Press the mixture firmly into the bottom of the pan, using the bottom of a measuring cup to pack it tightly and evenly.
- Bake the crust for 8–10 minutes until it smells toasty, then set it aside to cool while you mix the filling.
Mix the cheesecake filling
-
Beat the cream cheese in a large bowl on medium speed for 2–3 minutes until smooth and fluffy, scraping down the bowl as needed.
-
Add sugar and salt, then beat again until the mixture turns creamy and glossy.
-
Mix in sour cream and heavy cream on low speed until fully combined.
-
Add vanilla, sakura extract, and sakura syrup, then mix again and taste the batter.
-
Adjust the floral flavor by adding a bit more sakura extract if you want a stronger note.
-
Add pink gel food coloring a tiny bit at a time until you reach a soft cherry blossom shade.
-
Add the eggs one at a time, mixing on low speed just until each egg blends in.
-
Scrape down the bowl and fold the batter gently with a spatula to remove any streaks.
-
Tap the bowl lightly on the counter to pop large air bubbles.
Bake the cheesecake in a water bath
-
Pour the filling over the cooled crust and smooth the top with a spatula.
-
Place the foil-wrapped pan inside a large roasting pan.
-
Pour hot water into the roasting pan until it reaches about halfway up the sides of the springform pan.
-
Bake at 325°F (160°C) for 55–70 minutes, depending on your pan size and oven.
-
Check the cheesecake: the edges should look set, and the center should jiggle slightly like soft Jell-O when you nudge the pan.
-
Turn off the oven, crack the door slightly, and leave the cheesecake inside for 45–60 minutes so it cools gradually.
Cool and chill
-
Remove the cheesecake from the water bath and unwrap the foil.
-
Run a thin knife around the inside edge of the pan to loosen the cheesecake from the sides.
-
Let the cheesecake cool to room temperature on a wire rack, about 1–2 hours.
-
Cover the pan and chill the cheesecake in the fridge for at least 4 hours, preferably overnight.
-
When you feel ready to serve, release the springform ring and transfer the cheesecake to a serving plate.
-
Wipe the knife between slices to keep the cherry blossom cheesecake edges clean and neat.
Make the sakura whipped topping
-
Beat cold heavy cream in a chilled bowl until it thickens and soft peaks start to form.
-
Add powdered sugar, vanilla, and sakura syrup, then beat again until medium peaks form.
-
Spread or pipe the whipped cream over the chilled cheesecake.
-
Gently pat the soaked sakura blossoms dry and arrange them on top as decoration.
-
Chill the cheesecake again for 15–20 minutes so the topping sets slightly.
-
Slice and serve your Cherry Blossom Japanese Sakura Cheesecake Recipe with pride.
Recipe Variations
- Gluten-free: Use gluten-free graham crackers or cookies for the crust and check that your sakura products list gluten-free on the label.
- Vegan: Use vegan cream cheese, coconut cream instead of heavy cream, and a flax “egg” or commercial egg replacer; bake slightly longer and chill well to help it set.
- Low carb: Use almond flour mixed with a sugar substitute and butter for the crust, and swap sugar with a bake-friendly sweetener in the filling.
- Extra cherry: Swirl ¼ cup cherry jam into the top of the batter before baking for a marbled cherry blossom cheesecake.
- Matcha twist: Add 1–2 tsp matcha powder to part of the batter and swirl it through for a green-and-pink spring effect.
Ways to Serve Cherry Blossom Japanese Sakura Cheesecake Recipe
- Top slices with a spoonful of cherry compote or fresh cherries.
- Serve with sliced strawberries and a dollop of plain whipped cream.
- Pair with hot green tea, jasmine tea, or iced matcha for a gentle floral combo.
- Cut into small squares for a dessert buffet or afternoon tea spread.
- Add a tiny sakura blossom on each slice for individual presentation.
Storage Success
Store leftover Cherry Blossom Japanese Sakura Cheesecake Recipe covered in the fridge for up to 4–5 days. Keep it in an airtight container or wrap the pan tightly so the cheesecake does not absorb fridge odors. Chill slices on a flat plate before stacking with parchment between them to protect the sakura topping. Freeze individual slices tightly wrapped for up to 2 months, and thaw them overnight in the fridge when a cherry blossom craving hits.
Cherry Blossom Japanese Sakura Cheesecake
Ingredients
Instructions
- Grease a 7-inch (18 cm) round cake pan with butter or oil and line the bottom with parchment paper.
- Wrap the outside of the pan with foil if it is a springform to prevent water from leaking in.
- Preheat the oven to 160°C (320°F). Prepare a larger baking tray or roasting pan for a water bath.
- In a medium bowl, beat the softened cream cheese until completely smooth and lump-free.
- Add the melted butter and sugar, and whisk until the mixture is creamy and well combined.
- Add the eggs one at a time, whisking thoroughly after each addition until fully incorporated.
- Stir in the warm milk, vanilla extract, and salt, mixing until smooth.
- Sift cake flour and cornstarch over the mixture and gently whisk until just combined and smooth, avoiding overmixing.
- Strain the batter through a fine mesh sieve into a clean bowl to remove any remaining lumps and large air bubbles.
- Pour the batter into the prepared cake pan and tap it gently on the counter to release any air bubbles.
- Place the cake pan into the larger baking tray and pour hot water into the tray until it reaches about halfway up the sides of the cake pan.
- Bake at 160°C (320°F) for 50–60 minutes, or until the top is lightly golden and the center is set but still slightly jiggly.
- Turn off the oven, crack the door open slightly, and let the cheesecake rest in the oven for 10–15 minutes to prevent sudden shrinking.
- Remove the cheesecake from the water bath, cool to room temperature, then chill in the refrigerator for at least 2 hours before adding the jelly.
- Rinse the salt-pickled sakura blossoms under cold water to remove excess salt, then soak them in fresh water for 10–15 minutes. Drain and gently pat dry.
- In a small bowl, sprinkle the powdered gelatin over 2 tablespoons of cold water and let stand for 5 minutes to bloom.
- In a small saucepan, heat 200 ml of water with the sugar until the sugar dissolves. Remove from heat.
- Stir the bloomed gelatin into the hot liquid until completely dissolved. Add 2–3 drops of red food coloring if a pale pink color is desired, and let the mixture cool to room temperature, stirring occasionally so it does not set.
- Once the cheesecake is fully chilled and the top is level, carefully arrange the prepared sakura blossoms on the surface.
- Slowly pour the cooled gelatin mixture over the cheesecake, covering the blossoms and forming a thin, even layer.
- Refrigerate for at least 2 more hours, or until the jelly is completely set.
- To serve, run a thin knife around the edge of the pan and gently remove the cheesecake. Slice with a warm, clean knife for neat portions.
Notes
Approximate per 1 slice (1/10 of recipe): 190–220 calories; fat 14 g; saturated fat 8 g; carbohydrates 13 g; fiber 0 g; sugars 11 g; protein 4 g; sodium 130 mg. Values are estimates and will vary based on specific ingredients, brands, and portion sizes.
Leave a Reply