
Apple Hand Pies Recipe tastes like a cozy slice of apple pie you can eat with one hand, perfect for busy people who still want a homemade dessert in about 1 hour. This recipe works well for beginners and seasoned bakers who want something impressive without fuss. I tested these while my kids circled the kitchen like tiny dessert sharks, so you know they pass the real-life test.
Why Make This Apple Hand Pies Recipe at Home
Homemade apple hand pies taste fresher, flakier, and more buttery than anything from a box in the freezer aisle. You control the sweetness, the spice level, and how generous you feel with that apple filling.
You also bake them ahead for parties, lunchboxes, or after-school snacks. They travel well, they freeze well, and they disappear from the plate suspiciously fast.
“These apple hand pies taste like little bakery treats that somehow walked into my kitchen and decided to stay. ★★★★★”
Ingredients You Need
You can use homemade pie dough or store-bought refrigerated pie crusts. I usually keep a box of Pillsbury or Trader Joe’s crusts in the fridge for busy weeks, and they work great here. If you love baking from scratch, your favorite all-butter pie dough fits perfectly.
For the crust
- 2 refrigerated pie crusts, chilled but pliable
- Use store-bought crusts for speed, or swap in homemade pie dough if you want richer flavor.
- 1 large egg (for egg wash)
- 1 tablespoon milk or heavy cream
- 2 tablespoons coarse sugar or regular granulated sugar, for sprinkling
For the apple filling
- 3 medium apples, peeled, cored, and finely chopped
- Use firm apples that hold shape: Honeycrisp, Granny Smith, Pink Lady, or a mix.
- 2 tablespoons unsalted butter
- 1/3 cup brown sugar, packed
- 1 tablespoon granulated sugar
- 1 1/2 teaspoons ground cinnamon
- 1/4 teaspoon ground nutmeg
- 1/8 teaspoon ground cloves (optional, for a warmer flavor)
- 1 teaspoon vanilla extract
- 1 tablespoon lemon juice
- 1 1/2 tablespoons cornstarch
- Pinch of salt
If you run out of brown sugar, use all white sugar and add a tiny splash of molasses if you have it. If you avoid cornstarch, swap in the same amount of all-purpose flour, though the filling turns slightly less glossy.
Optional glaze
- 1/2 cup powdered sugar
- 1–2 tablespoons milk
- 1/4 teaspoon vanilla extract
- Pinch of cinnamon (optional)
Equipment
- Baking sheet
- Parchment paper or silicone baking mat
- Medium skillet or saucepan
- Mixing bowls
- Rolling pin (helpful even with pre-rolled crusts)
- 3 to 4 inch round cutter or a small bowl to trace
- Fork for crimping
- Pastry brush or clean fingertip for egg wash
- Small knife for venting the pies
Tips & Mistakes
- Cut the apples small so they soften quickly and tuck neatly into the dough.
- Chill the assembled pies in the fridge for 10–15 minutes before baking to keep the crust flaky.
- Do not overfill each hand pie or the filling leaks out the sides and burns.
- Seal the edges well with a fork and a little water or egg wash so the pies stay closed.
- Vent the tops with small slits so steam escapes and the crust stays crisp.
- Taste the filling before you cool it and adjust sugar or cinnamon to your preference.
- Use cold dough; warm, soft dough turns sticky and tears easily.
- Line the baking sheet with parchment so any escaped juices clean up easily.
- Let the pies cool slightly before glazing or the glaze slides right off.
- If you use very tart apples like Granny Smith, add an extra teaspoon or two of sugar.
How to Make Apple Hand Pies Recipe
Step 1: Prep the apples
Peel, core, and finely chop the apples into small cubes, about pea to blueberry size. Smaller pieces cook faster and sit more neatly inside the crust. Set them aside while you heat the pan.
Step 2: Cook the filling
Place a medium skillet over medium heat and add the butter. Once the butter melts and foams, stir in the chopped apples, brown sugar, granulated sugar, cinnamon, nutmeg, cloves, salt, and lemon juice. Stir often and cook until the apples soften but still hold shape, about 5 to 7 minutes.
Sprinkle the cornstarch over the apples and stir well to coat. Cook another 1 to 2 minutes until the juices thicken and look glossy. Turn off the heat, stir in the vanilla, and transfer the filling to a bowl to cool to room temperature.
Step 3: Prep the dough and cut circles
Preheat your oven to 400°F (200°C) and line a baking sheet with parchment paper. Unroll the pie crusts on a lightly floured surface. If the dough looks stiff, let it sit a couple of minutes so it softens slightly but still feels cool.
Use a 3 to 4 inch round cutter or a small bowl to cut circles from the dough. Gather scraps, gently press them together, and roll again to cut more circles. Aim for an even number of circles so you can pair them up.
Step 4: Fill the hand pies
Place half of the dough circles on the prepared baking sheet. Spoon 1 to 1 1/2 tablespoons of cooled apple filling into the center of each circle. Leave a small border around the edges so you can seal them.
Lightly brush the edges with water or a bit of egg wash. Top each filled circle with another dough circle. Gently press the edges together with your fingers.
Step 5: Seal and vent
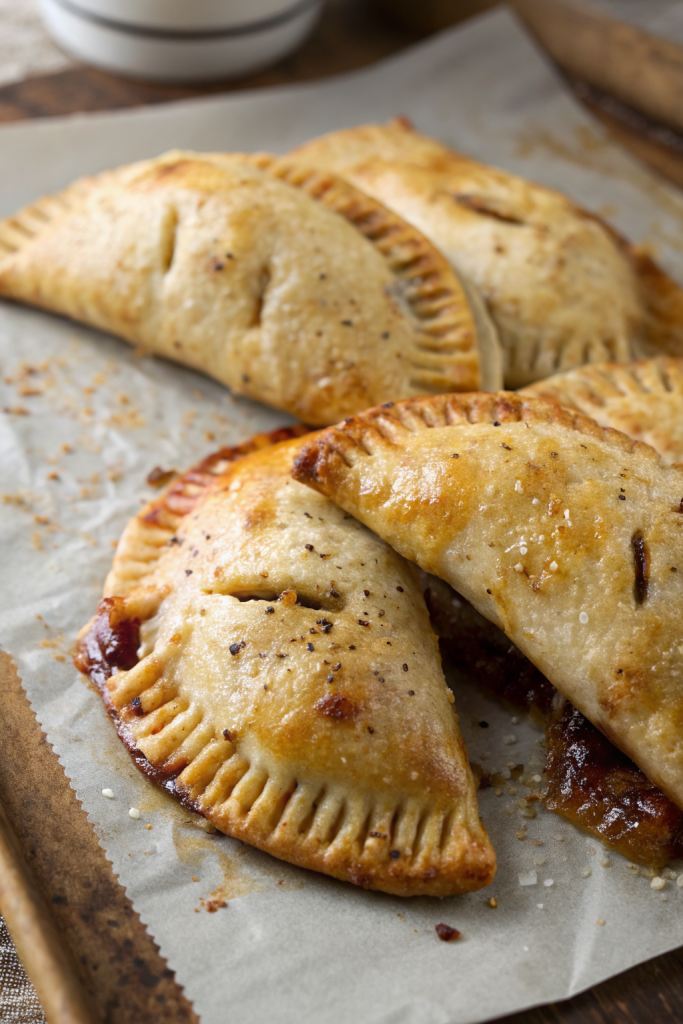
Use a fork to crimp the edges firmly all around each pie. This step keeps the filling inside and gives that classic hand pie look. With a small sharp knife, cut 2 to 3 small slits on top of each pie to let steam escape.
Step 6: Egg wash and sugar
Whisk the egg and milk together in a small bowl. Brush the tops of the pies with the egg wash. Sprinkle with coarse sugar or regular sugar for a little crunch and shine.
Step 7: Bake
Place the baking sheet in the oven and bake for 18 to 22 minutes. The hand pies finish when the crust turns deep golden and you see a little bubbling at the vents. Rotate the pan halfway through baking if your oven heats unevenly.
Let the pies cool on the pan for about 5 minutes, then move them to a wire rack. They taste amazing warm but still hold together better if you give them a few minutes to set.
Step 8: Add optional glaze
While the pies cool slightly, whisk powdered sugar, milk, vanilla, and cinnamon in a small bowl until smooth. Adjust the thickness with a few drops more milk if needed. Drizzle over the warm (not hot) pies and let the glaze set for a few minutes.
Variations I've Tried
I swap half the apples with finely chopped pears for a softer, slightly floral filling. A handful of tiny caramel bits in the filling turns these into caramel apple hand pies that vanish first at parties. I also add a spoonful of cream cheese inside with the apples for a richer, almost cheesecake-style version.
Sometimes I use puff pastry instead of pie dough for a lighter, crispier texture. Around fall holidays, I stir a tablespoon of apple butter into the filling for deeper apple flavor. You can also sprinkle a little coarse cinnamon sugar on top instead of glaze if you want a less sweet finish.
How to Serve Apple Hand Pies Recipe
Serve apple hand pies slightly warm so the filling feels cozy but does not burn your tongue. I like them with a scoop of vanilla ice cream or a spoonful of whipped cream on the side. They also taste great with a mug of hot coffee, tea, or hot chocolate. Pack them in lunchboxes, stack them on a dessert platter, or hand them out as after-dinner treats.
How to store
- Store leftover apple hand pies in an airtight container at room temperature for up to 1 day.
- Keep them in the fridge for 3 to 4 days; reheat in a 325°F oven or toaster oven for 8 to 10 minutes until warm and crisp.
- Freeze baked and cooled hand pies on a baking sheet, then move them to a freezer bag for up to 2 months.
- Reheat frozen pies in a 350°F oven for 15 to 20 minutes until hot in the center; avoid the microwave if you want the crust to stay flaky.

Apple Hand Pies Recipe
Ingredients
Instructions
- In a bowl, whisk together flour, 1 tablespoon granulated sugar, and salt. Cut in the cold butter with a pastry cutter or fingertips until the mixture resembles coarse crumbs.
- Add ice water, 1 tablespoon at a time, mixing just until the dough comes together. Form into a disk, wrap, and chill for at least 30 minutes if time allows.
- In another bowl, combine diced apples, brown sugar, 1 tablespoon granulated sugar, cinnamon, nutmeg (if using), and lemon juice. Stir to coat the apples evenly and set aside.
- Preheat the oven to 400°F (200°C). Line a baking sheet with parchment paper.
- On a lightly floured surface, roll the dough to about 1/8-inch thickness. Cut into 8 equal rectangles or circles.
- Place a spoonful of the apple mixture on one half of each piece of dough, leaving a small border around the edges.
- Brush the edges with a little beaten egg, fold the dough over the filling to enclose it, and press the edges with a fork to seal. Cut a small slit on top of each pie for steam to escape.
- Transfer the hand pies to the prepared baking sheet. Brush tops with remaining beaten egg and sprinkle with coarse sugar if desired.
- Bake for 18–22 minutes, or until the pies are golden brown and the filling is bubbling slightly.
- Let the hand pies cool on a wire rack for a few minutes before serving. Serve warm or at room temperature.
Notes
Approximate per 1 hand pie (1 of 8): 260 calories; fat 15 g; saturated fat 9 g; carbohydrates 30 g; fiber 2 g; sugars 10 g; protein 3 g; sodium 170 mg. Values will vary based on brands, exact apple size, and portion size.
Leave a Reply