

Caramel Apple Dessert Cups Recipe tastes like a caramel apple from the fair dressed up as a creamy, crunchy parfait. This small-batch dessert works well for busy families, holiday parties, or anyone who wants a cozy fall treat in under 40 minutes. I tested this version on my neighbors, and they now “forget” their leftovers at my house on purpose.
Why Choose This Caramel Apple Dessert Cups Recipe
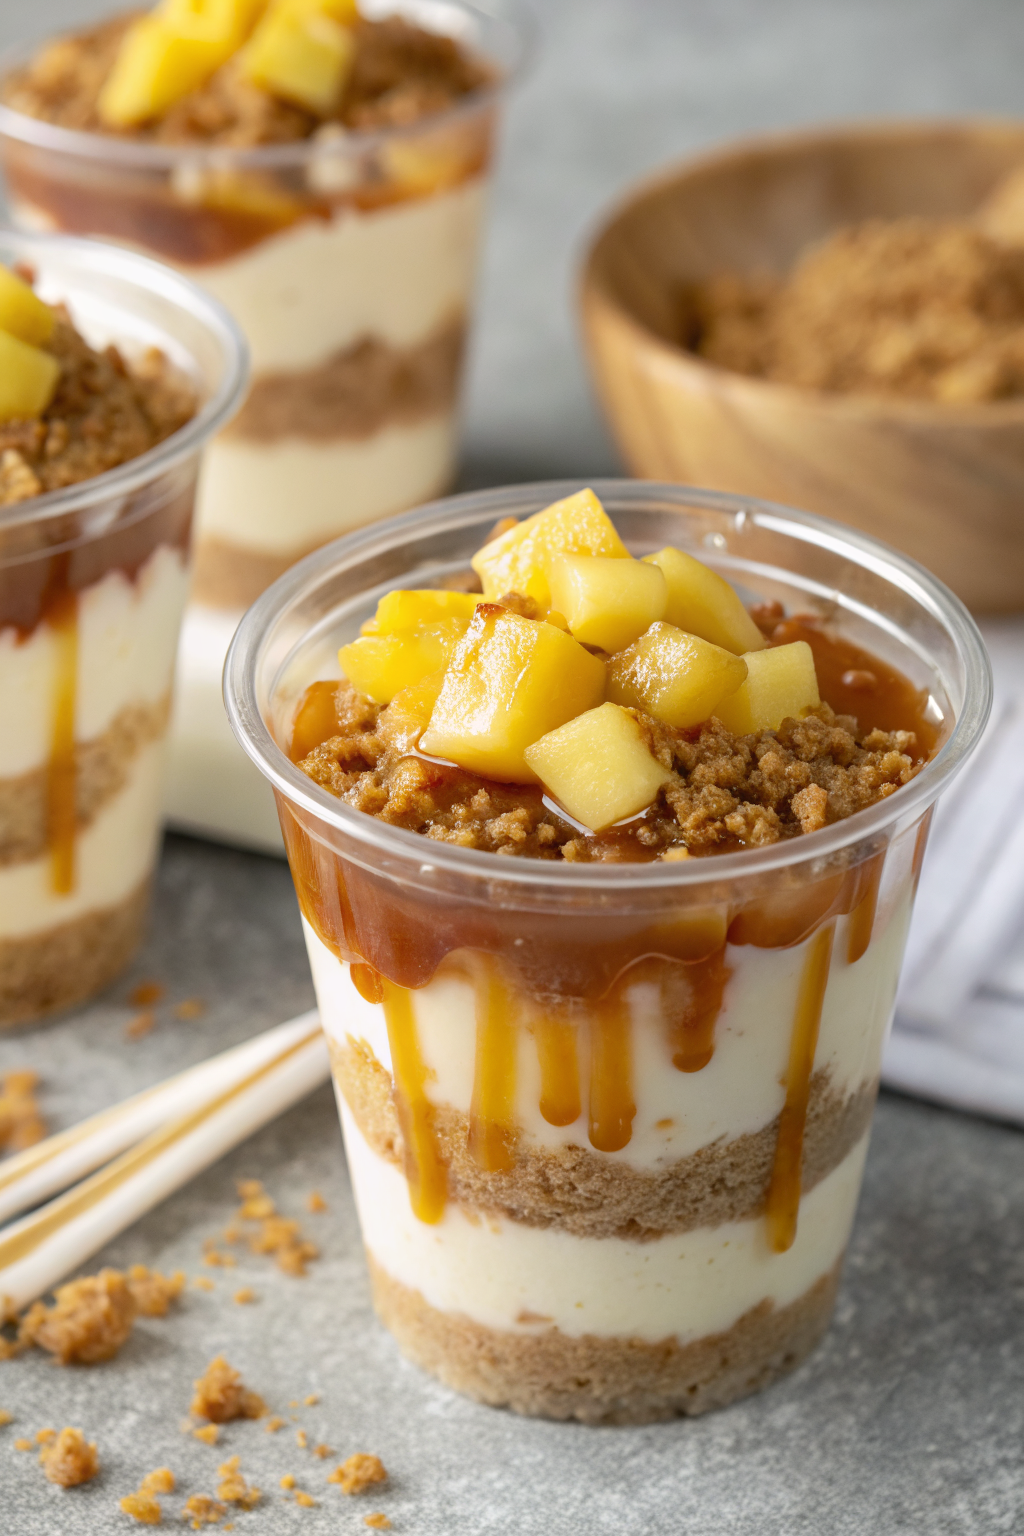
This Caramel Apple Dessert Cups Recipe layers buttery cookie crumbs, cinnamon apples, and silky caramel pudding in a way that feels fancy but stays weeknight easy. You cook the apples in one pan, whisk the pudding in one bowl, and then stack everything in cups so it looks like you spent way more time than you did.
The recipe uses store-bought caramel sauce and instant pudding, so you skip fussy candy thermometers and long stovetop stirring. You also portion everything into individual cups, which keeps serving simple and helps everyone feel like they scored their own personal dessert.
“These Caramel Apple Dessert Cups taste like fall in a glass and disappear from the dessert table in minutes. ★★★★★”
Ingredients You’ll Need
For the apple layer
- 3 medium apples, peeled, cored, and diced small
- Use firm apples like Granny Smith, Honeycrisp, or Pink Lady so they hold their shape.
- 2 tablespoons unsalted butter
- 3 tablespoons brown sugar, packed
- 1 teaspoon ground cinnamon
- 1 tablespoon lemon juice
- Pinch of salt
- Optional: 1 teaspoon cornstarch mixed with 1 tablespoon water for a thicker, saucier apple layer
For the caramel pudding layer
- 1 box (3.4 ounces) instant vanilla pudding mix
- Any major brand works well; I usually grab Jell-O or store brand.
- 1 3/4 cups cold whole milk
- Use 2% if you prefer; avoid skim since it tastes thin.
- 1/3 cup thick caramel sauce
- Use jarred ice cream topping to save time; choose a thicker style so the pudding sets nicely.
- 1/2 teaspoon vanilla extract
- Pinch of salt to balance the sweetness
For the cookie crumb base
- 1 1/2 cups crushed graham crackers or shortbread cookies
- Use pre-crushed graham crumbs as a shortcut if you like.
- 4 tablespoons unsalted butter, melted
- 2 tablespoons brown sugar
- Pinch of salt
For topping
- 1 1/2 cups heavy whipping cream, cold
- 2 tablespoons powdered sugar
- 1/2 teaspoon vanilla extract
- Extra caramel sauce for drizzling
- Extra cookie crumbs or chopped toasted pecans for garnish
Equipment
- Medium skillet for the apples
- Mixing bowls (at least two)
- Whisk
- Rubber spatula
- Measuring cups and spoons
- Small glasses, jars, or dessert cups (6 to 8 cups, about 6 to 8 ounces each)
- Electric hand mixer or stand mixer for whipped cream
- Small saucepan if you want to gently warm caramel for drizzling
Tips & Tricks
- Dice the apples small so they cook quickly and fit nicely into the dessert cups.
- Chill the pudding layer at least 10 minutes so it thickens and holds distinct layers.
- Use very cold cream and a chilled bowl to whip the topping faster and get better volume.
- Crush cookies in a zip-top bag with a rolling pin if you do not want to pull out a food processor.
- Taste the caramel pudding before layering and add a pinch more salt if it tastes too sweet.
- Layer in clear glasses or jars so everyone can see the caramel apple dessert layers.
- Build the cups just before serving if you want maximum crunch from the cookie base.
- Use gluten-free cookies and pudding mix if you need a gluten-free Caramel Apple Dessert Cups Recipe.
How to Make Caramel Apple Dessert Cups Recipe
Step 1: Cook the apple filling
Add butter to a medium skillet over medium heat and let it melt. Stir in the diced apples, brown sugar, cinnamon, lemon juice, and salt. Cook while you stir often until the apples turn tender but not mushy, about 6 to 8 minutes.
If you want a thicker, saucier texture, stir in the cornstarch slurry and cook 1 to 2 more minutes until the juices look glossy and cling to the apples. Take the skillet off the heat and let the apples cool to room temperature while you prep the other layers.
Step 2: Mix the caramel pudding
In a mixing bowl, whisk the cold milk and instant vanilla pudding mix until it thickens, about 2 minutes. Add the caramel sauce, vanilla extract, and a pinch of salt, then whisk again until smooth and fully combined. Taste and adjust the salt if needed so the caramel flavor tastes rich and balanced, not cloying.
Cover the bowl and place it in the fridge for at least 10 minutes while you handle the cookie base. The pudding will thicken more as it chills, which helps it layer cleanly.
Step 3: Prepare the cookie crumb base
In another bowl, combine the crushed graham crackers or shortbread crumbs, brown sugar, and salt. Pour in the melted butter and stir until the mixture looks like damp sand and holds together when you pinch it. If it looks too dry, add another teaspoon of melted butter; if it feels too wet, stir in a spoonful of extra crumbs.
Spoon 2 to 3 tablespoons of the crumb mixture into the bottom of each dessert cup and press gently with the back of a spoon. You can keep the layer loose and crumbly or press it firmly if you want more of a crust texture.
Step 4: Whip the cream topping
Pour the cold heavy cream into a chilled bowl. Add powdered sugar and vanilla extract. Beat with an electric mixer on medium-high speed until soft to medium peaks form and the cream looks thick and fluffy.
Do not overbeat or the cream will turn grainy. Keep the whipped cream in the fridge until you assemble the Caramel Apple Dessert Cups.
Step 5: Assemble the dessert cups
Give the chilled caramel pudding a quick whisk to smooth it out. Add a layer of caramel pudding over the cookie crumbs in each cup, using about 1/4 cup per serving. Spoon a generous layer of cooled cinnamon apples over the pudding.
Repeat with another thin layer of crumbs and another layer of caramel pudding if your cups have enough height. Finish with a big dollop or swirl of whipped cream on top of each dessert cup.
Step 6: Garnish and chill
Drizzle extra caramel sauce over the whipped cream. Sprinkle with extra cookie crumbs or chopped toasted pecans for crunch. You can serve the Caramel Apple Dessert Cups right away or chill them for 30 to 60 minutes if you want the layers to set a bit more.
If you chill longer than an hour, keep the whipped cream and garnishes separate and add them just before serving so the topping stays fluffy. Serve the cups cold with small spoons so everyone can dig through all the layers.
What to Serve with Caramel Apple Dessert Cups Recipe
Serve this Caramel Apple Dessert Cups Recipe after a cozy dinner like roasted chicken, pork chops, or a big pot of chili to keep the comfort food theme going. Pair the cups with hot drinks such as apple cider, hot chocolate, or a cinnamon-spiced herbal tea. Kids love them with cold milk, and adults often enjoy them with a strong cup of coffee.
If you host a fall party, set up a dessert bar with these cups, simple sugar cookies, and a fruit tray so guests can choose something lighter or sweeter. The individual servings also travel well to potlucks and family gatherings.
Storage Options
- Store assembled Caramel Apple Dessert Cups in the fridge, covered, for up to 2 days for best texture.
- Keep the cookie crumbs, apples, pudding, and whipped cream in separate containers in the fridge for up to 3 days if you want the crunchiest layers.
- Freeze only the apple layer and cookie crumbs for up to 2 months; thaw in the fridge before using and make fresh pudding and whipped cream.
- Chill leftovers and enjoy them cold; if the apples feel too firm from the fridge, warm just the apple portion briefly in the microwave, cool slightly, then layer again with fresh whipped cream.
Caramel Apple Dessert Cups Recipe
Ingredients
Instructions
- Melt the butter in a medium skillet over medium heat. Add the diced apples, brown sugar, cinnamon, lemon juice, and a pinch of salt.
- Cook, stirring often, until the apples are tender but not mushy, about 6 to 8 minutes.
- If you want a thicker, saucier texture, stir in the cornstarch slurry and cook 1 to 2 minutes more until the juices look glossy and cling to the apples.
- Remove from the heat and let the apples cool to room temperature while you prepare the other layers.
- In a mixing bowl, whisk the cold milk and instant vanilla pudding mix until it thickens, about 2 minutes.
- Whisk in the caramel sauce, vanilla extract, and a pinch of salt until smooth and fully combined. Taste and add a tiny bit more salt if the pudding tastes too sweet.
- Cover and refrigerate for at least 10 minutes so the pudding can thicken for clean layers.
- In another bowl, combine the crushed graham crackers or shortbread crumbs, brown sugar, and a pinch of salt.
- Pour in the melted butter and stir until the mixture looks like damp sand and holds together when pinched. Adjust with a little more butter or crumbs if needed.
- Spoon 2 to 3 tablespoons of the crumb mixture into the bottom of each dessert cup and press gently with the back of a spoon to form a loose base or firmer crust, as you prefer.
- Add the cold heavy cream to a chilled bowl. Add the powdered sugar and vanilla extract.
- Beat with an electric mixer on medium-high speed until soft to medium peaks form and the cream is thick and fluffy. Do not overbeat.
- Refrigerate the whipped cream until you are ready to assemble the dessert cups.
- Whisk the chilled caramel pudding briefly to smooth it out.
- Spoon about 1/4 cup of caramel pudding over the cookie crumbs in each cup.
- Add a generous layer of cooled cinnamon apples over the pudding.
- If your cups are tall enough, repeat with another thin layer of crumbs and another layer of caramel pudding.
- Finish each cup with a big dollop or swirl of whipped cream on top.
- Drizzle extra caramel sauce over the whipped cream and sprinkle with extra cookie crumbs or chopped toasted pecans for crunch.
- Serve immediately, or chill the assembled cups for 30 to 60 minutes if you want the layers to set more firmly.
Notes
Approximate per serving (1 of 6): 430 calories; fat 26 g; saturated fat 16 g; carbohydrates 47 g; fiber 2 g; sugars 34 g; protein 5 g; sodium 320 mg. Values are estimates and will vary based on exact ingredients, brands, and portion sizes.
Leave a Reply