
Chili Cheese Fries Recipe hits every comfort food craving at once: crispy fries, rich meaty chili, and a gooey blanket of melted cheese. It works for game day, movie night, or a random Tuesday when you want dinner in about 45–60 minutes and don’t feel fancy at all. I first tested this version for a football party, and my friends stopped talking completely for five minutes, which counts as a rave review in my book.
Why You Should Try This Chili Cheese Fries Recipe
This Chili Cheese Fries Recipe gives you a full meal on a sheet pan: carbs, protein, and plenty of flavor. The fries stay crisp under the chili, and the cheese pulls into those perfect strings with every bite. You get smoky, spicy, cheesy, and salty in one forkful.
This recipe works for beginners and experienced cooks. You use simple ingredients, mostly pantry staples, and you cook everything in a few basic pans. You also customize the heat level so kids and spice-lovers both stay happy.
You also prep parts of it ahead of time, which saves your sanity on busy nights. The chili tastes even better the next day, and you reheat it while the fries bake. That timing makes this feel easy even when you feel tired.
“These chili cheese fries disappeared faster than the wings at our game night. The fries stayed crisp, the chili tasted rich and hearty, and the cheese pulled like a diner-style plate. My family already asked for this recipe again next weekend.”
Ingredients You’ll Need
For the fries
- 1 to 1½ pounds frozen French fries, crinkle-cut or steak fries
- Frozen fries give consistent crispiness and save time. I like Ore-Ida or Alexia, but any brand with “extra crispy” on the bag works well.
- 1 to 2 tablespoons neutral oil (only if your fries do not already contain oil)
- ½ teaspoon kosher salt
- ½ teaspoon smoked paprika or regular paprika
- ¼ teaspoon black pepper
You can also use fresh potatoes if you feel ambitious: cut 3 large russet potatoes into fries, soak in cold water, dry well, toss with oil and seasonings, and bake until crisp. Frozen fries still win on busy nights.
For the chili
- 1 tablespoon olive oil or neutral oil
- 1 pound ground beef (80–90 percent lean)
- You can swap half or all of the beef with ground turkey or plant-based crumbles.
- 1 small onion, finely diced
- 1 small green bell pepper, finely diced
- 1 jalapeño, minced (seeded for mild heat)
- 3 cloves garlic, minced
- 2 tablespoons tomato paste
- 1 can (14.5 ounces) diced tomatoes, undrained
- 1 can (15 ounces) tomato sauce
- 1 can (15 ounces) kidney beans or pinto beans, drained and rinsed
- 1 cup beef broth or chicken broth
- 1½ to 2 tablespoons chili powder
- 1 teaspoon ground cumin
- ½ teaspoon smoked paprika
- ½ teaspoon dried oregano
- ½ teaspoon kosher salt, plus more to taste
- ¼ teaspoon black pepper
- ¼ teaspoon cayenne pepper (optional, for extra heat)
- 1 teaspoon brown sugar (balances the acidity)
If you use a canned chili shortcut, pick a brand you already like and doctor it with extra chili powder, cumin, and a splash of broth. Let it simmer until it thickens, since you want a spoonable but not soupy chili.
For the cheese and toppings
- 2 to 3 cups shredded cheddar cheese, Monterey Jack, or a blend
- I recommend shredding from a block, since bagged shreds contain starch that affects melting.
- ¼ cup sour cream or plain Greek yogurt
- 2 to 3 green onions, thinly sliced
- ¼ cup pickled jalapeño slices
- ¼ cup diced red onion
- ¼ cup chopped fresh cilantro or parsley
- Hot sauce, to taste
You can also add diced avocado, salsa, or a drizzle of queso if you feel extra.
Equipment
- Large sheet pan for baking the fries
- Large skillet or Dutch oven for the chili
- Cutting board and sharp knife
- Wooden spoon or spatula
- Measuring cups and spoons
- Cheese grater
- Serving platter or you can serve directly from the sheet pan for a casual vibe
Tips & Tricks
This Chili Cheese Fries Recipe turns out best when you treat each layer with a little care.
- Bake the fries on a preheated sheet pan so they crisp up faster and stay crunchy under the chili.
- Spread fries in a single layer and avoid crowding so they roast instead of steam.
- Season the fries right when they come out of the oven so the salt and spices stick.
- Let the chili simmer until it thickens; a thicker chili clings to the fries and avoids soggy spots.
- Taste the chili near the end and adjust salt, chili powder, and cayenne so the flavor pops.
- Shred your own cheese from a block for the smoothest melt and best flavor.
- Layer fries, then a little cheese, then chili, then more cheese so every bite gets everything.
- Broil the assembled fries for 1 to 3 minutes to melt and brown the cheese slightly, but watch closely so it does not burn.
- Serve toppings on the side if you cook for picky eaters, so everyone builds their own plate.
- For a lighter version, use baked sweet potato fries, turkey chili, and Greek yogurt instead of sour cream.
How to Make Chili Cheese Fries Recipe
Step 1: Sauté veggies and aromatics
Heat oil in a large stock pot or Dutch oven over medium heat. Once hot, add onions and carrots; cook until soft, about 8 minutes. Stir in garlic, ginger, harissa, coriander, and turmeric; cook 2 minutes, until aromatic. Season with salt.
Step 2: Cook the meat
Heat 1 tablespoon oil in a large skillet or Dutch oven over medium-high heat. Add the ground beef and break it up with a wooden spoon into small crumbles. Cook until the meat browns and no pink remains, about 6 to 8 minutes, and drain excess fat if the pan looks very greasy.
Sprinkle in a pinch of salt and pepper while the meat cooks so the flavor builds from the start. If you use turkey or plant-based crumbles, cook until the pieces brown and pick up some color. Browning adds a lot of flavor to the final chili.
Step 3: Add veggies and aromatics
Add the diced onion, bell pepper, and jalapeño to the skillet with the cooked meat. Stir and cook over medium heat until the vegetables soften and the onion turns translucent, about 5 to 7 minutes. Add the minced garlic and cook 1 minute more, until it smells fragrant.
Stir in the tomato paste and cook it for 1 to 2 minutes, stirring often. This step lets the tomato paste caramelize slightly and deepens the flavor. Scrape the bottom of the pan as you stir so nothing sticks.
Step 4: Build and simmer the chili
Add the diced tomatoes with their juices, tomato sauce, beans, and broth to the skillet. Stir in the chili powder, cumin, smoked paprika, oregano, salt, black pepper, cayenne, and brown sugar. Mix everything well so the spices distribute evenly.
Bring the chili to a gentle boil, then lower the heat to medium-low. Let it simmer uncovered for 20 to 30 minutes, stirring occasionally, until it thickens to a hearty, spoonable consistency. Taste and adjust seasoning with more salt, chili powder, or cayenne as needed.
If the chili thickens too much, add a splash of broth or water. If it looks too thin, keep simmering until it reduces. You want a thick chili that sits on top of the fries instead of running off.
Step 5: Bake the fries
While the chili simmers, preheat your oven according to the directions on your bag of frozen fries, usually around 425°F. Place a large sheet pan in the oven while it heats so the pan gets hot. Toss the frozen fries with a little oil if needed, smoked paprika, salt, and pepper.
Spread the fries on the hot sheet pan in a single layer. Bake according to package directions, usually 20 to 25 minutes, flipping once halfway through. Bake until the fries turn golden and crisp, since they will soften slightly under the chili and cheese.
If you use an air fryer, cook the fries in batches at 375°F until crisp, then assemble everything on a sheet pan for the final cheese melt. Keep cooked fries in a warm oven while you finish the rest. Aim for fries that feel firm and crunchy at the edges.
Step 6: Assemble the chili cheese fries
When the fries finish baking, keep the oven at 400°F. Pile the hot fries into a slightly mounded layer on the sheet pan or transfer them to an oven-safe serving dish. Sprinkle about one-third of the shredded cheese over the fries.
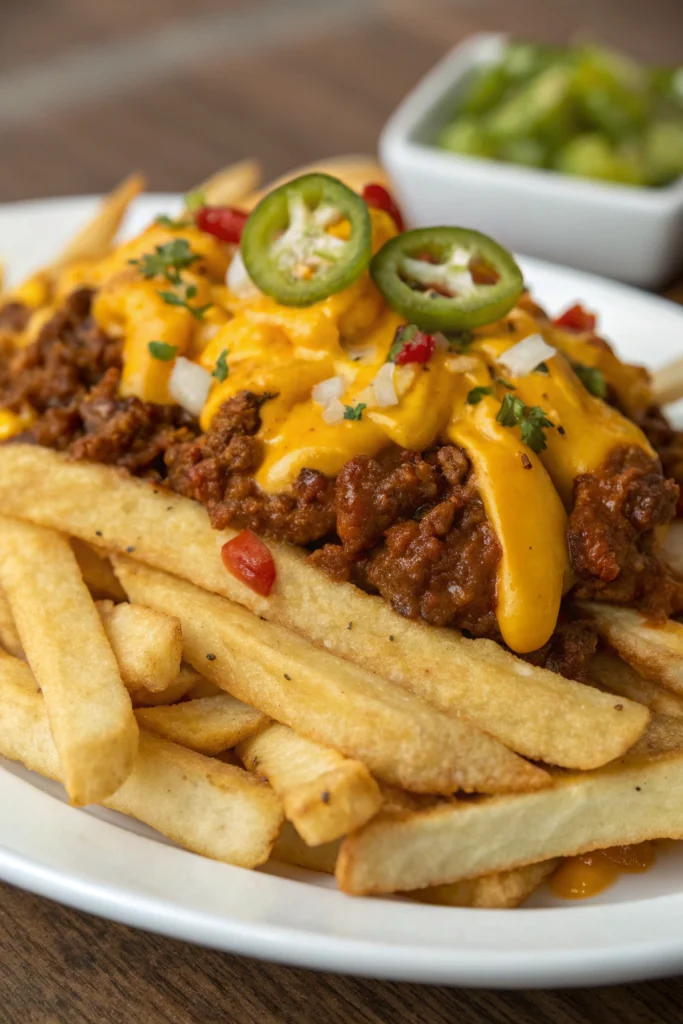
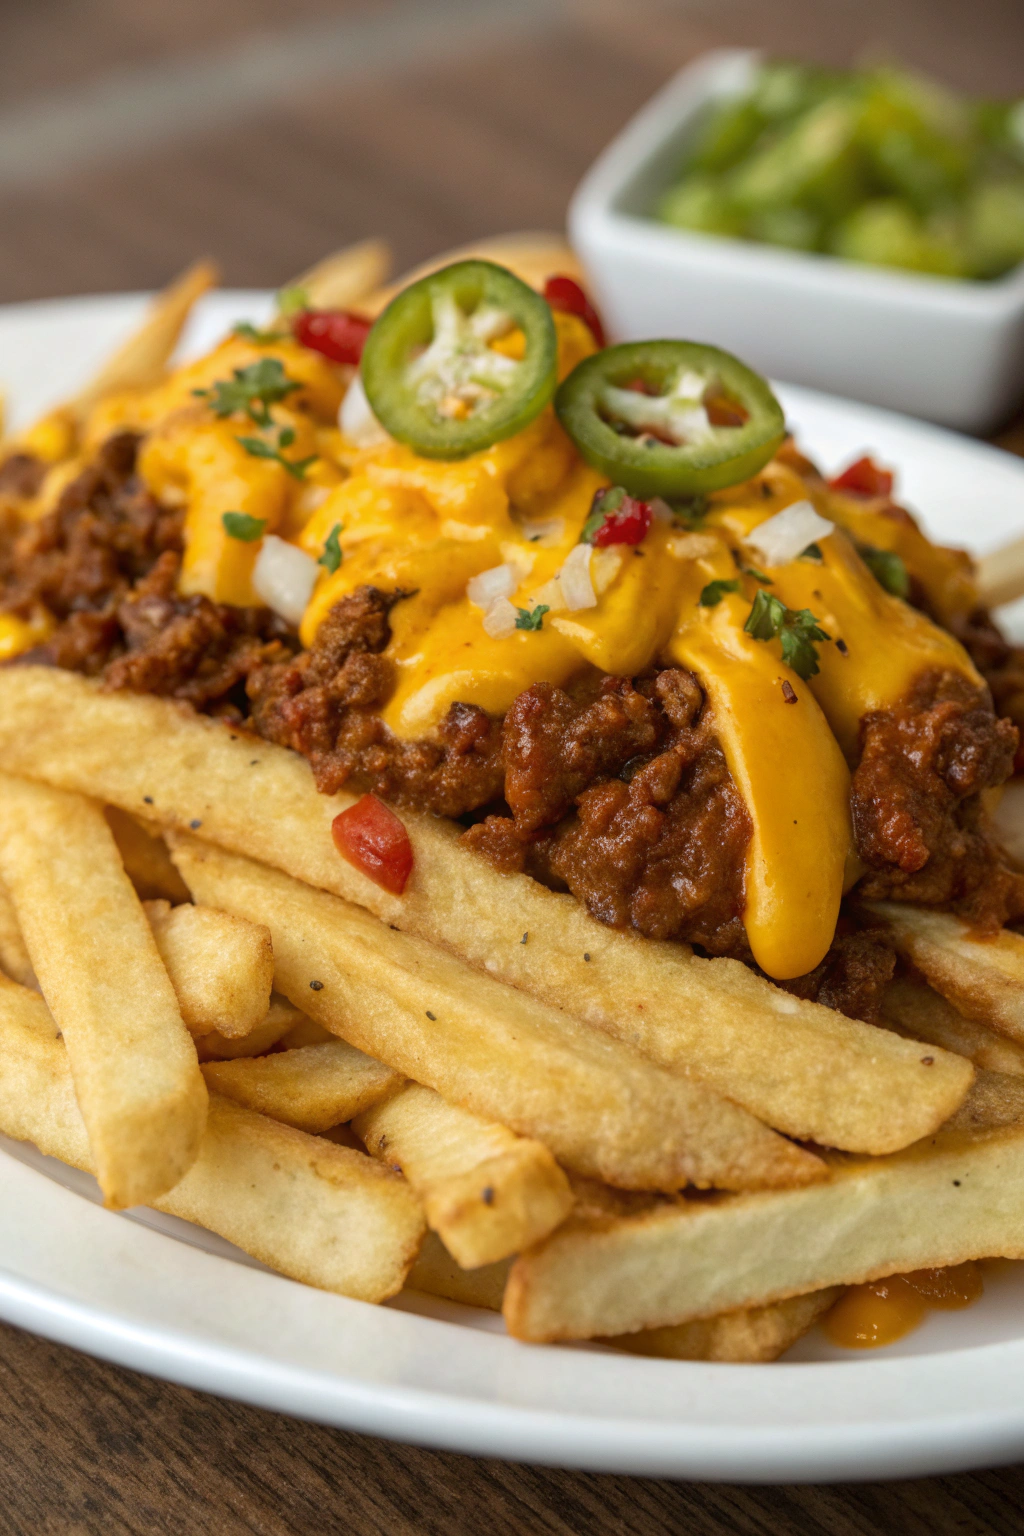
Ladle a generous layer of hot chili over the fries, covering most of the surface but leaving some fries peeking out. Top with the remaining cheese, spreading it evenly to cover the chili. You want cheese in every corner so no one fights over the “good” section.
Step 7: Melt the cheese
Place the pan back in the oven at 400°F for 5 to 7 minutes, until the cheese melts and looks bubbly. For extra browning, switch the oven to broil for 1 to 3 minutes, watching closely so the cheese does not burn. Pull the pan out when the cheese looks fully melted with a few golden spots.
Let the chili cheese fries sit for 3 to 5 minutes so everything settles slightly. This short rest helps the chili thicken again and keeps the fries from sliding all over when you serve. Use that time to prep toppings.
Step 8: Add toppings and serve
Scatter green onions, diced red onion, pickled jalapeños, and chopped cilantro over the top. Add small dollops of sour cream or Greek yogurt, or serve it on the side. Drizzle with hot sauce if you like extra heat.
Serve the Chili Cheese Fries Recipe straight from the pan for a casual feel, or transfer portions to plates or shallow bowls. Make sure each serving gets fries, plenty of chili, and a generous amount of cheese and toppings. Watch them vanish.
What to Serve with Chili Cheese Fries Recipe
This Chili Cheese Fries Recipe already feels hearty, so I like to pair it with something fresh and crunchy. A simple green salad with a tangy vinaigrette cuts through the richness. You can also serve sliced cucumbers, carrot sticks, or a basic coleslaw for a cool contrast.
For a kid-friendly spread, add a platter of fresh fruit like grapes, apple slices, or orange wedges. If you host a game day, round things out with chips and salsa or a veggie tray with ranch, and you have a full snack table without much extra work.
Storage Options
- Store leftover chili separately from the fries when possible; keep chili in an airtight container in the fridge for up to 4 days.
- Keep leftover fries and assembled chili cheese fries in a separate container in the fridge for up to 2 days, knowing the fries soften.
- Freeze extra chili (without fries) in freezer-safe containers or bags for up to 3 months; label with the date.
- Reheat chili on the stovetop over medium heat with a splash of water or broth, or in the microwave in short bursts, stirring often.
- Reheat fries or assembled leftovers in a 375°F oven or air fryer until hot and as crisp as possible; avoid the microwave for fries since it makes them soft.
Chili Cheese Fries Recipe
Ingredients
Instructions
- Preheat the oven according to the package directions for the frozen French fries.
- Spread the fries on a baking sheet, drizzle with vegetable oil, and toss to coat lightly. Sprinkle with salt.
- Bake the fries until golden and crispy, following package directions, turning once halfway through for even browning.
- While the fries bake, heat a large skillet over medium heat. Add the ground beef and cook, breaking it apart, until browned and no longer pink. Drain excess fat if needed.
- Add the chopped onion and minced garlic to the skillet and cook for 3–4 minutes until softened.
- Stir in chili powder, cumin, paprika, salt, and black pepper. Cook for 1 minute to toast the spices.
- Add tomato sauce, beef broth, and tomato paste. Stir well and bring to a simmer.
- Reduce heat to low and simmer for 10–15 minutes, stirring occasionally, until slightly thickened and flavorful. Adjust seasoning to taste.
- Once the fries are crispy, transfer them to an oven-safe serving dish or baking pan.
- Spoon a generous amount of hot chili evenly over the fries.
- Sprinkle shredded cheddar cheese over the top.
- Return the dish to the oven for 3–5 minutes, just until the cheese is melted and bubbly.
- Remove from the oven and top with sour cream, green onions, and jalapeños if desired.
- Serve immediately while hot and enjoy your Chili Cheese Fries.
Notes
Approximate per serving (1/4 of recipe): 720 calories; fat 43 g; saturated fat 18 g; carbohydrates 53 g; fiber 5 g; sugars 5 g; protein 30 g; sodium 1180 mg. Values are estimates and will vary based on exact products, add-ins, and portion size.
Leave a Reply