
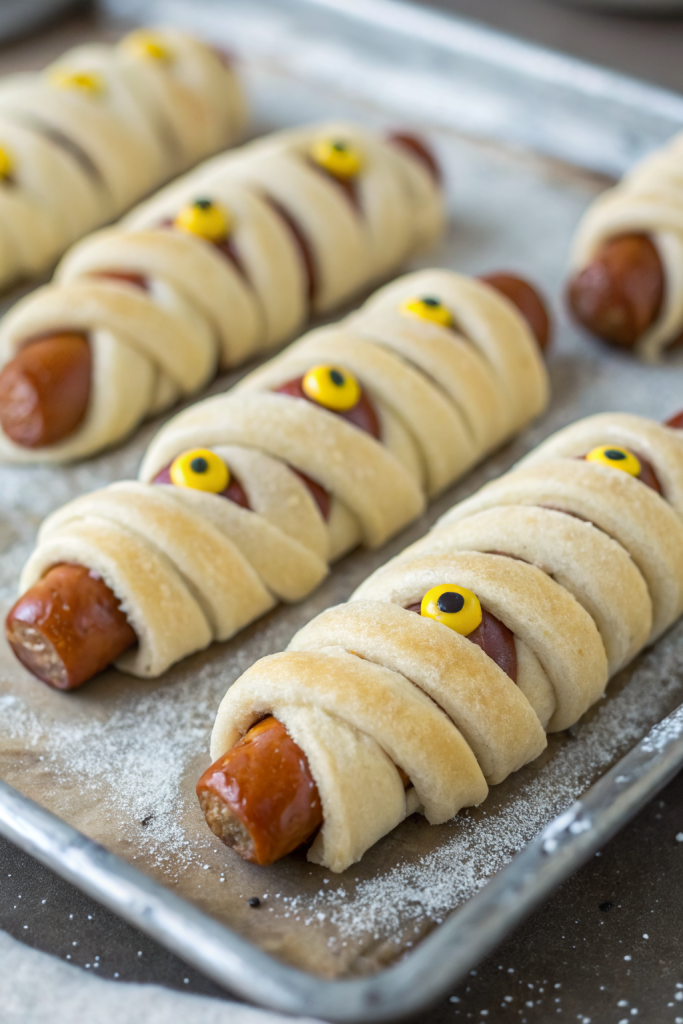
Halloween Snacks for Kids Parties taste sweet, salty, crunchy, and just spooky enough to thrill kids without scaring the littles, and you can pull everything together in about 60 to 90 minutes. This spread works best for busy parents who want fun Halloween party food without complicated baking projects or specialty tools. I still find orange and black sprinkles in my kitchen drawers every November, so you are in good company here.
Why Make This Halloween Snacks for Kids Parties at Home
Homemade Halloween snacks for kids parties let you control sugar, food dyes, and allergy concerns while still keeping everything fun and colorful. You skip the mystery ingredients and build a table full of treats that actually taste good, not just look cute in photos.
You also save money when you assemble snacks at home instead of buying themed packaged treats. Kids love the hands-on, slightly messy look, and you can involve them in decorating without stressing over perfection.
My kids and their friends devoured every single spooky snack, and parents kept asking for the “recipe list” for their own parties ★★★★★
Ingredients You Need
Here is a flexible list that covers a full Halloween snacks for kids parties spread. You do not need every single item, but mixing sweet, salty, and fresh options keeps everyone happy.
Base snacks
- Mini pretzels
- Popcorn (plain or lightly salted; microwave bags work great)
- Tortilla chips (triangle chips look like little witch hats with the right dip)
- Graham crackers or plain tea biscuits
- Mini rice cakes or rice crackers
- Vanilla and chocolate sandwich cookies
Fruits and veggies
- Bananas (for “ghost” pops)
- Green and red apples (for “monster” mouths)
- Seedless grapes (for “eyeballs” or “monster eggs”)
- Baby carrots
- Cucumber slices
- Cherry tomatoes
- Celery sticks
Proteins and dairy
- String cheese sticks (for “witch brooms”)
- Mozzarella pearls or mini fresh mozzarella balls
- Cream cheese (block or tub)
- Peanut butter or sunflower seed butter (for nut-free parties)
- Hummus (store bought works perfectly)
- Yogurt (vanilla or strawberry for dipping fruit)
Candy and decorations
- Mini chocolate chips
- Candy eyes (Wilton or store brand)
- Mini marshmallows
- Regular marshmallows
- Gummy worms
- Gummy bears
- Candy corn
- Chocolate chips or chocolate melting wafers
- White chocolate chips or white candy melts
- Halloween sprinkles (orange, black, purple, green)
Sauces and spreads
- Chocolate syrup or fudge sauce
- Caramel sauce (store bought saves time)
- Strawberry or raspberry jam (great for “bloody” effects)
- Pizza sauce or marinara
- Ranch dressing
- Salsa
- Guacamole
Pantry shortcuts and brand notes
- Use pre-popped bagged popcorn if you want zero stovetop time.
- Buy pre-cut veggie trays and just add spooky labels like “witch fingers” or “ogre toes.”
- Store brand sandwich cookies, pretzels, and chips work just as well as name brands once you decorate them.
- Shelf-stable caramel dip and chocolate syrup keep well and handle quick drizzling.
Equipment list
- Baking sheets lined with parchment paper
- Microwave safe bowls for melting chocolate
- Small bowls or ramekins for toppings
- Plastic or disposable gloves if kids help with food shaping
- Toothpicks and lollipop sticks
- Small zip-top bags or piping bags
- Sharp knife and cutting board
- Serving platters and a big tray or board for the snack spread
Tips & Mistakes
-
Use parchment paper so chocolate covered snacks lift easily and do not stick.
-
Dry fruit pieces well before dipping in chocolate so the coating sticks and does not slide off.
-
Keep candy eyes and sprinkles nearby and open, because melted chocolate sets quickly.
-
Avoid super dark food coloring in frosting for young kids, since it can stain clothes and tiny faces.
-
Offer at least one nut-free snack and label it clearly to keep allergy parents calm.
-
Cut grapes and cherry tomatoes in half for toddlers so you reduce choking risk.
-
Do not overload the table with only sugar; mix in popcorn, pretzels, and veggies for balance.
-
Prep messy chocolate items early so they have time to set before kids arrive.
-
Use disposable tablecloths and paper liners so cleanup stays easy after the party stampede.
-
Keep hot items like mini pizzas or mummy dogs on a warm tray so they stay tasty, not rubbery.
-
Avoid overly hard candies for younger kids, since costumes and masks already make chewing tricky.
-
Label foods with fun names like “monster teeth” or “witch broomsticks” so kids feel excited to try them.
How to Make Halloween Snacks for Kids Parties
You can mix and match these ideas to build one big Halloween snacks for kids parties board. I will walk through several easy, high-impact snacks step by step.
Banana ghost pops
- Peel bananas and slice each one in half crosswise.
- Insert a lollipop stick or popsicle stick into the cut end of each piece.
- Melt white chocolate or white candy melts in a microwave safe bowl in 20 second bursts, stirring between each.
- Dip each banana piece into the melted coating and place it on parchment paper.
- Press two mini chocolate chips or candy eyes near the top for eyes and one for a mouth.
- Chill in the fridge for 20 to 30 minutes until the coating firms up.
Apple monster mouths
- Slice apples into thick wedges and pat them dry with a paper towel.
- Spread peanut butter or sunflower seed butter on one side of each wedge.
- Press mini marshmallows along the edge of one wedge to look like teeth.
- Top with another wedge, nut butter side down, to form a mouth that shows the marshmallow teeth.
- Add a little jam at one corner if kids want a “bloody” monster smile.
Witch broomsticks with cheese
- Cut string cheese sticks into thirds.
- Use a small knife to slice thin cuts up one end of each piece so it looks like broom bristles.
- Insert a thin pretzel stick into the uncut end of each cheese piece.
- Stand them upright on a platter or lay them flat with a little cup of ranch dressing nearby.
Mummy hot dogs or veggie dogs
- Preheat the oven according to the crescent roll dough package.
- Wrap hot dogs or veggie dogs with thin strips of crescent dough, leaving small gaps for “eyes.”
- Place on a parchment lined baking sheet and bake until the dough turns golden and puffy.
- Cool slightly, then dot on mustard or ketchup eyes using a toothpick.
Spooky popcorn mix
- Pop popcorn or open a bag of pre-popped popcorn and pour it into a large bowl.
- Toss in mini pretzels, candy corn, and a handful of mini marshmallows.
- Melt chocolate chips and drizzle over the mix while you toss gently with a spatula.
- Sprinkle Halloween sprinkles on top and let the chocolate set on parchment paper.
- Break into clusters and serve in cups or small bowls.
Monster eye grape skewers
- Thread grapes onto short skewers or toothpicks.
- Mix a spoonful of cream cheese with a little yogurt to thin it slightly.
- Dot a small circle of the mixture on each grape and press a mini chocolate chip in the center to look like an eye.
- Chill until the topping firms up slightly.
Graveyard dip platter
- Spread refried beans or hummus in a shallow dish as the base.
- Add a layer of guacamole or salsa on top.
- Sprinkle shredded cheese around the edges.
- Stand tortilla chips upright in the dip and write “RIP” on a few with sour cream in a zip-top bag with the corner snipped.
- Add sliced olives and cherry tomato halves as “creepy” decorations.
Cookie spider bites
- Place sandwich cookies on a tray.
- Cut thin strips of licorice or fruit leather to use as legs.
- Gently open each cookie, press four “legs” on each side into the frosting, then close the cookie.
- Use a tiny bit of melted chocolate or frosting to attach candy eyes on top.
Variations I've Tried
I sometimes swap banana ghost pops for yogurt covered frozen banana bites when kids want something colder. You just dip banana slices in yogurt, roll them in granola or crushed cereal, and freeze them on a tray.
I also use mini English muffins or bagels to make “monster pizzas” with olive eyes and pepper strips as mouths. Kids love decorating their own, and it keeps them busy for a while.
If a party needs more protein, I add “jack o’ lantern” quesadillas by cutting faces into one tortilla, topping another with cheese and beans, then cooking them together in a skillet. The cheese melts through the cutouts and looks like glowing faces.
For a no-bake option, I mix cereal, pretzels, and mini marshmallows with melted white chocolate and press it into a pan, then cut it into bars and add candy eyes on top. It tastes like a Halloween snack mix in bar form and travels well.
How to Serve Halloween Snacks for Kids Parties
Serve Halloween snacks for kids parties on one big board or a few themed platters so kids can see everything at once. Group sweet items on one side and savory snacks on the other to keep flavors from mixing too much. Offer small plates, napkins, and kid friendly drinks like water, juice boxes, or milk so parents do not worry about caffeine. Keep the spookiness fun, not gory, especially if toddlers and younger siblings join the party.
How to store
-
Banana ghost pops
Store in an airtight container in the fridge for up to 1 day. They taste best the same day, since bananas brown quickly. Skip freezing, since the texture turns icy and mushy. -
Apple monster mouths
Store in the fridge for up to 4 hours, covered tightly. Brush apple slices with a little lemon juice to slow browning. Do not freeze, because apples lose their crunch. -
Popcorn mix and cookie spiders
Keep in an airtight container at room temperature for 2 to 3 days. Store away from heat so chocolate does not melt. Do not refrigerate popcorn, since it turns chewy. -
Mummy hot dogs or veggie dogs
Store leftovers in the fridge for up to 3 days in a sealed container. Reheat in a 350°F oven for 8 to 10 minutes so the dough crisps again. Avoid microwaving if possible, since it can make the dough rubbery. -
Veggie trays and dips
Store cut veggies in separate containers in the fridge for up to 3 days. Keep hummus, ranch, and guacamole chilled and covered, and use within 3 to 4 days. Stir guacamole and press plastic wrap directly on the surface to slow browning. -
Graveyard dip
Store covered in the fridge for up to 2 days. Rebuild the “graveyard” decorations right before serving so chips stay crisp. Serve leftovers cold with fresh chips or veggie sticks.
Leave a Reply